Bravely Default II Job Level 15 | how to unlock the job level limit
During the outset of Chapter 6 of Bravely Default II - and after the game’s first "ending", seven stone gateways you’ve likely seen strewn throughout the world will start to come to life. These portals are key to unlocking the level limit for your jobs, allowing you to level up classes to job level 15.
Given that we're talking about events that don't happen until Chapter 6, from here on this page will contain spoilers for BD2 up to that point.
Anyway, these gates that unlock at the start of Chapter 6 will bring you to the Halls of Tribulation, which will have you face off with the spirits of Asterisk wielders you’ve already bested in combat (with one interesting exception). These spirits are grouped together now, however, and are even given a considerable buff. Win these tough challenges, and you’ll find yourself expanding the level limit from each of your Jobs from 12 to 15!
These bosses are no joke, and we recommend being at level 85-90 if you want to stand a chance. By then you’ll have assuredly beaten the main story, but maybe you enjoy a good challenge? The rush of your blood pumping seeing numbers grow bigger. We’ve taken the liberty of saving you all time scouring the map for these seven gates, listing where you can find them and which Asterisks Holders can be challenged there.
As a heads up, the gateway will not appear unless you’ve unlocked ALL of the Jobs associated with them; lucky for you, we've got guides on unlocking all jobs in Bravely Default 2, including the optional Gambler and Salve-Maker classes. We've also got our picks of the best jobs, subjobs, and job combos.
- Gate 1: Bravebearer, Black Mage & Bastion
- Gate 2: Bard, Beastmaster, Thief & Gambler
- Gate 3: Salve-Maker, Shieldmaster & Swordmaster
- Gate 4: Spiritmaster, Oracle & Dragoon
- Gate 5: Pictomancer, Berserker & Arcanist
- Gate 6: Phantom, Hellblade & Monk
- Gate 7: White Mage, Vanguard, Ranger & Red Mage
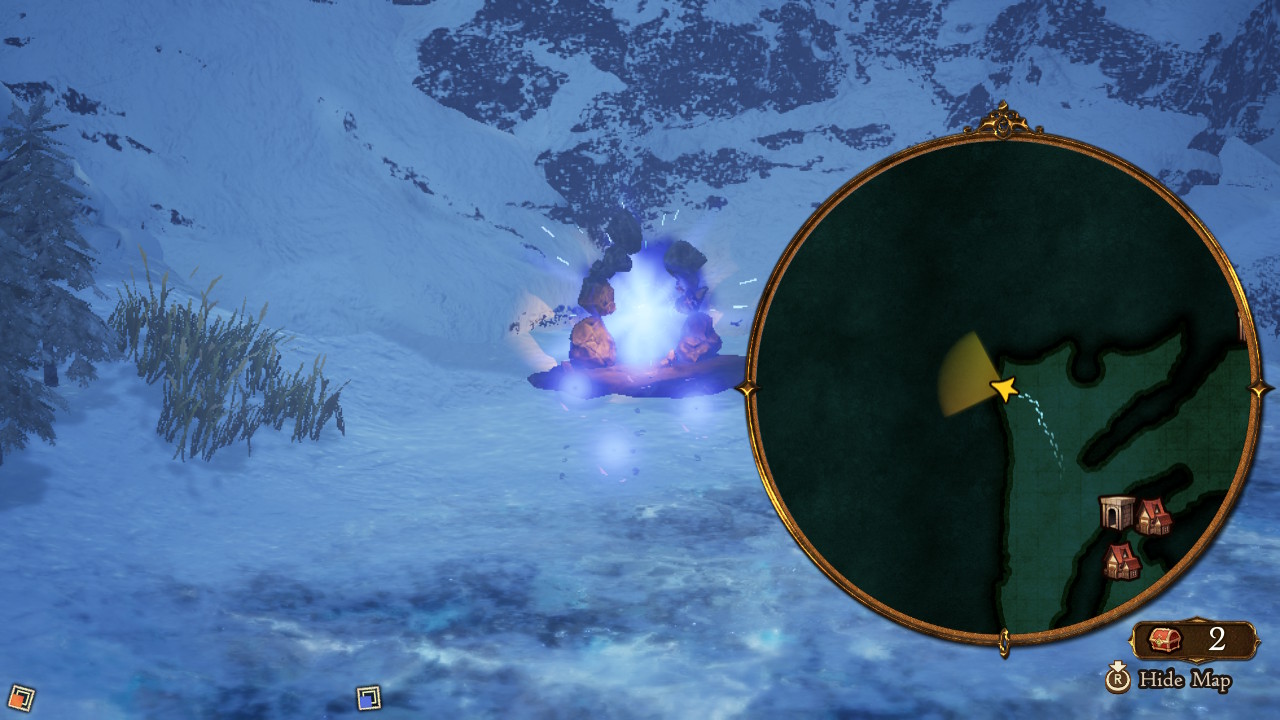
Gate 1: Bravebearer, Black Mage & Bastion Level 15 Limit Unlock
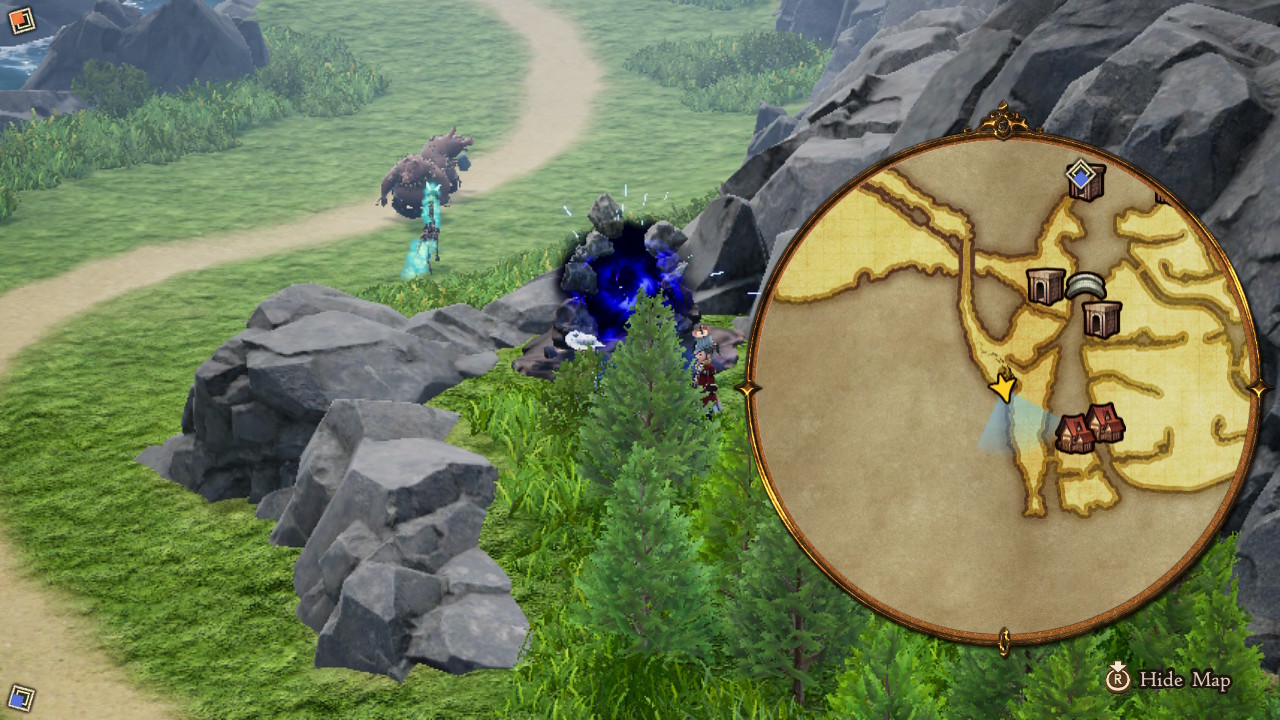
Despite being labeled “number one”, in our opinion this gate is probably best to do last. This is found in the west of the Halcyonia region, with the exact location being pictured above. The Asterisk Holders you find here are as follows:
- Sir Sloan: The Bravebearer
- Lady Emma: The Black Mage
- Lonsdale: The Bastion
Bravebearer: The best job in the game somehow got even more broken! If you’ve been playing this game as long as we have (the guides don’t write themselves!) then Best Practice will do you wonders. It’s like the Practice Makes Perfect skill, but instead of a single hit based on how long you’ve played the game, you get too! BP Bump is great in a pinch, letting the user give up two BP for the entire party to gain one. What’s most important though is Across the Board, which is a passive that works great for magic builds and allows abilities that typically only hit one target to hit multiple.
- Across the Board: Any ability that usually affects a single target now affects multiple targets. (Passive, costs 2 to equip)
- BP Bump: Increase all allies’ BP by one. (2 BP cost)
- Best Practice: Perform two physical attacks on a target, each dealing damage based on the length of time for which the game has been played. (3 BP cost)
Black Mage: Unlike many of the other Jobs here, unlocking the level limit for Black Mage doesn’t offer any fancy passives or abilities that change up how you play the class. It’s pretty straight forward, allowing you to simply dish out more powerful versions of the main three elemental spells. But like we said earlier, who doesn’t enjoy the simple pleasure of seeing numbers go up?
- Flare: Perform an incredibly powerful fire magic attack on a target. (80 MP cost)
- Freeze: Perform an incredibly powerful ice magic attack on a target. (80 MP cost)
- Burst: Perform an incredibly powerful lightning magic attack on a target. (80 MP cost)
Bastion: The new abilities gained from this Job highlight what makes Tanks so effective. You’ll be able to deal out more damage based on how high your defence is, making dual wielding shields viable. If you’d like to carry over a shield to any of your glass cannon or magic builds, you can now do that too!
- Holy Light: Perform an extremely powerful light-imbued physical attack on a target. (90 MP cost)
- Shield Lore: Shield aptitude is increased to S. (Passive, costs 1 to equip)
- Corporal Punishment: Perform a powerful physical attack on a target that will deal more damage the higher the user’s physical defence. (1 BP cost)
Gate 2: Bard, Beastmaster, Thief, and Gambler Level 15 Unlock
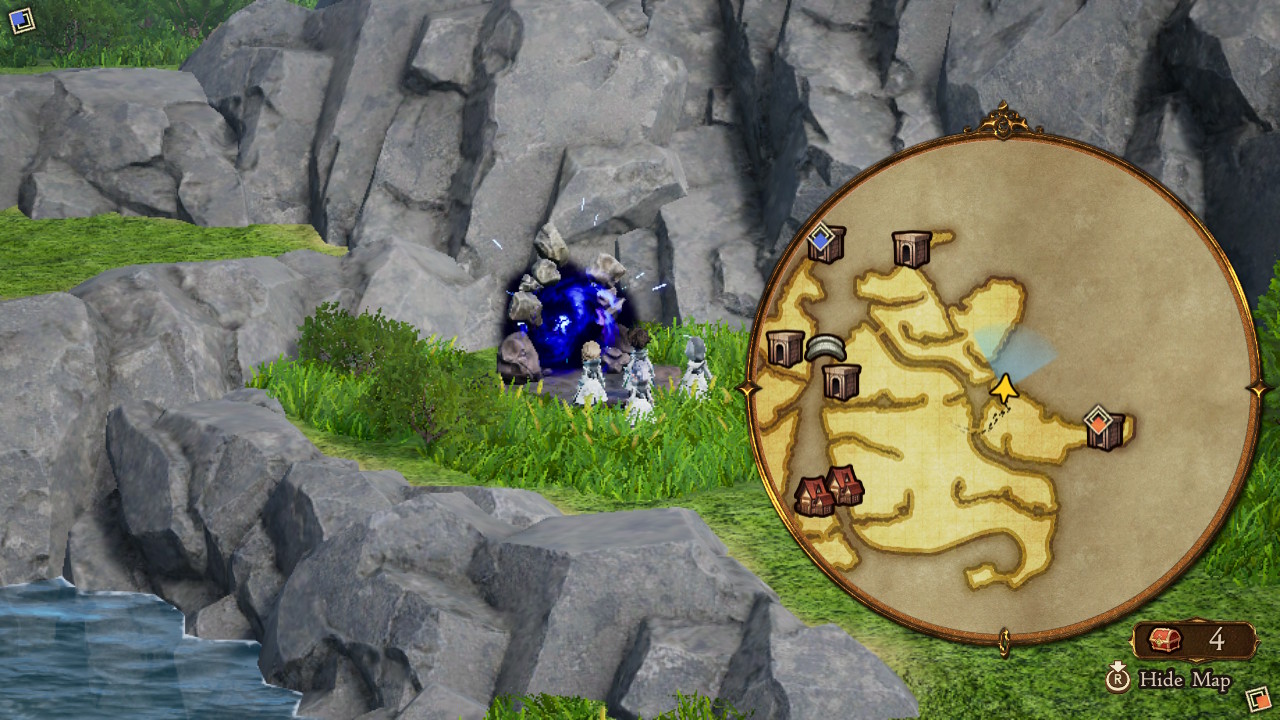
This is found in the east of the Halcyonia region, with the exact location being pictured above. The Asterisk Holders you find here are as follows:
- Orpheus: The Bard
- Anihal: The Beastmaster
- Bernard: The Thief
- Shirley: The Gambler
Bard: It’s rather fitting that Bravely Default II’s main buff class hides an ability that offers quite an incredible, permanent buff to any of the game’s offense based magic builds. Epic Group-Cast is a necessity for these kinds of play styles, letting you cast spells on a group of enemies without it weakening. In addition to that though, truly maxing this Job will allow your Singing buffs to last longer too.
- Thank You, and Goodnight: Perform a powerful non-elemental attack on all targets that may also put them to sleep. (66 MP cost)
- Epic Group-Cast: Targeting all enemies with spells or abilities will not reduce their damage or effects. (Passive, costs 1 to equip)
- More! Mooore!: Extend the effects of all Singing abilities currently affects all targets for another three turns. (1 BP cost)
Beastmaster: Maxing out Beastmaster doesn’t necessarily expand too much for what makes this job stand out, but fans of this job will still find a lot of reason to spend the time to grind this out. The highlight is Nature’s Blessing, allowing you to negate the MP cost of abilities for two turns. Also, Brute Force is a great passive worth grabbing for characters you tend to spam BP just to deal massive physical damage.
- Muzzling Maelstrom: Use equipped spear to perform four powerful physical attacks at random. These attacks may also silence their targets. (115 MP cost)
- Brute Force: Increases physical attack by 50% when three BP are spent performing the Brave command in the same turn. (Passive, costs 1 to equip)
- Nature’s Blessing: Reduce the user’s MP costs to zero for two turns. (1 BP cost)
Thief: One of our favorite classes in the game has now gotten… not necessarily better or worse? In our opinion, while the new abilities are nice they don’t hold a candle to Godspeed Strike. Dagger Lore could work well though if you want to have Thief as a subclass to an excellent late game job like Bravebearer.
- Tornado’s Edge: Perform an extremely powerful wind-imbued physical attack on a target. (70 MP cost)
- Dagger Lore: Dagger aptitude increased to S. (Passive, costs 1 to equip)
- Rest in Peace: Attacking sleeping enemies will not wake them up. (Passive, costs 1 to equip)
Gambler: The ultimate high risk high reward job increases the stakes! Not only do you have two new wheels to spin, letting you possibly deal out even stronger elemental and physical damage, but you can even gain a ton of new money after every battle!
- Even More Money: Pg earned after battle increases by 20% for every party member with this ability. (Passive, costs 2 to equip)
- Real Elemental Wheel: Spin a double wheel featuring both numbers and elements, and perform powerful elemental attacks on random targets based on the result. (700 pg cost)
- Unlucky Eight: Spin the wheel and perform a physical attack that will be eight times more powerful if you land on number eight. (800 pg cost)
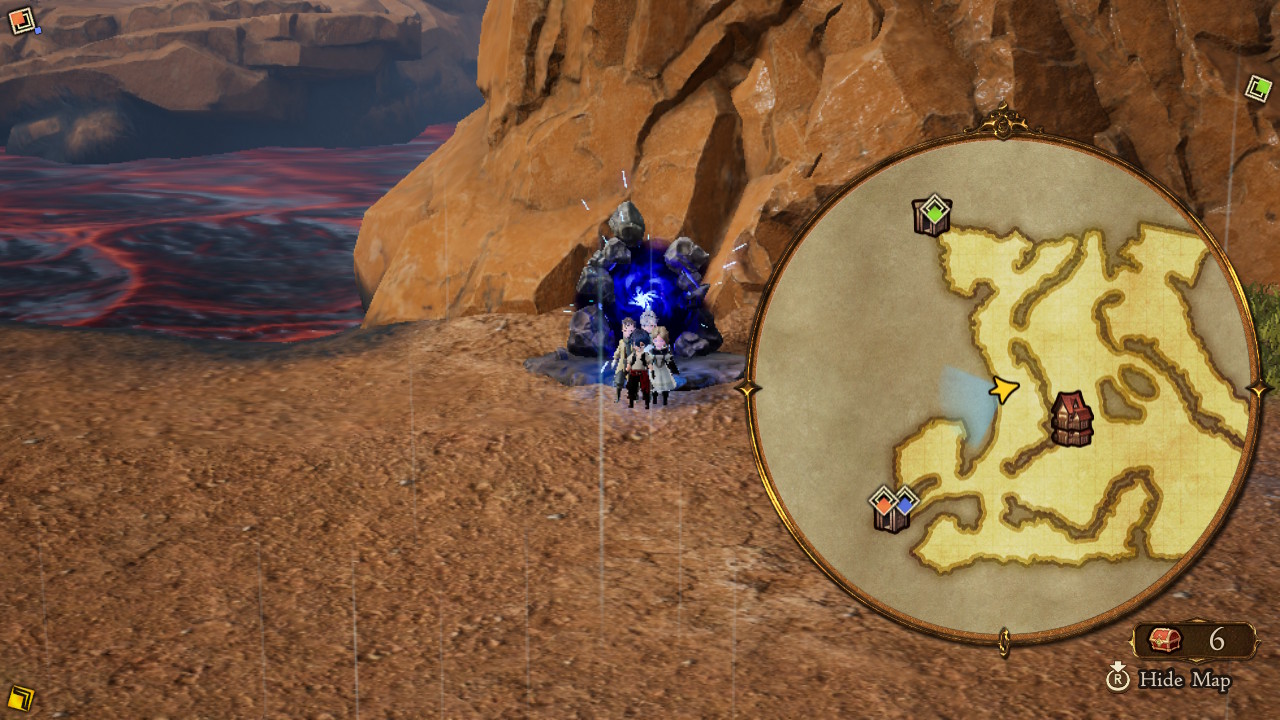
Gate 3: Salve-Maker, Shieldmaster & Swordmaster Level 15 Unlock
This is found northeast of the Savalon region, with the exact location being pictured above. The Asterisk Holders you find here are as follows:
- Glenn: The Salve-Maker
- Galahad: The Shieldmaster
- Gladys: The Swordmaster
Salve-Maker: One of Bravely Default II’s more unique classes, maxing out Salve-Maker can allow you to fuse even more items together during compounding. With all of the new abilities, it even stands up with Spiritmaster depending on what you’re looking for in a support class!
- Advanced Compounding: Combine three items together for a range of exciting effects.
- Double BP Tonic: Mix up a medicine that increases BP by two, and administer it to a target. (15000 pg cost)
- Multimix Elixir: Make five copies of an item and administer them to a target at regular intervals.
Shieldmaster: The controversial equipment load mechanic might seem frustrating, but at least they made a Job centered around it. Two of the final three abilities learned utilize encumbrance to dish out extreme damage, and the last reflects back ANY damage received right back to the enemy.
- Super Heavy Hitter: Perform two physical attacks on a target. The heavier the equipment in both the user’s hands, the greater the damage inflicted. (2 BP cost)
- Firmly Grounded: Boost MP and magical attack for three turns by an amount based on the user’s encumbrance. Any negative effects of being overburdened are ignored. (20% HP cost)
- Harsh Reprisal: For three turns, 100% of any damage received by the user will also be inflicted on the attacker. (68 MP cost)
Swordmaster: The new abilities gained for maxing out this Job aren’t necessarily groundbreaking compared to many other classes, but they’re important all the same! More damage, more hits, and a better implementation of the stances! What’s not to love? Simple, yet effective.
- Ninefold Flurry: Perform nine physical attacks on a target in quick succession. (99 MP cost)
- Solid Smash: Usable when in Solid Stance. Perform an extremely powerful physical attack on a target that will delay their turn, and also bring the user’s next turn around more quickly. (90 MP cost)
- Fluid Frenzy: Usable when in Fluid Stance. When attacked, hit back with a powerful physical strike that will steal one of the target’s BP. This will happen every time the user is attacked until their next turn, even if they have a negative number of BP. (72 MP cost)
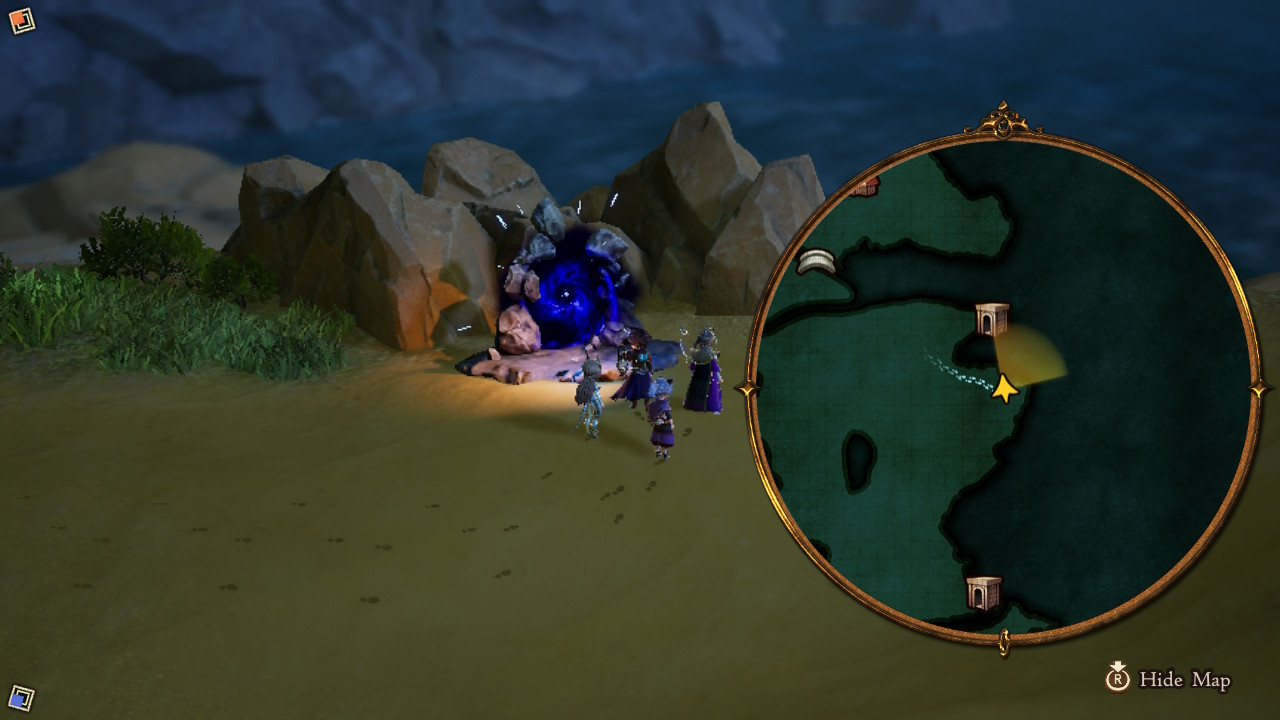
Gate 4: Spiritmaster, Oracle & Dragoon Level 15 Unlock
This is found northeast in the Wiswald region, with the exact location being pictured above. The Asterisk Holders you find here are as follows:
- Helio: The Spiritmaster
- Domenic: The Oracle
- Martha: The Dragoon
Spiritmaster: If you’ve maxed out this class, then you probably understand how vital it is to have on any healing build. This might just be one of the best Jobs in the entirety of Bravely Default II. It’s beyond broken, and now you can go even further beyond any preconceived limits. Two new spirits now constantly reviving and giving more BP is all you really need. Staff Lore serves as the icing on an already gigantic cake.
- Lifebringer: Summon a spirit that will revive all allies three times at regular intervals. Two spirits cannot be summoned at once. Summoning a new spirit will cause any existing spirit to disappear. (2 BP cost)
- Staff Lore: Staff aptitude is increased to S. (Passive, costs 1 to equip)
- Bravebringer: Summon a spirit that will restore a BP to all allies three times, at regular intervals. Two spirits cannot be summoned at once. Summoning a new spirit will cause any existing spirit to disappear. (1 BP cost)
Oracle: We all know and love the Time Mage archetype. For players who play dangerously, preferring to blow all their BP and go into dept, Oracle gives you a safety cushion to bounce back ASAP. Like Black Mage, the new abilities gained really only offer more efficient versions of the core three you’re already used to. Once again though, we’re certainly not complaining.
- Quickga: Enable an ally to deliver 100% more hits with the ‘Attack’ command for two turns. (32 MP cost)
- Slowga: Attempt to slow a target down significantly. (62 MP cost)
- Triplega: Perform up to three powerful fire, water or lightning magic attacks on a target in quick succession. (110 MP cost)
Dragoon: Dragoon is a simple Job, and we love it for that. Spear Lore is essential for those wishing to bring spears over into their Bravebearer builds late game, and worth it even if you don’t tend to run this Job. Outside of that however, how could any of us say no to an even more powerful Jump?
- Spear Lore: Spear aptitude is increased to S. (Passive, costs 1 to equip)
- Bolt Blast: Perform an extremely powerful lightning-imbued physical attack on a target. (90 MP cost)
- Super Jump: Jump up and out of the field of battle, then come crashing down next turn, performing a powerful physical attack on all targets. (3 BP cost)
Gate 5: Pictomancer, Berserker, and Arcanist Level 15 Unlock

This gate is found in the northeast of the Rimedhal region, with the exact location being pictured above. The Asterisk Holders you find here are as follows:
- Folie: The Pictomancer
- Prince Castor: The Berserker
- Viginito: The Arcanist
Pictomancer: The final abilities unlocked with the Pictomancer aren’t too different from the ones unlocked for the Bard. Dirty Fighter maximizes the utility for the job’s toolkit, and Mass Production let’s each paintbrush themed debuff apply to more than one enemy.
- Dirty Fighter: The more status ailments a target is afflicted with, the more damage is inflicted when attacking that target. (Passive, costs 1 to equip)
- Brush with Death: Attempt to inflict the doom ailment on a target. If the target is immune to doom or instant death attacks, they will receive a set amount of magical damage instead. (23 MP cost)
- Mass Production: For three turns, the user’s Artistry abilities can be applied to multiple targets. (70 MP cost)
Berserker: Out of all the physical based Jobs, Berserker is easily the most “careless”. It rewards players playing dangerously, forgoing defense for constant attacks. The highlight here is Death’s Door, encouraging players to keep their HP as low as possible and use up a large chunk of their MP to destroy their foes.
- Flood Damage: Perform a powerful water-imbued physical attack on a target. (80 MP cost)
- Axe Lore: Axe aptitude increased to S. (Passive, costs 1 to equip)
- Death’s Door: Perform an incredibly powerful physical attack on all targets. The lower the user’s current HP, the greater the damage inflicted. (200 MP cost)
Arcanist: In a way, Arcanist is the “Berserker” of magic builds in Bravely Default II. That’s probably why they’re paired up in this gate! For those who want to blow their MP fast to kill enemies as soon as the fight starts, they’ll want to check this out. In addition to more powerful spells (like the legendary Meteor), the Magic Amp passive is worth investing in.
- Magic Amp: Spells cost 50% more MP but deal 25% more damage. (Passive, costs 1 to equip)
- Apocalypse: Perform an extremely powerful magical attack on ally and foe alike that combines the powers of earth and darkness. (110 MP)
- Meteor: Perform four incredibly powerful non-elemental magic attacks on random enemies in quick succession. (136 MP cost)
Gate 6: Phantom, Hellblade & Monk Level 15 Unlock
This gate is found in the northwest of the Rimedhal region, with the exact location being pictured above. The Asterisk Holders you find here are as follows:
- Marla: The Phantom
- Adam: The Hellblade
- Horten: The Monk
Phantom: If there’s one downside to speed builds, it’s that you often can’t deal enough damage with normal attacks. Unless you’re spamming Godspeed Strike the entire game, you’ll come across this problem quite often. Phantom continues to prove itself as the best Job in this category with the final two abilities. One is a passive letting you dish out up to 32 hits per normal attack, and the second is a buff you can cast that ignores your target’s defence.
- Burial Shroud: Perform an extremely powerful darkness-imbued physical attack on a target. (96 MP cost)
- Frenetic Fighting: The maximum number of hits dealt by the ‘Attack’ command is increased from 16 to 32. (Passive, costs 1 to equip)
- Ethereal Edge: Enable the user’s weapon to ignore enemies’ physical defence for three turns. (66 MP cost)
Hellblade: We listed before that Hellblade was one of the ultimate damage dealing classes in Bravely Default II. The best and final ability, Deathstorm, is a dangerous move that can sap you of all HP, MP, and puts you into serious BP dept while doing ridiculous amounts of damage for every element type. If you can somehow survive when you get all your BP back, a well timed Minus Strike will combo with this extremely well.
- Ultima Sword: Sacrifice all MP in order to inflict damage on a target proportional to the amount of MP expended.
- Last Resort: Physical and magical attack power increase as HP is reduced. (Passive, costs 1 to equip)
- Deathstorm: Bombard all targets with ten magical sword strikes imbued with random elements, after which the user will be left with one HP, zero MP and -3 BP.
Monk: If you’re like us, you probably dedicated a character to going bare handed for your entire playthrough of Bravely Default II. If you have (and if you haven’t) then you’ll need to truly max out Monk right away. Natural Talent takes barehanding a step further, increasing your physical attack by 200% as long as you equip absolutely nothing. Like weapons too much to do this? Then you should still max this job anyway, since doing so unlocked a passive that can allow your characters to gain HP that exceeds the 9999 cap.
- Natural Talent: Boosts physical attack and aim by 200% when no weapons, armour or accessories are equipped. (Passive, costs 2 to equip)
- Phoenix Flight: Reduce the user’s HP to one, and deal the amount of HP lost as damage to a target twice. (2 BP cost)
- Maximise HP: Doubles maximum HP during battle. This can enable HP to exceed 9999. (Passive, costs 1 to equip)
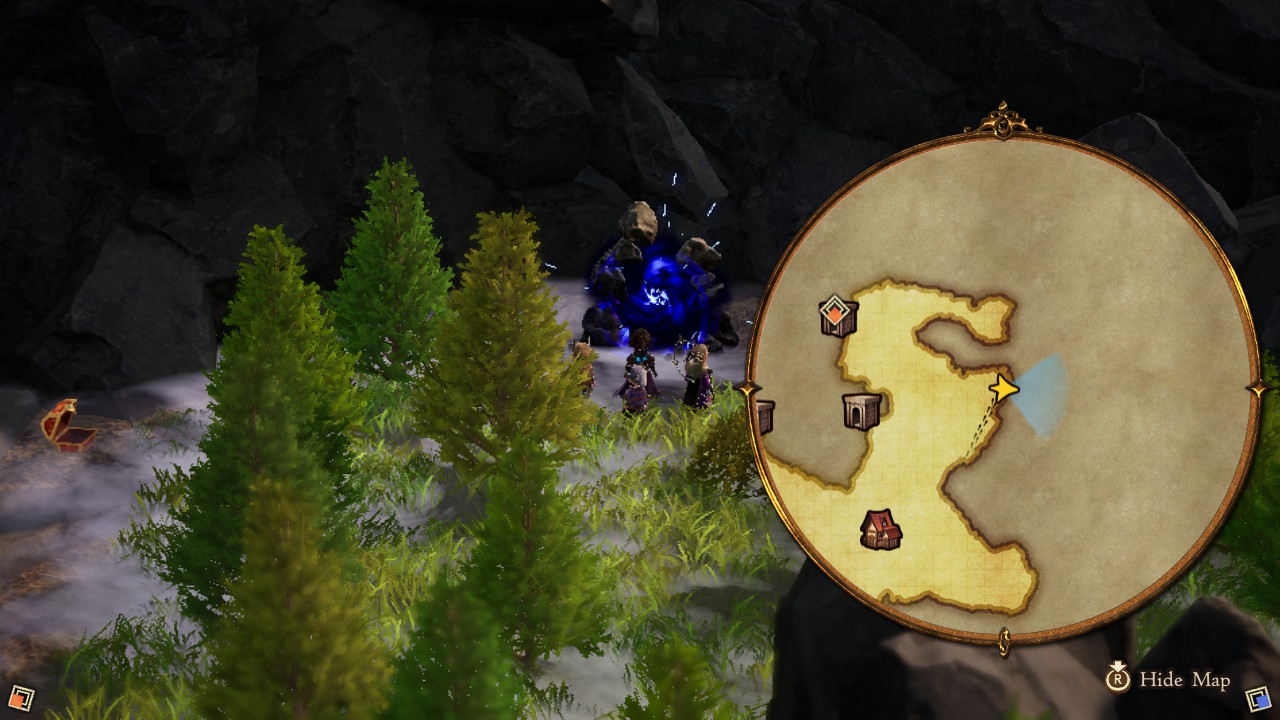
Gate 7: White Mage, Vanguard, Ranger, and Red Mage Level 15 Unlock
This gate is found in the west section of the Holograd region, with the exact location being pictured above. The Asterisk Holders you find here are as follows:
- Selene: The White Mage
- Dag: The Vanguard
- Lily: The Ranger
- Roddy: The Red Mage
White Mage: This Job is already one of the most important ones in the game, and unlocking it somehow makes it even better. All these new abilities are great, but the best one in our opinion has to be Above and Beyond. Similar to the Level 11 skill Better than Ever, this one allows you to temporarily increase their HP to up to 9999 (unless you’ve broken past that with Maximise HP, then the sky’s the limit). Raise All is also especially useful in a pinch.
- Esuna: Cure most of a target’s status ailments (works on all ailments cured by Basuna plus dread, berserk, confusion, charm, slow, stop, doom and resistance reductions). (45 MP cost)
- Above and Beyond: When a target is healed beyond maximum HP, their maximum HP is temporarily increased by the remainder. (Passive, costs 2 to equip)
- Raise All: Revive multiple knocked-out targets with full HP. (110 MP cost)
Vanguard: The final Job abilities for the one of the initial Jobs you unlock in the game aren’t too flashy, but they certainly get the job (pun intended) done! With Infuriate and Ultimatum you can use Aggro to your advantage, going between attracting all the attention and hiding away from it while you recover. We’re not sure why you would be using this Job late game, but we certainly respect anyone who can make it work!
- Infuriate: Increase the user’s likelihood of being targeted by 50% for three turns. Stats cannot be increased beyond 200% of their base value. (40 MP cost)
- Quake Blade: Perform an extremely powerful earth-imbued physical attack on a target. (70 MP cost)
- Ultimatum: Perform an extremely powerful physical attack on all targets, after which the user is less likely to be targeted until their next turn comes around. (1 BP cost)
Ranger: The Bow was practically made just for the Ranger Job, allowing you to snipe enemies of any species for incredible damage. This late into the game it’s unlikely that you’re still using this, but Spirit Slayer and Bow Lore are very effective for late game challenges.
- Spirit Slayer: Perform a physical attack on a target. Particularly effective against Spirit family monsters. (48 MP cost)
- Bow Lore: Bow aptitude increased to S. (Passive, costs 1 to equip)
- Grand Barrage: Perform 5-8 quick physical attacks on all targets. Extra damage will be dealt to paralysed foes. (15% HP cost)
Red Mage: If you’ve been playing Bravely Default II for a while, then you might have already discovered that maining the Red Mage job is rather disappointing. Both the Job abilities and the passives are often best served working in junction with others Jobs. The highlight of this is HP/MP Converter, a risky move that could go very well for High Attack, low MP Jobs.
- Quake: Perform an incredibly powerful earth magic attack on a target. (80 MP cost)
- Tornado: Perform an incredibly powerful wind magic attack on a target. (80 MP cost)
- HP/MP Converter: Using abilities during battle expends HP instead of MP, but at ten times the MP cost. (Passive, costs 2 to equip)