

The Legend of Zelda Ocarina of Time Remake - Gold Skulltula Locations Guide
One of the main collectibles to seek out and find in The Legend of Zelda: Ocarina of Time is the skittering Gold Skulltulas. Killing one will net you a special token, with 100 of these creatures hidden around the lands of Hyrule and its dungeons. Going through the hassle of seeking them out will net you some really nice rewards courtesy of a very grateful family in Kakariko Village who has been cursed by the things. One handy new feature found in the 2026 remake is that on your map, you can now see how many of the Gold Skulltulas and Heart Pieces (check out our guide on finding all of those) you have collected in an area, and even the specific spots where you found them if you zoom in. This feature is further enhanced after beating the game and will then show both how many you have collected and how many are in the area period, making hunting down the last ones far easier this time around. That said, this guide will point you in the direction of where you can find each one, but first, some important info to know.
Hunting at Night
Many Gold Skulltulas can only be found during the night, often showing up on walls of buildings, in trees, and such. Make good use of the Song of the Sun to quickly change things to nighttime when you’re on the hunt.
Get those Beans
To access some of the Gold Skulltulas, you will need to plant a Magic Bean in patches of soft soil (the little dirt mounds with the hole in the top, kind of look like Cheez-Its) as a child and then return there as an adult. The fully grown plants will hover and fly to new, previously inaccessible places. These can be bought from a gentleman sitting near the entrance of the Zora River from Hyrule Field. While the price starts low, each bean you buy will increase the cost by an additional 10 rupees, so be sure to have some money with you.
The Rewards
In order to earn the rewards from killing these bugs, you will need to return to Kakariko Village. You will find a house in the southern area of the village with cobwebs covering it. Inside, you will find the cursed family. In order to gain the rewards, you will need to talk to the dad, who is the first Skulltula-person you encounter inside.
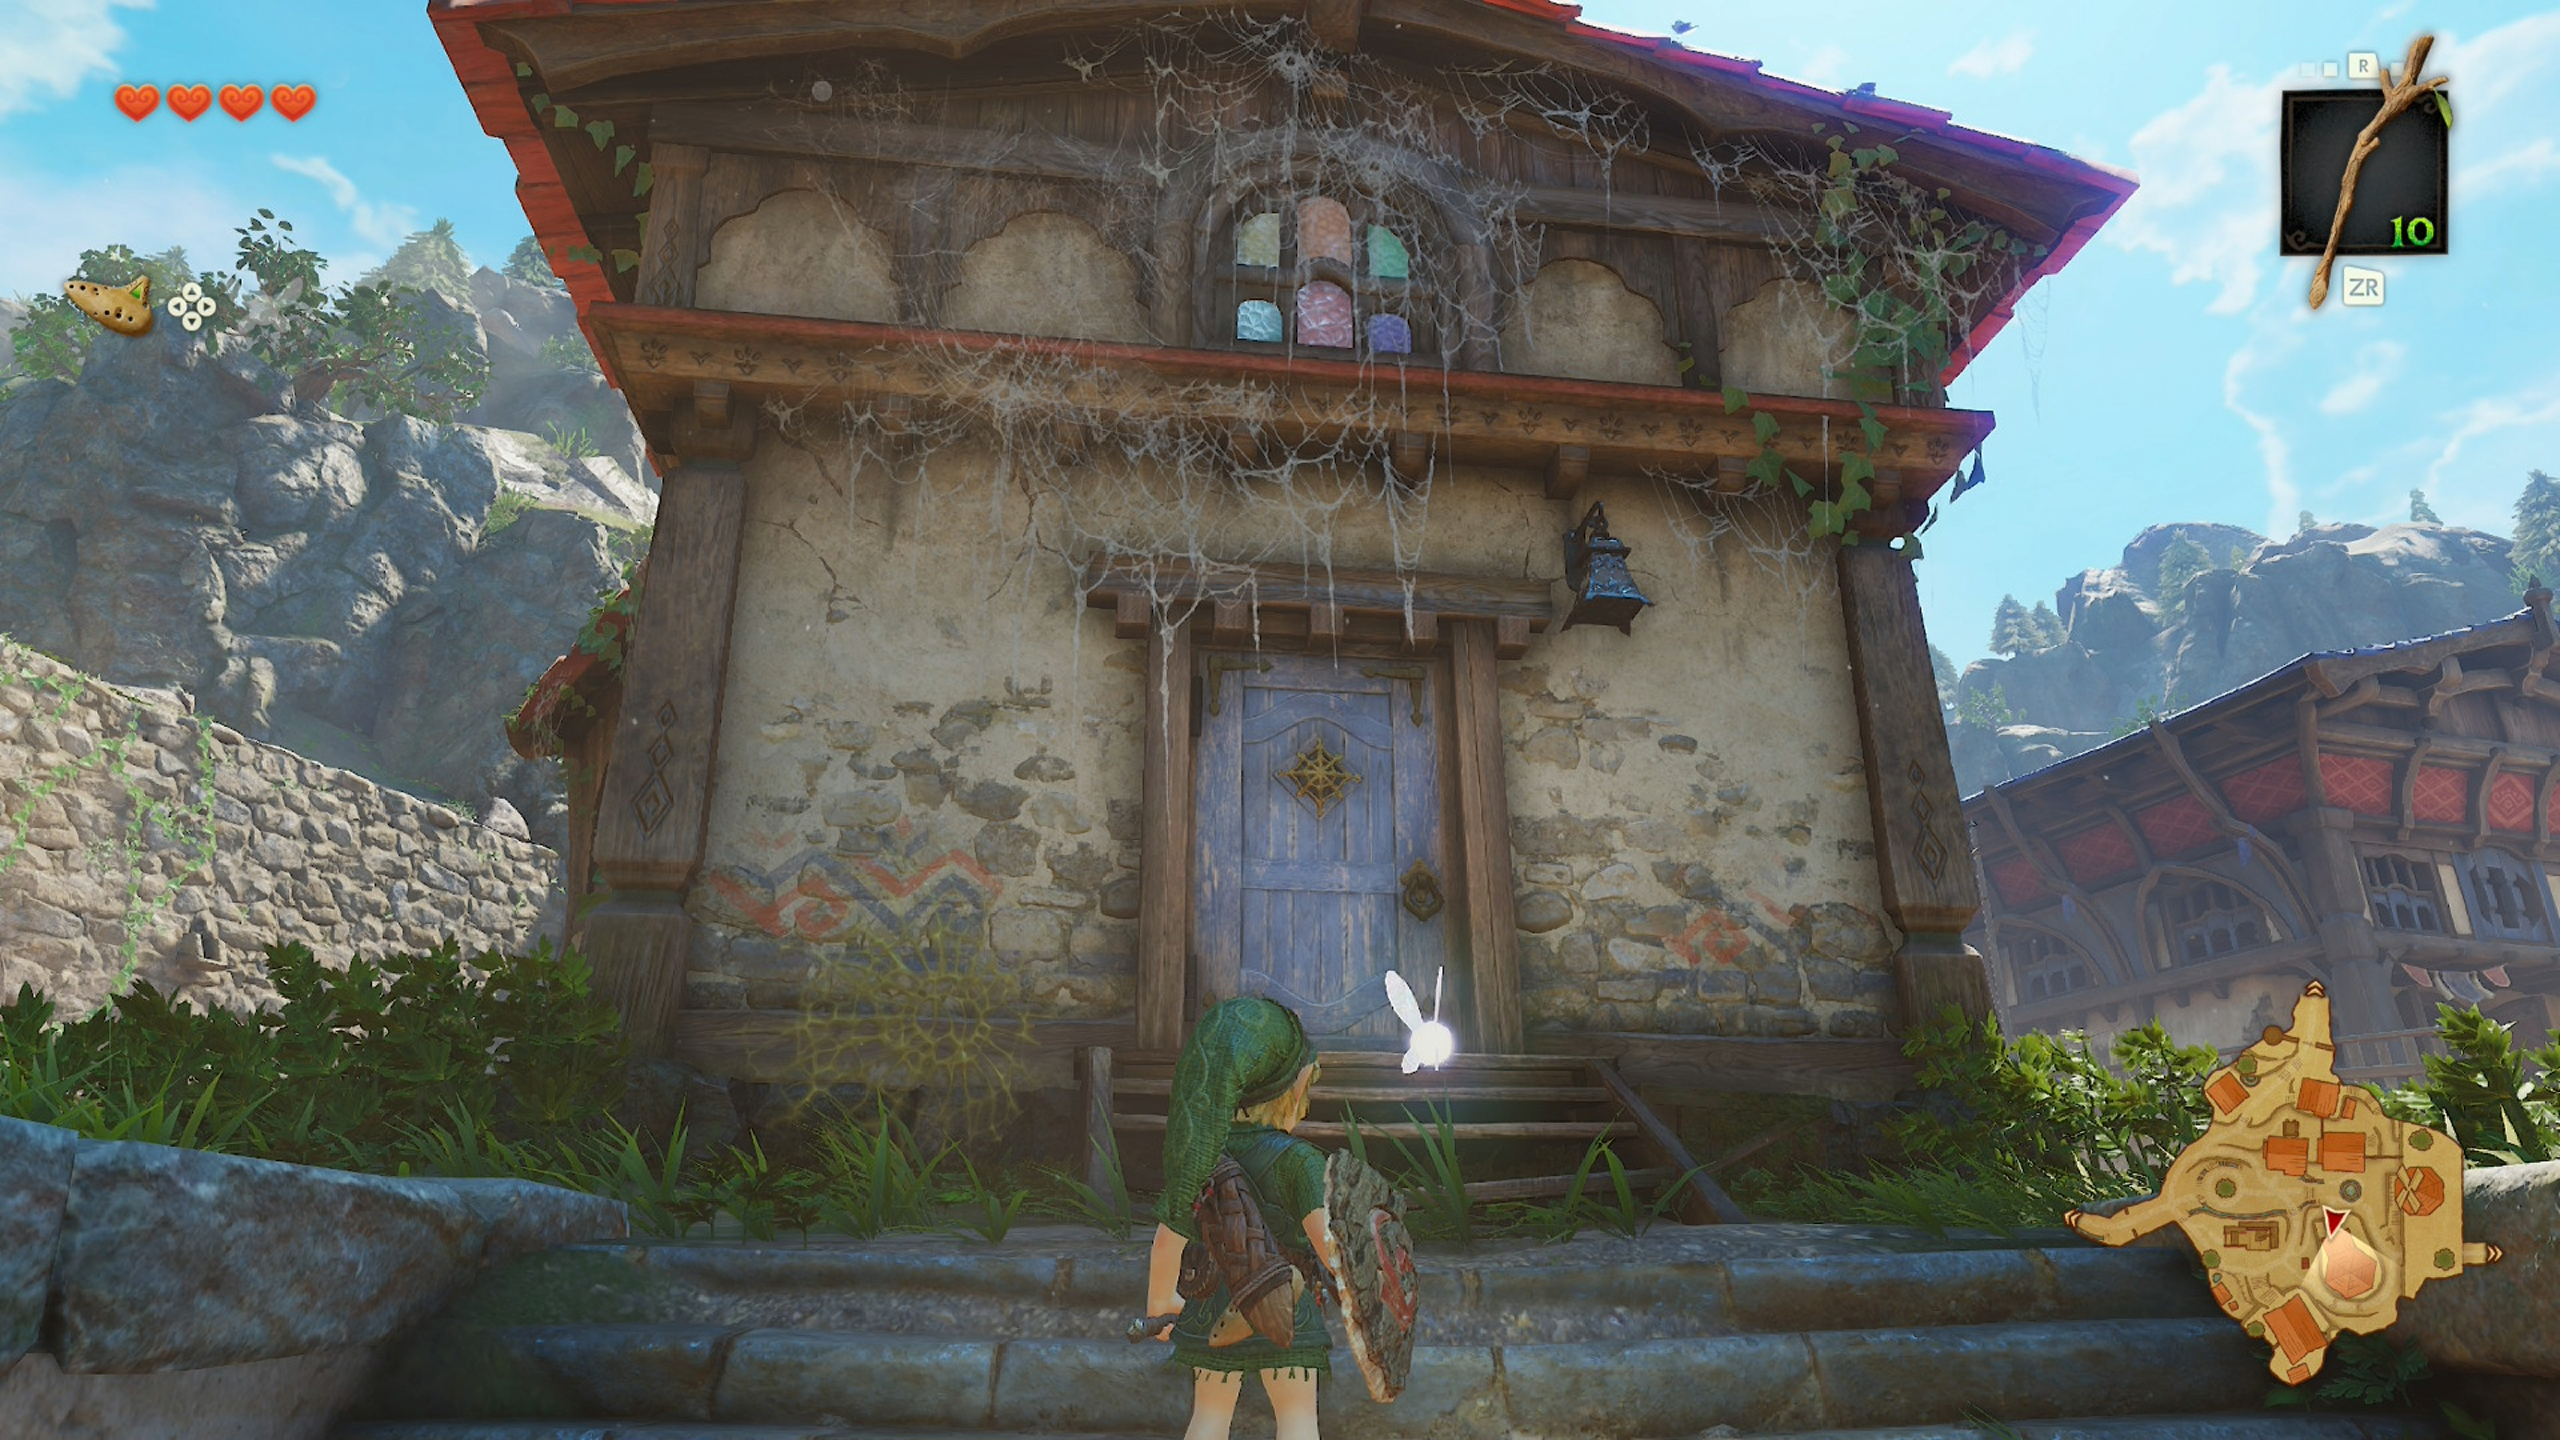
These are the rewards:
10 Skulltula Tokens: Adult Wallet (Holds 500 rupees)
20 Skulltula Tokens: Echo Gem (a piece of equipment that you can equip to let you know when a Gold Skulltula is nearby)
30 Skulltula Tokens: Giant’s Wallet ( Holds 1000 rupees)
40 Skulltula Tokens: 20 Bombchus
50 Skulltula Tokens: Piece of Heart
100 Skulltula Tokens: Infinite supply of rupees (200 at a time)
Gold Skulltula Locations:
- Gold Skulltula 1 - Great Deku Tree / In the room with the platforms that get raised by the Switch (the room where you get the Compass), the optional alcove contains Gold Skulltula #1.
- Gold Skulltula 2 - Great Deku Tree / Once you drop down to the lower levels, turn around and look at the vines you can climb back up to the entrance - Gold Skulltula #2 is here.
- Gold Skulltula 3 - Great Deku Tree / In this same central room downstairs, Gold Skulltula #3 is hanging out against a grate in the north.
- Gold Skulltula 4 - Great Deku Tree / In the room where you light the torches, burn a spiderweb to reveal a hidden area with Gold Skulltula #4.
- Gold Skulltula 5 - Castle Town / As you enter Hyrule Castle Town, on your right there’s a door that leads to a room full of pots. You can smash the pots for Rupees, but what we’re really here for is Gold Skulltula #5, which is hiding inside a crate that twitches and bounces.
- Gold Skulltula 6 - Lon Lon Ranch / On your way out, look behind the building with the Super Cucco Search minigame. You can roll into a tree here to reveal Gold Skulltula #6.
- Gold Skulltula 7- Kakariko Village / is on the ladder that leads to the village watchtower.
- Gold Skulltula 8 - Kakariko Village / is right next to the front door of the house that contains the people cursed by these very spiders, in the middle of town.
- Gold Skulltula 9 - Kakariko Village / is on the building site, also towards the middle of town.
- Gold Skulltula 10 - Kakariko Village / falls out of the tree in the middle of the town when you roll into it.
- Gold Skulltula 11 - Kakariko Village / is hiding behind the house in the northwest.
- Gold Skulltula 12 - Kakariko Graveyard / Drop a bug from a bottle into the patch of soft soil in the northwest; this flushes out Gold Skulltula #12.
- Gold Skulltula 13 - Kokiri Forest / When you pass through Kokiri Forest, make it nighttime and go behind the south-western house, the Know-It-All Brothers’ abode. Gold Skulltula #13 is behind it.
- Gold Skulltula 14 - Kokiri Forest / Follow the path from this screen to find some soft soil. You can use a bug in a bottle here to access Gold Skulltula #14.
- Gold Skulltula 15 - Death Mountain Path / Once the rocks in front of Dodongo Cavern entrance is cleared, before entering the dungeon you can release a bug into the soft soil to get Gold Skulltula #15.
- Gold Skulltula 16 - Dodongo Cavern / When you get to the room where you place a bomb flower in the middle of a whole bunch of them to make a staircase up, it’s spidey time. Get to the top of the stairs and then as you climb up, look for Gold Skulltula #16 at the rear side of the stairs when you loop around at the top.
- Gold Skulltula 17 - Dodongo Cavern / Once you return to the central chamber and make a shortcut back to the ground floor and dungeon entrance, turn right and blow up the cracked rock. Inside, there’s Gold Skulltula #17.
- Gold Skulltula 18 - Dodongo Cavern / Loop back to an earlier part of the dungeon. On the eastern side of the 1st floor of the dungeon there’s the corridor-like room where you will have first encountered Baby Dodongos; blow up a cracked rock to find Gold Skulltula #18.
- Gold Skulltula 19 - Dodongo Cavern / After going through the mouth of the giant skull, you’ll encounter a room with a block pushing puzzle. Blow up an optional cracked wall here to get to Gold Skulltula #19.
- Gold Skulltula 20 - Death Mountain / After exiting Dondongo Cavern, there’s a bombable wall on the road back to Kakariko. Behind it is Gold Skulltula #20.
- Gold Skulltula 21 - Goron City / In Goron City, you can use bombs to blow your way into a room on the west of the city. There’s chests with cash back here, plus Gold Skulltula #21.
- Gold Skulltula 22 - Death Mountain / Next to the Fairy Fountain is the entrance to Death Mountain Crater. Quickly duck in here with full health and dash left - smash the crates to get Gold Skulltula #22.
- Gold Skulltula 23 - Zora River / Drop a bug into the soft soil next to the bean seller to get Gold Skulltula #23. Buy as many as you can, and plant a Magic Bean in the soil next to him. This should be your routine for all soft soil going forward.
- Gold Skulltula 24 - Zora River / Down at the bottom in this area, on the back of the rocks is Gold Skulltula #24.
- Gold Skulltula 25 - Lake Hylia / The soil outside the Lakeside Laboratory yields Gold Skulltula #25; and plant a magic bean!
- Gold Skulltula 26 - Zora Fountain / Once you reach Zora Fountain, roll into a tree to reveal Gold Skulltula #26.
- Gold Skulltula 27 - Jabu Jabu’s Belly / Opposite the Dungeon Map chest are some vines that are home to Gold Skulltula #27; you can get to it when the water is raised.
- Gold Skulltula 28 - Jabu Jabu’s Belly / When the tentacles are defeated revealing a new hole opens down to the floor below, drop down and immediately look for Gold Skulltula #28, which your Boomerang will let you kill and collect.
- Gold Skulltula 29 - Jabu Jabu’s Belly / Right after this as you take the path away from here you’ll be able to take out Gold Skulltula #29 up on the ceiling.
- Gold Skulltula 30 - Jabu Jabu’s Belly / In the last room before the boss, Gold Skulltula #30 is up on the vines.
- Gold Skulltula 31 - Zora Fountain / After you exit Jabu-Jabu, ensure it’s nighttime and then look for Gold Skulltulla #31 on a wall in the Zora Fountain area. You can now use the Boomerang to get it.
- Gold Skulltula 32 - Lake Hylia / Ensure it’s nighttime in Lake Hylia and find Gold Skulltula #32 on the side of the Lakeside Lab, from the bridge side.
- Gold Skulltula 33 - Lake Hylia / Swim to the far south-western end of Lake Hylia to find a tiny outcropping of land. Crawl through the gap here to get Gold Skulltula #33.
- Gold Skulltula 34 - Lon Lon Ranch / At nighttime, you’ll now be able to Boomerang Gold Skulltula #34 on the window of Lon Lon Ranch.
- Gold Skulltula 35 - Lon Lon Ranch / Similarly, return to the ruined building in the south-west of Lon Lon Ranch and use the Boomerang to nab Gold Skulltula #35.
- Gold Skulltula 36 - Kakariko Graveyard / Make it night, and look behind Dampe’s hut. Here there’s Gold Skulltula #36, who you can finally get with the boomerang.
- Gold Skulltula 37 - Hyrule Field / Head to the Lost Woods via Kokiri Forest. In Hyrule Field as you approach the Kokiri Forest area, there’s a lone tree at the end of a stream that cuts across the road from Kokiri to Hyrule Castle. Rolling into this tree dislodges a nocturnal Gold Skulltula #37.
- Gold Skulltula 38 - Kokiri Forest / Use a bug to get Gold Skulltula #38 to spawn behind the Kokiri Forest shop. You can also plant a Magic Bean here.
- Gold Skulltula 39 - Lost Woods / Deeper into the Lost Woods there’s a hidden area called the ‘Forest Stage’ (R, L, R, L, L from the Kokiri entrance). Here there’s a patch of soft soil begging for a bug to spawn Gold Skulltula #39, and a Magic Bean.
- Gold Skulltula 40 - Gerudo Valley / Visit Gerudo Valley just to pick up a few items, including Gold Skulltula #40 next to the small plank bridge at night.
- Gold Skulltula 41 - Gerudo Valley / Flutter jump from that heart piece to the north. Down here there’s soft soil which spawns Gold Skulltula #41.
- Gold Skulltula 42 - Kakoriko Village / Hookshot onto vines near the house furthest in the south. This lets you get behind the house, to where you got a heart piece as a kid. Behind here at night there’s now Gold Skulltula #42.
- Gold Skulltula 43 - Kokiri Forest / In Kokiri Forest, Gold Skulltula #43 can be found behind the house in the south-east at night.
- Gold Skulltula 44 - Kokiri Forest / After passing Mido, go left on the next screen to reach the area with the Forest Stage. Hop on the magic bean plant to be levitated up to Gold Skulltula #44.
- Gold Skulltula 45 - Sacred Forest / Around halfway through the maze in the Sacred Forest medal you’ll find Gold Skulltula #45.
- Gold Skulltula 46 - Forest Temple / In the very first room Gold Skulltula #46 is available up the vines.
- Gold Skulltula 47 - Forest Temple / In the central chamber, head to the door in the north. Don’t go through, but turn around and look to the left - there’s Gold Skulltula #47.
- Gold Skulltula 48 - Forest Temple / Gold Skulltula #48 can be found after you drop through a hole after the boss key, then walk through a door onto a balcony. Follow the ledge here south to find the spider and token.
- Gold Skulltula 49 - Forest Temple / At a point, you’ll be able to push a block down to create a shortcut back to the main chamber. When you do this, turn around and look up to see an inaccessible ledge. Play the Scarecrow’s Song and hookshot to the scarecrow to get Gold Skulltula #49.
- Gold Skulltula 50 - Forest Temple / When you reach the room where you have to rotate the entire room around to access different areas, one of the areas revealed during the rotation has Gold Skulltula #50.
- Gold Skulltula 51 - Dodongo Cavern / Enter Dodongo Cavern. The corridor-like room on the lower-eastern exit from the main chamber has a spot to play the Scarecrow’s Song to get Gold Skulltula #51. It’s where Baby Dodongo spawn.
- Gold Skulltula 53 - Fire Temple / In the large room with the sinking lava platforms, the top-left of the room has a platform that rises rather than sinks. Ride it up and use the Song of Time to gain access to Gold Skulltula #53.
- Gold Skulltula 54 - Fire Temple / In the room with the rolling rocks, there’s a bombable wall hiding Gold Skulltula #54.
- Gold Skulltula 55 - Fire Temple / You’ll eventually reach the upper level of the ball maze area. When you first reach here, turn to the south-west and play the Scarecrow’s Song to hookshot up and ride an elevator up to a hidden room with Gold Skulltula #55.
- Gold Skulltula 56 - Fire Temple / Continue on from here, hookshotting fast to then get Gold Skulltula #56.
- Gold Skulltula 57 - Fire Temple / Once you get the Megaton Hammer and can smash the doorway on the right of the temple’s first room, you can smash some more rocks to get Gold Skulltula #57.
- Gold Skulltula 58 - Death Mountain / On the path up to Death Mountain Crater where the volcano rained rocks on you as a kid there’s a Megaton smashable rock that hides Gold Skulltula #58.
- Gold Skulltula 59 - Death Mountain / There’s another one of these rocks near the entrance to Goron City that conceals Gold Skulltula #59.
- Gold Skulltula 60 - Death Mountain Crater / Teleport to Death Mountain Crater as a child to drop a bug and a bean in soft soil, which will reveal Gold Skulltula #60.
- Gold Skulltula 61 - Zora River / Travel up Zora’s river using the Magic Bean plant. Around the area with the Gossip Stone and the Grottos you visited as a child at night is Gold Skulltula #61.
- Gold Skulltula 62 - Zora River / As you reach the top of the river look high, where Gold Skulltula #62 awaits on a wall.
- Gold Skulltula 63 - Zora Domain / Go to where the diving minigame was in Zora Domain to find Gold Skulltula #63 hookshotable from the high ledge.
- Gold Skulltula 64 - Ice Cavern / When you reach the first room with a spinning blade, Gold Skulltula #64 is up high.
- Gold Skulltula 65 - Ice Cavern / In the same room where you get the Compass, Gold Skulltula #65 is up and to the north-west from the chest.
- Gold Skulltula 66 - Ice Cavern / Towards the entrance of the ice block sliding puzzle room, there’s Gold Skulltula #66.
- Gold Skulltula 67 - Water Temple / When the water level is at the green level, you’ll be able to use the iron boots inside the central lift shaft style chamber. The water level means a block is floating, uncovering a path down to B1F, ultimately leading to a room containing Gold Skulltula Token #67.
- Gold Skulltula 68 - Water Temple / After getting the Longshot, you'll end up in a corridor with lots of whirlpools. As you progress, partway up, above the water, is Gold Skulltula #68.
- Gold Skulltula 69 - Water Temple / When you return to the central column with the Longshot, you can now use it to get to the top of the column, where Gold Skulltula #69 is hiding.
- Gold Skulltula 70 - Water Temple / After you get the boss key, leave back to the hallway which has boulders rolling past. Gold Skulltula #70 is hiding out where the water is cascading down.
- Gold Skulltula 71 - Water Temple / With the water at level 2 (green), before going to the boss room, head to the blue lit room that earlier on led to your first water level change. With the water at level 2, when you surface there’s a bombable wall. Smash it to find Gold Skulltula #71.
- Gold Skulltula 72 - Lake Hylia / As soon as you get control back after the Water Temple ending cutscenes, look up at the tree near you. Longshot up to the vines to find Gold Skulltula #77.
- Gold Skulltula 73 - Lake Hylia / In the Lakeside Lab, sink to the bottom of the water tank and nab Gold Skulltula #78.
- Gold Skulltula 74 - Hyrule Castle / You need to be a kid again for the next phase of the story. When you first return to childhood, sneak back into Hyrule Castle Grounds. To the right of the vine that leads you up to the castle proper, there’s a tree that when rolled into at night drops Gold Skulltula #74.
- Gold Skulltula 75 - Hyrule Castle / Back up where you found Talon asleep when going to meet Zelda, there’s a tree in the corner facing towards castle town. The Song of Storms opens a grotto here; inside you’ll find Gold Skulltula #75.
- Gold Skulltula 76 - Kakariko Village Bottom of the Well / Once you have the Lenses, you can see the safe path through the room with the Beamos and get to the door, behind which is Gold Skulltula #76.
- Gold Skulltula 77 - Kakariko Village Bottom of the Well / The western locked room in the central chamber holds Gold Skulltula #77.
- Gold Skulltula 78 - Kakariko Village Bottom of the Well / Finally, a path on the east of the dungeon, hidden without the lenses, leads to Gold Skulltula #78.
- Gold Skulltula 79 - Shadow Temple / When you reach the room with the invisible spinning scythe, defeat the Like Like in the corner. This unlocks a door. In this room there’s two chests (one of which is invisible) and Gold Skulltula #79
- Gold Skulltula 80 - Shadow Temple / When you reach a room with falling spikes, you’ll use a block to protect yourself from them. Push the block to the end, climb it, and clamber around the room to get on top of the spikes. Up here, to the left, is Gold Skulltula #80.
- Gold Skulltula 81 - Shadow Temple / You’ll eventually get to rooms with fans. When you use the hookshot to get over a gap without being blown away by a fan, turn around to find Gold Skulltula #81.
- Gold Skulltula 82 - Shadow Temple / When you take the elevator down to the area with the boat, you can pull a block aside to make a shortcut to an earlier bit of the dungeon. Play the Scarecrow’s Song and hookshot up to the scarecrow to find Gold Skulltula #82.
- Gold Skulltula 83 - Shadow Temple / As you explore, you’ll find a room with three skull-shaped pots. Throw bombs in all three to get to Gold Skulltula #83.
- Gold Skulltula 84 - Gerudo Valley / When you arrive at Gerudo Valley, make sure it’s nighttime, and then look for Gold Skulltula #84 on the rocky formations near the tents.
- Gold Skulltula 85 - Gerudo Valley / Then check behind the tents to discover Gold Skulltula #85.
- Gold Skulltula 86 - Gerudo Fortress / You can either do this while rescuing the carpenters or do it after, when you have free roam of the Gerudo Fortress, but there’s a Gold Skulltula #86 is on a wall to the east of the area.
- Gold Skulltula 87 - Gerudo Fortress / While at the Horseback Archery range, look on the back of the north-eastern target at night to find Gold Skulltula #87.
- Gold Skulltula 88 - Mirage Desert / When you pass through the Mirage Desert you’ll hit a small building. In the basement of it is Gold Skulltula #88.
- Gold Skulltula 89 - Desert Colossus / To the right of the temple entrance is an area with lots of birds flying overhead. At night, Gold Skulltula #89 is here.
- Gold Skulltula 90 - Desert Colossus / Return here as a child using the song, and drop a bug into the soft soil to get Gold Skulltula #90. Also plant a Magic Bean
- Gold Skulltula 91 - Spirit Temple / When you open the gate by collecting the five crystals/silver Rupees, find Gold Skulltula #91.
- Gold Skulltula 92 - Spirit Temple / After getting the Dungeon Map, look to the far right of the statue from the chest to discover Gold Skulltula #92 waiting for you.
- Gold Skulltula 93 - Spirit Temple / After you solve a puzzle which involves sliding blocks and a beam of sunlight, pause as you enter the next room: look behind you, above the door - there’s Gold Skulltula #93.
- Gold Skulltula 94 - Spirit Temple / When you return as Adult Link after retrieving the Silver Gauntlets, ride the Magic Bean plant that has now sprouted outside the dungeon. This plant takes you to Gold Skulltula #94 atop a rock formation at night.
- Gold Skulltula 95 - Spirit Temple / When in the room where you’re collecting crystals/Silver Rupees while avoiding rolling rocks, there’s alcoves only accessed by moving a blue block with The Song of Time. One of these alcoves hides Gold Skulltula #95.
- Gold Skulltula 96 - Spirit Temple / When you get back to the room with the giant statue, move from the hand holding the chest you got to spawn and past it, to the nearest ledge. Play the Scarecrow’s Song here and hookshot up to the scarecrow to get Gold Skulltula #96.
- Gold Skulltula 97 - Castle Town Ruins / After getting the Light Arrows, head towards what was Hyrule Castle. Don’t enter Ganondorf’s castle yet, but on the back of a collapsed building you can find Gold Skulltula #97.
- Gold Skulltula 98 - Hyrule Field / There’s an area in the west of Hyrule Field with Marshland. Find a hidden grotto here and smash the crate inside to flush Gold Skulltula #98 out of hiding.
- Gold Skulltula 99 - Hyrule Field / In the South of Hyrule Field there’s some woods that divide Lake Hylia from the Gerudo area, running along the back of Lon Lon Ranch. Find a bombable crack here to find a grotto with Gold Skulltula #99.
- Gold Skulltula 100 - Zora Fountain / Return to Zora Fountain. You can now use your Silver Gauntlets to lift a huge rock next to the Fairy Fountain Entrance. Through a cave with invisible enemies, you can find Gold Skulltula #100 at the top.