Final Fantasy V Job Guide: Best jobs to master, unlocks, and skills
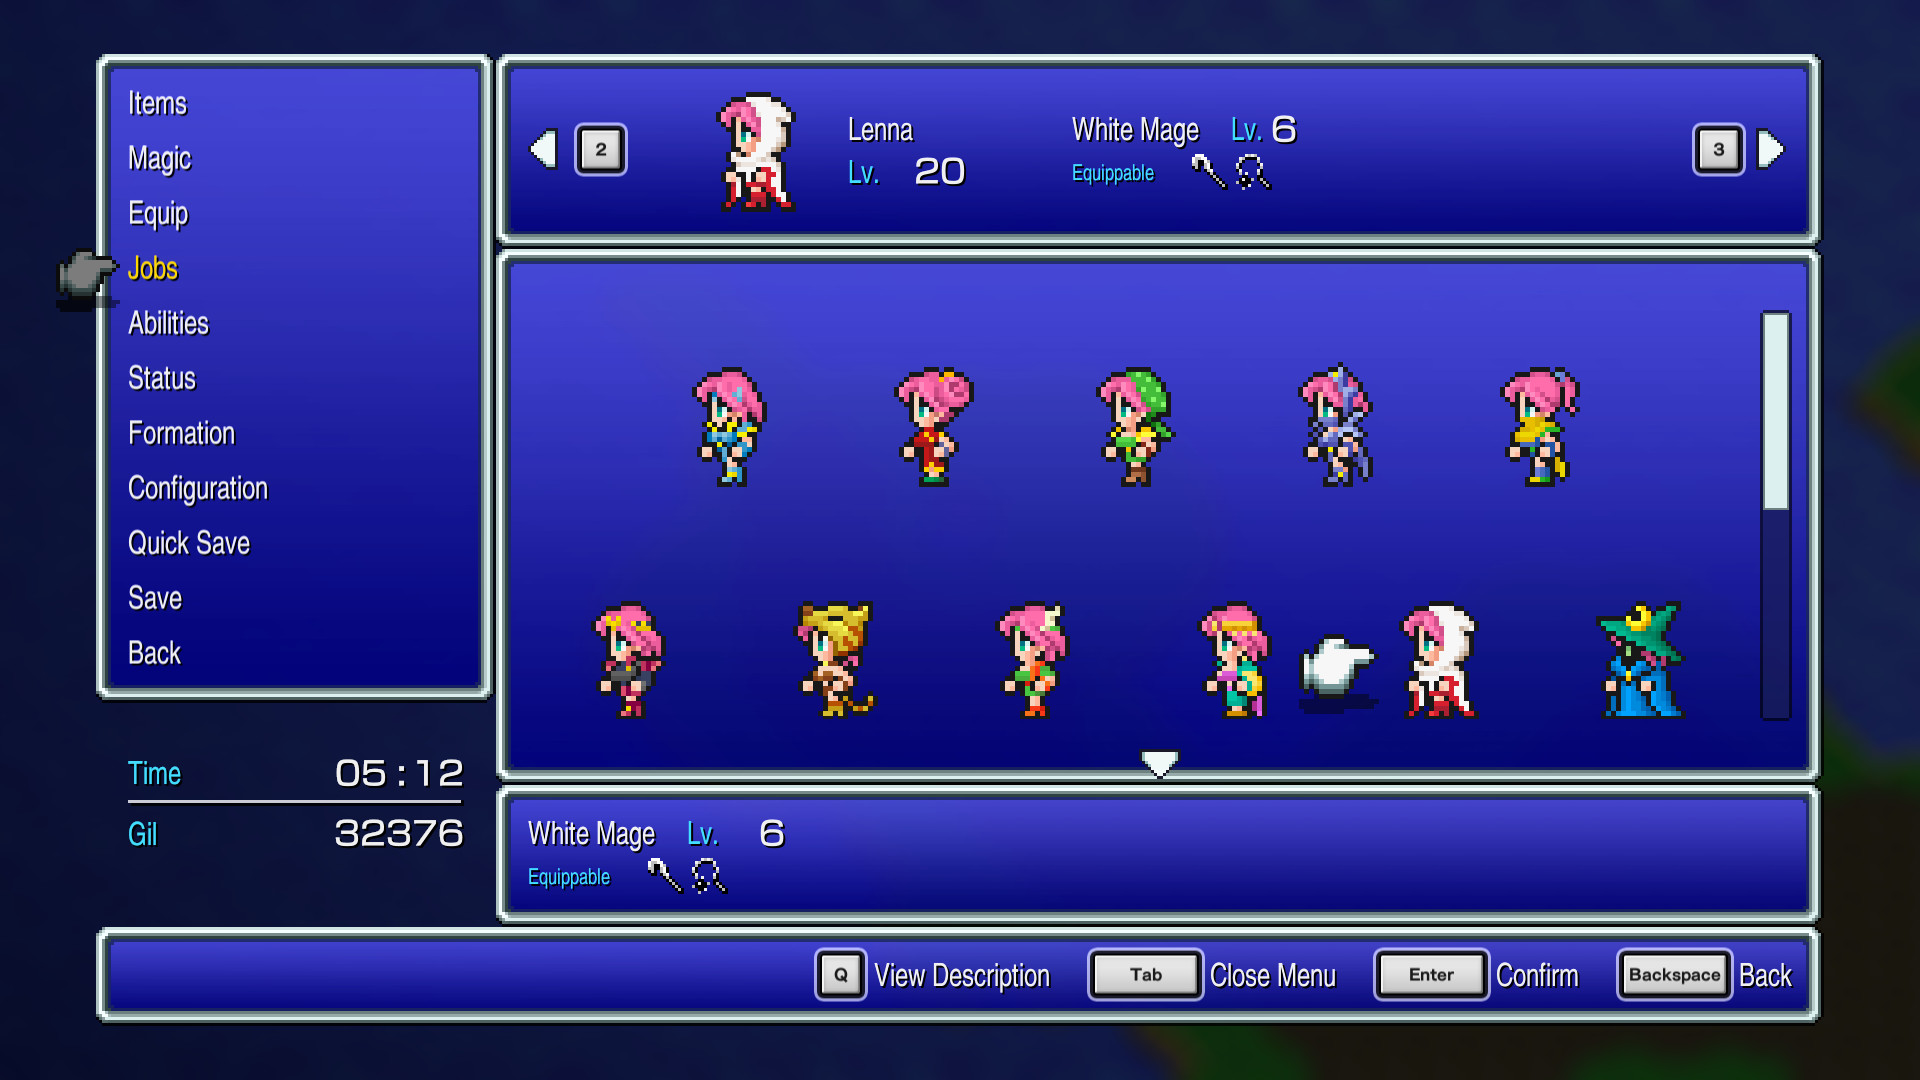
The defining aspect of Final Fantasy V has to be its rich and elaborate Job System. While there was also a job system in FF3, it's fair to say that FF5 is really the game where this mechanic cemented itself as an all-time classic - and ultimately, a mechanic that'd go on to return multiple times throughout the FF series in many forms. It's complicated, customizable, and powerful - and that's why we've crafted this FF5 Job Guide.
With its 20+ jobs to choose from, each with unique abilities and skills to mix and match together, FF5 offers players near limitless ways to tackle the game. This also means it can be a bit daunting, so planning can be key. This guide will offer a bunch of information that'll allow you to plan accordingly - and grind smartly:
A Brief Introduction to the FF5 Job System: unlocks, best jobs, and stats
It only makes sense to kick off this lesson with a brief overview of how the job system works. The job classes in FF5 all base their stats on that of the 'Freelancer', which is the basic starting job. The Freelancer is a 'balanced' class, with the same stat for Strength (normal attack damage), Agility (ATB speed), Stamina (HP), and Magic (magic spell power) - but each class modifies that. A Knight, for instance, gains vast amounts of strength and Stamina, but has more or less the same Agility and actually loses Magic Power. The statistical strengths of each class are lined up with their abilities and what they're good at.
On top of the stats difference, each class of course has its own unlockable abilities - and mixing and matching these can lead to great effects. For example, there's no Paladin in FF5 - but if you want one, you can mix the skills of the Knight and the White Mage to basically craft your own from the job system. It's surprisingly intricate, and a big part of why people love the game. Indeed, the job system mechanics have even inspired the FF5 Four Job Fiesta, a charity event built around a 'challenge' method of playing the game.
Because you can master the skills of a job and then take them to other classes, one of the aims will be to master a job and then return to freelancer, where you can use the abilities of many jobs with a balanced skill set. But this isn't the only way to develop a powerful party...
How to unlock all the Jobs in FF5
FF5's various jobs unlock naturally throughout a chunk of the game's story - at a point you'll have unlocked them all and be free to customize and experiment for the rest of the game. For a while, though, you'll be drip-fed jobs in small amounts as follows:
- Starting Job: Freelancer
- Wind Crystal Jobs: Knight, Monk, Thief, Black Mage, White Mage, Blue Mage
- Water Crystal Jobs: Red Mage, Time Mage, Summoner, Berserker, Mystic Knight
- Fire Crystal Jobs: Beastmaster, Geomancer, Ninja, Ranger, Bard
- Earth Crystal Jobs: Dragoon, Dancer, Samurai, Chemist
- Optional Jobs: Mime (return to the sunken Walse Tower in the Merged World and fight an optional boss as detailed in our FF5 Boss Guide)
- Sealed Temple Jobs: (GBA/non Pixel Remaster PC/Mobile only): Necromancer, Cannoneer, Gladiator, Oracle
Are there Canon Jobs for the FF5 Characters?
FF5 is designed to be entirely open, and so that means the statistical advantages of attaching certain classes to specific characters are minimal. This is different to a lot of FF titles, where characters tend to have a firm natural 'steer' on what they're good at. So from a mechanical perspective, there is no canon job for each of FF5's cast. What about beyond that, though? Well... there's some things you can consider:
- In mobile game Final Fantasy Opera Omina, the FF5 cast appear and have skill sets that align with specific jobs:
- Bartz is a Freelancer
- Lenna is a Ranger
- Faris is a Thief
- Galuf is a Knight
- Krile is a Mage
- In another mobile game, FF Record Keeper, the cast appear and have 'star ratings' in various classes. Based on these ratings, the most appropriate classes for each class are as follows:
- Bartz: Knight/Thief
- Lenna: Black/White Mage, Dancer
- Faris: Thief, Red Mage, Dancer, Ranger
- Galuf: Monk
- Krile: Black Mage / Summoner
- In FF5 and beyond, the core cast of the game are generally associated each with an element - and as it happens, the jobs unlock in line with elemental crystals, too. So you could assign jobs that way; Bartz is Wind, Faris is Fire, Lenna is Water, and Galuf & Krile are Earth.
- In crossover Dissidia: Final Fantasy, Bartz appears and acts mostly as a mix of the Blue Mage and Mime classes, with a Freelancer outfit.
The Best Jobs to Master in FF5
The next question is pretty obvious for those looking to min-max: what's the best job in Final Fantasy V? Well, the answer is... it's complicated. The truth is that there is no wrong way to play FF5 and there are no bad jobs, but if you really are looking to maximize your damage output, there are some things to consider as you head into the game. Here's some of our tips around the best jobs in the game, which might help you to decide which to master first...
- Party Composition is King. Unless you're doing something like a 'four job fiesta' challenge, you should think how your party slots together. The four party members should slot together in such a way that they create a formidable unit that covers every aspect of combat: healing, physical damage, and magical damage. This is perhaps the most important thing of all.
- If you want to learn all the spells, everyone should do a little Blue Mage action. In order to learn the Blue Mage's spells, you need to be hit with the spell in question by an enemy with the 'Learning ' skill activated. We detail this more in our FF5 Blue Magic guide, but the short of it is that everyone should grab the learning skill from the Blue Mage as early as they can, even if you then move them straight off that class.
- Barehanded is brilliant. The Monk has a great level 2 ability, 'Barehanded'. For 30 ABP, it lets any other job fight with the same physical attack power of the Monk. This augments your strength stat, meaning that even if you have a weapon equipped, this skill can be a significant buff to some weaker classes. Removing weapons and actually fighting barehanded can give an even better boost, depending on your character level.
- For Early Stats, farm Thief, Monk, and Summoner. These three classes give a good, balanced set of skills and upgrades that can raise your character stats significantly.
- Freelancer shouldn't be ditched. You might think that the Freelancer is just a starting class and should be dropped as soon as possible, but that's not the case. The Freelancer is unique - it can carry the innate ability from any other job the character has mastered (with a few exceptions). This means that once you've mastered a bunch of jobs, the Freelancer becomes a beefy class. Towards the end-game, it becomes one of the best classes in the game.
- Eventually, Mimic Reigns Supreme. The only optional class in the original version of FF5, the Mimic is a supremely powerful class - but only in the late game. Make sure you unlock it - which you can do once you hit the Merged World.
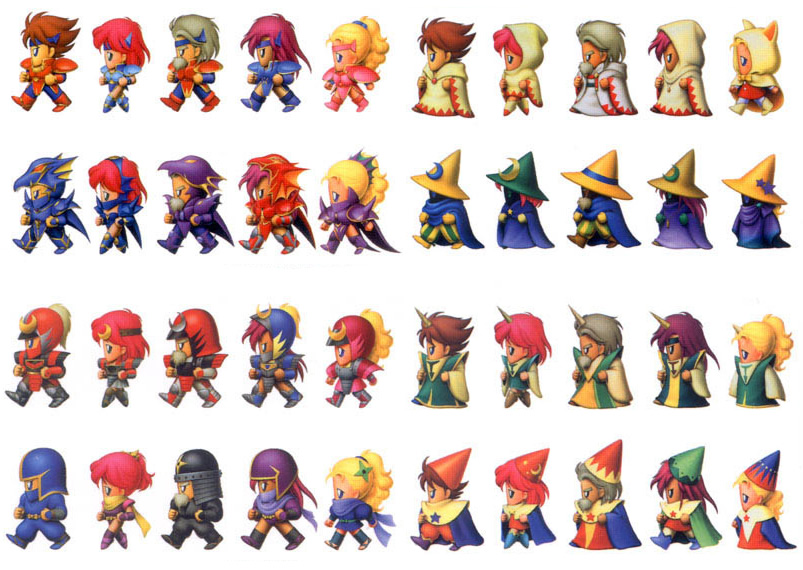
FF5 jobs list: the complete job class overview
Well, here it is - our complete list of Final Fantasy V's job classes, their unlocks, abilities, and stats. Peruse to your heart's content and use this list to practice your load-out, crafting it in your mind before you take it in-game. Scroll away, or click one of these links to reach the job you want to learn about instantly:
Red Mage / Time Mage / Summoner / Berserker / Mystic Knight
Beastmaster / Geomancer / Ninja / Ranger / Bard
Dragoon / Dancer / Samurai / Chemist / Mime
Freelancer
Location: Starting Class, Equipped by Default
Stats:
- Str/Agi/Stm/Mag = +0
Abilities:
- N/A
- Note: The Freelancer can equip any piece of armor or weapon and will adopt the highest stat bonuses from any other class that has been mastered.
Knight
Location: Wind Crystal / Wind Shrine
Native Ability: Cover
Stats:
- Str: +23
- Agi: +1
- Stm: +20
- Mag: -14
Abilities:
- Level 1 (10 AP) : Cover
- Take damage in place of a weak ally
- Level 2 (30 AP): !Guard
- Completely block and negate a physical attack
- Level 3 (50 AP): Double Grip
- Increase damage by holding a weapon in both hands
- Level 4 (100 AP): Equip Shield
- Allows you to equip a shield
- Level 5 (150 AP): Equip Armor
- Allows you to equip heavy armor
- Level 6 (350 AP): Equip Sword
- Allows you to equip a sword
Monk
Location: Wind Crystal / Wind Shrine
Native Ability: Kick
Stats:
- Str: +26
- Agi: +1
- Stm: +26
- Mag: -23
Abilities:
- Level 1 (15 AP): !Focus
- Take a turn to focus and deal double damage the next turn
- Level 2 (30 AP): Barehanded
- Allows you to do as much damage barehanded as a monk does
- Level 3 (45 AP): !Chakra
- Heals some HP and cures Blind/Poison status effect
- Level 4 (60 AP): Counter
- Counter physical attacks against you
- Level 5 (100 AP): HP+10%
- Increase max HP by 10%
- Level 6 (150 AP): HP+20%
- Increase max HP by 20%
- Level 7 (300 AP): HP+30%
- Increase max HP by 30%
Thief
Location: Wind Crystal / Wind Shrine
Native Ability: Steal
Stats:
- Str: +1
- Agi: +16
- Stm: +2
- Mag: -6
Abilities:
- Level 1 (10 AP): Passages
- Level 2 (20 AP): !Flee
- Escapes from most encounters
- Level 3 (30 AP): Dash
- Move faster outside of battle by holding down a button
- Level 4 (50 AP): !Steal
- Attempt to steal an enemies held item
- Level 5 (75 AP): Caution
- Prevents back attacks
- Level 6 (150 AP): !Mug
- Steal and do damage
- Level 7 (300 AP): Footwork
- Speed and agility become has high as a thief
Black Mage
Location: Wind Crystal / Wind Shrine
Native Ability: Magic
Stats:
- Str: -9
- Agi: 0
- Stm: -2
- Mag: +31
Abilities:
- Level 1 (10 AP): !Black Lv1
- Can cast up to level 1 Black Magic Spells
- Level 2 (20 AP): !Black Lv2
- Can cast up to level 2 Black Magic Spells
- Level 3 (30 AP): !Black Lv3
- Can cast up to level 3 Black Magic Spells
- Level 4 (50 AP): !Black Lv4
- Can cast up to level 4 Black Magic Spells
- Level 5 (70 AP): !Black Lv5
- Can cast up to level 5 Black Magic Spells
- Level 6 (100 AP): !Black Lv6
- Can cast up to level 6 Black Magic Spells
- Level 7 (450 AP): MP +30%
- Increase max MP by 30%
White Mage
Location: Wind Crystal / Wind Shrine
Native Ability: Magic
Stats:
- Str: -7
- Agi: +1
- Stm: 0
- Mag: +25
Abilities:
- Level 1 (10 AP): !White Lv1
- Can cast up to level 1 White Magic Spells
- Level 2 (20 AP): !White Lv2
- Can cast up to level 2 White Magic Spells
- Level 3 (30 AP): !White Lv3
- Can cast up to level 3 White Magic Spells
- Level 4 (50 AP): !White Lv4
- Can cast up to level 4 White Magic Spells
- Level 5 (70 AP): !White Lv5
- Can cast up to level 5 White Magic Spells
- Level 6 (100 AP): !White Lv6
- Can cast up to level 6 White Magic Spells
- Level 7 (300 AP): MP +10%
- Increase max MP by 10%
Blue Mage
Location: Wind Crystal / Wind Shrine
Native Ability: Blue Magic
Stats:
- Str: -8
- Agi: +1
- Stm: +3
- Mag: +23
Abilities:
- Level 1 (10 AP): !Check
- Check an enemies HP
- Level 2 (20 AP): Learning
- Allows you to learn a Blue Magic spell when hit with it. Find out where to learn all the spells in our FF5 Blue Magic guide.
- Level 3 (70 AP): !Blue
- Use Blue Magic spells
- Level 4 (250 AP): !Scan
- See an enemy’s HP, level, weaknesses, and status effects
Red Mage
Location: Water Crystal / Waltz Tower
Native Ability: Magic
Stats:
- Str: +8
- Agi: +5
- Stm: -6
- Mag: +8
Abilities:
- Level 1 (20 AP): !Red Lv1
- Can cast up to level 1 Black and White Magic Spells
- Level 2 (40 AP): !Red Lv2
- Can cast up to level 2 Black and White Magic Spells
- Level 3 (100 AP): !Red Lv3
- Can cast up to level 3 Black and White Magic Spells
- Level 4 (999 AP): DualCast
- Cast two spells in a single turn
Time Mage
Location: Water Crystal
Native Ability: Magic
Stats:
- Str: -5
- Agi: +2
- Stm: -3
- Mag: +24
Abilities:
- Level 1 (10 AP): !Time Lv1
- Can cast up to level 1 Time Spells
- Level 2 (20 AP): !Time Lv2
- Can cast up to level 2 Time Spells
- Level 3 (30 AP): !Time Lv3
- Can cast up to level 3 Time Spells
- Level 4 (50 AP): !Time Lv4
- Can cast up to level 4 Time Spells
- Level 5 (70 AP): !Time Lv5
- Can cast up to level 5 Time Spells
- Level 6 (100 AP): !Time Lv6
- Can cast up to level 6 Time Spells
- Level 7 (250 AP): Equip Rods
- Allows you to equip a Rod
Summoner
Location: Water Crystal / Waltz Tower
Native Ability: Summon
Stats:
- Str: -10
- Agi: -1
- Stm: -1
- Mag: +33
Abilities:
- Level 1 (15 AP): !Summon Lv1
- Can cast up to level 1 Summon Spells
- Level 2 (30 AP): !Summon Lv2
- Can cast up to level 2 Summon Spells
- Level 3 (45 AP): !Summon Lv3
- Can cast up to level 3 Summon Spells
- Level 4 (60 AP): !Summon Lv4
- Can cast up to level 4 Summon Spells
- Level 5 (100 AP): !Summon Lv5
- Can cast up to level 5 Summon Spells
- Level 6 (500 AP): !Call
- Randomly calls one of your possible summons without spending any MP
Berserker
Location: Water Crystal / Waltz Tower
Native Ability: Always Berserked
Stats:
- Str. +21
- Agi: -9
- Stm: +25
- Mag: -23
Abilities:
- Level 1 (100 AP): Berserk
- Attacks are stronger but your character is uncontrollable
- Level 2 (400 AP): Equip Axe
- Allows you to equip a axe
Mystic Knight
Location: Water Crystal / Waltz Tower
Native Ability: Magic Sword
Stats:
- Str: +14
- Agi: +14
- Stm: +14
- Mag: +1
Abilities:
- Level 1 (10 AP): Magic Wall
- Auto-Shell at the start of battle
- Level 2 (20 AP): !Spellblade Lv1
- Can cast up to level 1 Spellblade infusions
- Level 3 (30 AP): !Spellblade Lv2
- Can cast up to level 2 Spellblade infusions
- Level 4 (50 AP): !Spellblade Lv3
- Can cast up to level 3 Spellblade infusions
- Level 5 (70 AP): !Spellblade Lv4
- Can cast up to level 4 Spellblade infusions
- Level 6 (100 AP): !Spellblade Lv5
- Can cast up to level 5 Spellblade infusions
- Level 7 (400 AP): !Spellblade Lv6
- Can cast up to level 6 Spellblade infusions
Beast Master
Location: Fire Crystal / Karnak Castle
Native Ability: Catch / Release
Stats:
- Str: +13
- Agi: +1
- Stm: +8
- Mag: -3
Abilities:
- Level 1 (10 AP): !Calm
- Paralyze an enemy
- Level 2 (50 AP): !Control
- Take direct control over an enemy
- Level 3 (100 AP): Equip Whips
- Allows you to equip a whip
- Level 4 (300 AP): !Catch/!Release
- Capture a weakened enemy / Release a captured enemy to attack
Geomancer
Location: Fire Crystal
Native Ability: !Earth
Stats:
- Str: +4
- Agi: +2
- Stm: +4
- Mag: +24
Abilities:
- Level 1 (25 AP): !Gaia
- Trigger an attack that changes depending on the environment you are in
- Level 2 (50 AP): Findhole
- Allows you the chance to avoid hidden holes
- Level 3 (100 AP): AntiTrap
- The party takes no damage from damage-dealing environments
Ninja
Location: Fire Crystal
Native Ability: Throw
Stats:
- Str: +15
- Agi: +14
- Stm: +3
- Mag: -10
Abilities:
- Level 1 (10 AP): !DustB
- Allows you to escape most encounters
- Level 2 (30 AP): !Image
- Absorbs one physical attack
- Level 3 (50 AP): FirstAtk
- Increase the likelihood of a pre-emptive attack
- Level 4 (150 AP): !Throw
- Hurl an item at an enemy to damage them
- Level 5 (450 AP): Dual-Wield
- Equip a weapon in both hands
Ranger
Location: Fire Crystal / Black Chocobo Forest
Native Ability: Aim
Stats:
- Str: +16
- Agi: +12
- Stm: +1
- Mag: -5
Abilities:
- Level 1 (15 AP): !Animals
- Summon an animal to help you out
- Level 2 (45 AP): !Aim
- 100% Accuracy attack
- Level 3 (135 AP): Equip Bows
- Allows you to equip a bow
- Level 4 (405 AP): !X-Fight
- Hit four four times but at half the strength
Bard
Location: Fire Crystal / Black Chocobo Forest
Native Ability: !Sing
Stats:
- Str: -8
- Agi: +8
- Stm: -9
- Mag: +11
Abilities:
- Level 1 (25 AP): !Hide / Reveal
- Prevent an enemy from attack or targeting you, return the the battlefield
- Level 2 (50 AP): Equip Harp
- Allows you to equip a harp
- Level 3 (100 AP): !Sing
- Sing one of your songs
Dragoon
Location: Earth Crystal / Ronkan Ruins
Native Ability: Jump
Stats:
- Str: +18
- Agi: +5
- Stm: +15
- Mag: -12
Abilities:
- Level 1 (50 AP): !Jump
- Jump into the air, making the character untargetable, and then deliver a powerful attack
- Level 2 (150 AP): !Lance
- Absorb HP and MP from an enemy
- Level 3 (400 AP): Equip Lance
- Allows you to equip a lance
Dancer
Location: Earth Crystal / Ronkan Ruins
Native Ability: Dance
Stats:
- Str: +5
- Agi: +5
- Stm: -10
- Mag: -5
Abilities:
- Level 1 (25 AP): !Flirt
- Attempt to charm an enemy and lose its upcoming turn
- Level 2 (50 AP): !Dance
- Perform a random dance attack
- Level 3 (325 AP): Equip Ribbon
- Allows you to equip the ribbon accessory
Samurai
Location: Earth Crystal / Ronkan Ruins
Native Ability: Gil Toss / Zeninage
Stats:
- Str: +19
- Agi: +2
- Stm: +19
- Mag: -12
Abilities:
- Level 1 (10 AP): !Mineuchi
- Paralyze and damage an enemy
- Level 2 (30 AP): !Zeninage
- Throw money at all enemies
- Level 3 (60 AP): Shirahadori
- Attempts to parry an enemy’s attack
- Level 4 (180 AP): Equip Katanas
- Allows you to equip a katana
- Level 5 (540 AP): !Iainuki
- Chance to auto-kill all enemies on screen
Chemist
Location: Earth Crystal / Ronkan Ruins
Native Ability: Mix
Stats:
- Str: +2
- Agi: +3
- Stm: +6
- Mag: -4
Abilities:
- Level 1 (15 AP): Pharmacology
- Doubles the effectiveness of healing potions while in combat
- Level 2 (30 AP): !Mix
- Mix components together to create effects
- Level 3 (45 AP): !Drin
- Can use drink items to increase stats
- Level 4 (135 AP): Recover
- Cure the party of status afflictions
- Level 5 (405 AP): Revive
- Revive KO’d teammates
Mime
Location: Sunken Waltz Tower World 3
Stats: N/A
Abilities:
- Level 1 (999 AP): Mimic
- Repeats the last action that a party member took