
Honkai Star Rail: Reroll Guide Launch Edition
Honkai Star Rail is a spin-off game of the popular mobile game, Honkai Impact 3rd and part of the HoYoverse lineup, so players that played Genshin Impact should already be in familiar territory. Honkai is a free-to-play game with a gacha system - which means getting good rolls is vital. When you're starting out, you might want to reroll in order to have the best start.
For those unfamiliar with gacha, this system let players use in-game currency or real money to draw from a pool of randomized characters or items. Due to the limited amount of starting currency, players may not always get their desired result and will start from the beginning to get their ideal starting point. This guide serves as a memo to explain the rerolling process to get the desired results, or if you would rather stick with your current account.
Just a fair warning, rerolling in Honkai Star Rail is a very time-consuming process, and many players may find it outright tedious. You will need to create a new account every time you start the rerolling process. To get access to rolling, you must clear the tutorial story which can take up to 30 to 50 minutes depending on your pace. There are also some players who would rather avoid rerolling altogether because they like their current account names, etc.
- Making an Account
- Getting to Rolls
- Types of Currency
- Banner Types
- Amount of Free Currency Available
- Characters to Aim For
How to Reroll in Honkai Star Rail
Making an Account
Honkai Star Rail accepts four types of accounts: HoYoverse, Google, Facebook, and Twitter. A HoYoverse account is based on the email you use to create the account. Early birds during the Genshin Impact launch days could have secured a HoYoverse account with no email attached and can have an account with just a username. If you have one of these accounts, you might consider yourself lucky as they no longer accept creating these types of accounts. It should be noted that HoYoverse does not accept salted emails, so you will need a brand new email to create a new account.
Getting to Rolls
In order to get access to rolling, you need to clear the prologue in the main story, which can take up to 30 to 50 minutes depending on your pace. It should be noted that the protagonist's gender is permanent, and cannot be changed when you have selected the gender during the prologue. Clearing through the story should be rather straightforward, just follow the yellow objective marker until you reach the destination. There will be several battles along the way, another note is the auto battle and fast forward function is not available until leaving the first zone.
Once you have cleared the prologue segment, you will earn an achievement called "A Moment of Peace," which grants access to the mailbox. The mailbox contains some tickets to start rolling, along with access to the Traveler's Log. Check the Traveler's Log to see events; the current event has a Star Rail Special Pass as a freebie, so be sure to snag that.
Types of Currency

- Star Rail Pass: Used for the beginner banner or the standard banner.
- Star Rail Special Pass: These tickets are used for the special banner, which includes the featured character who is typically limited and will only be available at certain times. The currency can also be used to roll for Light Cones, which are equivalent to weapons from past miHoYo games.
- Stellar Jade: The in-game currency can be used for all sorts of functions, mostly to redeem rolling tickets and other shop items such as refilling stamina. It is highly recommended that you use them for the Star Rail Special Pass.
- Oneiric Shard: The paid currency of the game, can be used to purchase skins or converted to Stellar Jade to redeem rolls.
- Undying Embers: This is obtained every time you perform a roll in the game. With this currency, you can purchase a total of 10 draw tickets (5 Standard and 5 Special) from the shop every month. Therefore, it is important to roll in enough to accumulate enough embers to redeem the tickets.
- Starlight Exchange: Similar to Undying Embers, you only get this currency when you pull anything from a 4 to 5 star rarity.
Banner Types
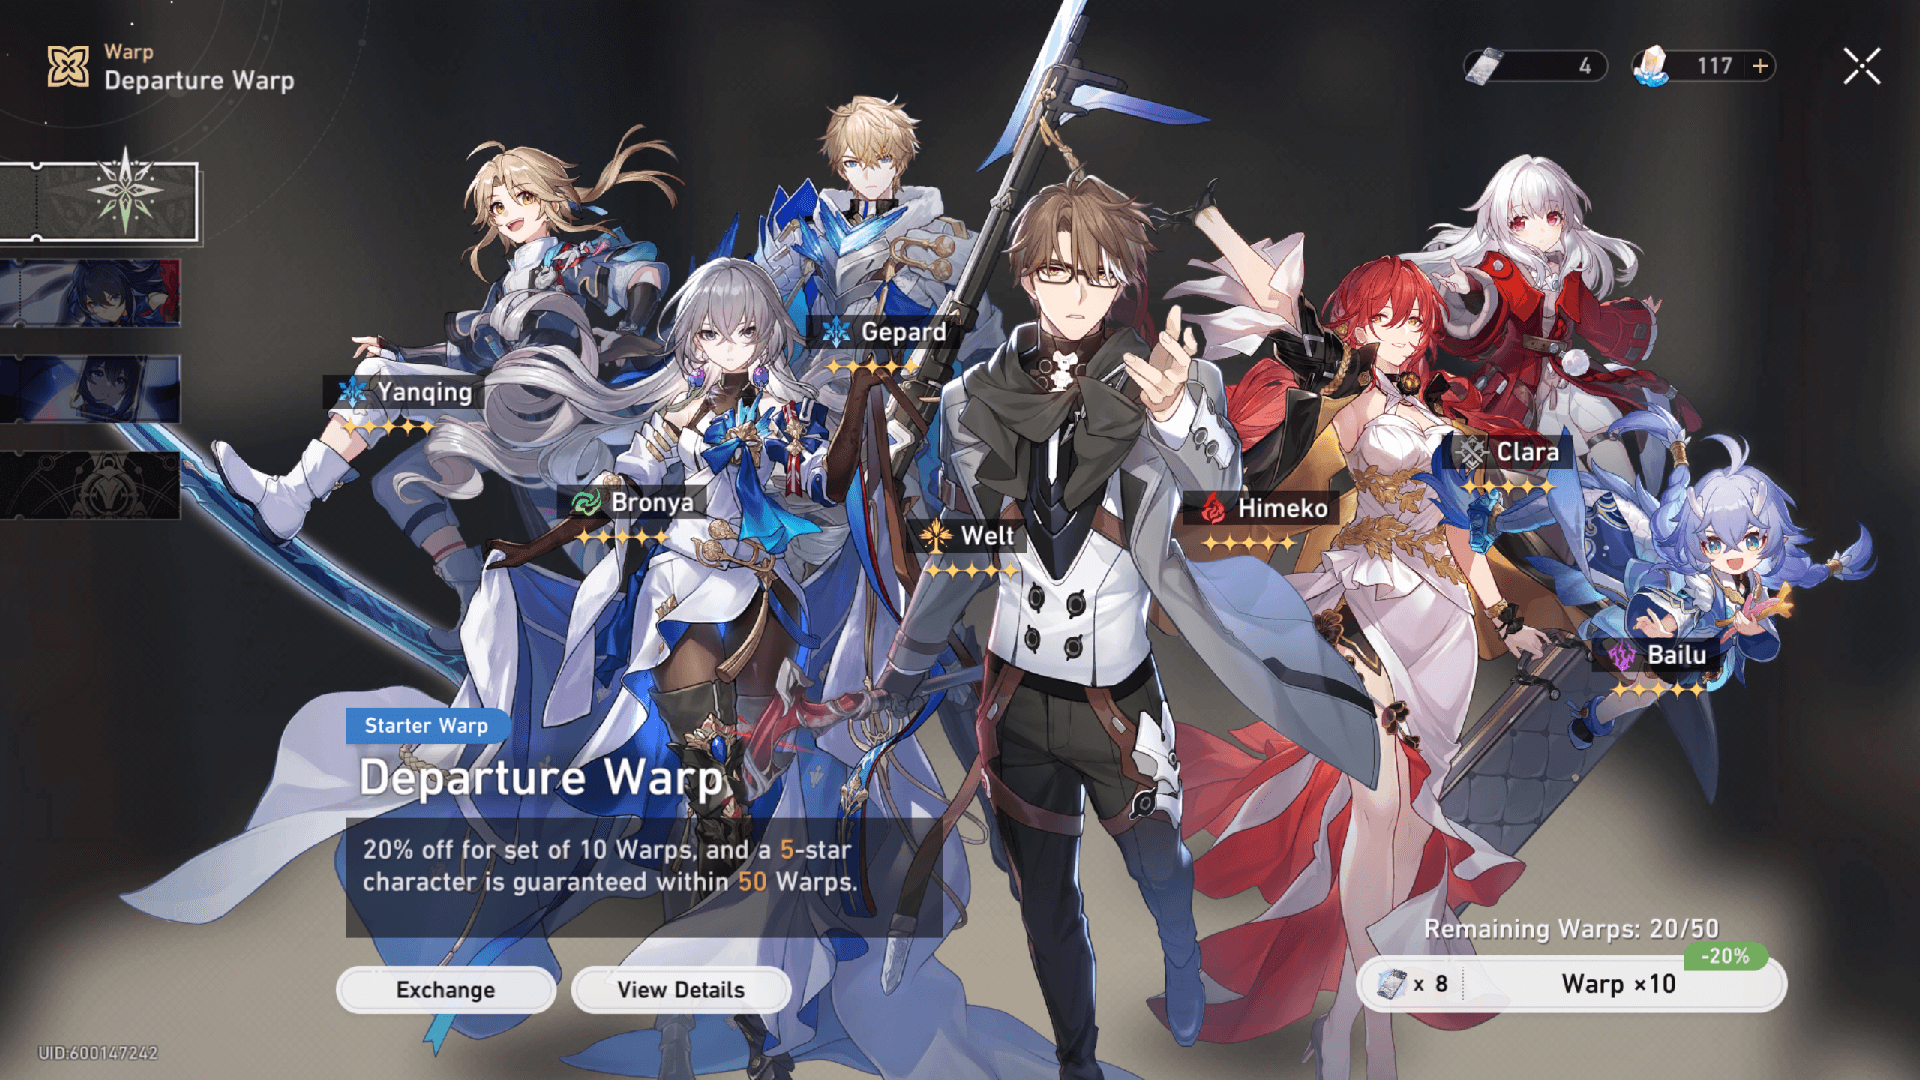
- Starter Warp: The discounted banner can be accessed using the Star Rail Pass currency for standard rolling. When you roll 50 times on this banner, you are guaranteed to get a 5-star rarity character from the standard pool.
- Character Event Warp: This banner features the current limited unit and requires a harder-to-obtain currency called Special Star Rail Pass to roll. With this rolling system, there is a soft pity when reaching 70 rolls and a guarantee when reaching 90 rolls. In addition, there is a 50% chance of getting a 5-star from the standard banner. If you do not get the featured character with the 50/50 chance, you are guaranteed to get them on the next pity.
- Light Cone Event: A Light Cone is placed on an equippable slot that provides powerful passive effects. The banner that features a character's Light Cone is also limited and uses the same rolling system as the limited character banner. While Light Cones are extremely powerful, it's recommended to only aim for them if you're very focused on the meta and have enough currency to spare.
- Regular Warp: The standard banner includes every rollable item in the game except for the limited unit. If you hit the pity, you can also receive a Light Cone instead of a character. It is recommended to only use this banner after exhausting the Starter Warp. The currency used for the regular warp will accumulate over time, so it is not advisable to use your hard-earned Stellar Jade on regular tickets.
Amount of Free Currency Available
Depending on how much time you want to invest in your account before you restart the rerolling process, here is the possible options you can take.
Bare Minimum Route
The bare minimum route basically will start a new account once you have exhausted all the rolling currency without diving too far into the game. If you managed to get Seele from using the Special Pass ticket, you should keep the account regardless of how your pulls end up using the normal pass. As Seele is a limited character and is much harder to get than anything from the regular banners.
- Mailbox : 20 Star Rail Pass, 10 Special Rail Pass (Concert Promotion)
- Rank 5 Launch Event: 10 Star Rail Pass
- Store: 5 Star Rail Pass, 5 Special Star Rail Pass (Redeem with Undying Embers)
- Traveler's Lodge: Special Star Rail Pass per daily reset ( A Limit of 10 Tickets)
- Redeem Granding Opening Codes: 300 Stellar Jade
Beginner Pass Route
The beginner pass route requires players to progress through the story to accumulate regular tickets and reach the pity from the beginner banner (At 40 tickets, the beginner banner is drawn at a reduced price). This is because the beginner banner offers a totally random SSR character, and for players who don't expect to be lucky, this is a way to obtain an SSR character to start with. The strategy is aimed to have at least a SSR and don't want to waste too much time redoing the reroll process. As mention from the other route, if you manage to get Seele, you should stick with the account regardless, as standard SSRs are much more easier to obtain over time compared to the limited ones.
- Mailbox : 20 Star Rail Pass, 10 Specail Rail Pass (Concert Promotion)
- Rank 5 Launch Event: 10 Star Rail Pass
- Store: 5 Star Rail Pass, 5 Special Star Rail Pass (Redeem with Undying Embers)
- Traveler's Lodge: Special Star Rail Pass per daily reset ( A Limit of 10 Tickets)
- Redeem Granding Opening Codes: 300 Stellar Jade
- Play Simulated Universe and redeem items from Herta's Store (2 Star Rail Pass, 1 Special Star Rail Pass)
- Talk to Pom-Pom and redeem rank rewards (Few Star Rail Pass Depending on rank)
- Reach Rank 15: 10 Star Rail Pass (Should be obtain when somewhere in the 1st world you visit)
- Ascend Characters from 20 to 30: 1 Star Rail Pass per character.
Characters to Aim For
To achieve the best performance in the game, it is recommended the order of priority of getting characters should be Bronya>Welt>Bailu. However, if you're speedrunning, then the most effective order would be Bailu>Bronya>Welt. While all of the characters in the game are well-designed, players can choose their own preferred team as long as they adhere to basic team-building principles. Obviously, just because someone is meta, it might not totally tuned to your playstyle and opinions for each character at this early stage of the game is highly subjective.
However, if you are looking to follow the meta, then the most ideal team would consist of Dan Heng, Asta, Natasha, Serval, Herta, and Pela. As you might have noticed, these characters are only 4 star rarity, and actually more than sufficient to complete the game as their elemental properties and break strength can handle nearly all bosses encountered in the game. The main character is also extremely strong unlike most gacha games which allows you to tackle most content.
High Priority
- Seele: If you happen to obtain Seele during your rerolling, it's highly recommended to stop immediately. Seele is a limited character with a draw rate of only 0.6%, and can only be obtained through the use of the Special Star Rail Pass. In combat, Seele boasts the highest single-target attack power out of all the characters in the game, making her an excellent choice for taking down tough bosses and a potential replacement for Dan Heng. What makes Seele extremely deadly is her extreme speed and ability to gain extra turns. These extra turns occur when using an Ultimate or even defeating an enemy, with the proper combination Seele can get an insane amount of turns. Although Seele was significantly nerfed from her closed beta incarnation, which could make her susceptible to power-creep over time, obtaining her at this stage of the game is incredibly difficult, so it's still worthwhile to keep her regardless of any future changes to the game.
- Bronya: Bronya is one of the best support characters in the game. Bronya can push the speed of her allies, allowing them to take more action which is highly effective for end game players. Additionally, she has a skill for removing debuffs and providing speed and damage buffs to her allies. A combo of Bronya and Seele should easily trivialize all content in the game.
- Welt: An excellent debuffer that's focused on slowing down enemies and delaying their action. Although doesn't seem very valuable at the early stage of the game, you will find Welt to be extremely powerful when fighting strong enemies and bosses for the later parts of the game. Especially against bosses when they take multiple action at once.
- Bailu: Bailu is an excellent support character who happens to be the best healer in the current state of the game. In comparison to another healer, Natasha, Bailu is far superior in terms of the range of her recovery abilitles, and also the ability to resurrect allies. Therefore its easy to place Bailu in any team lineup.
Medium Priority
- Gepard: Gepard is a powerful tank that can provide strong shields to his allies. But besides that he also has all the essential abilities to be a great tank. This includes his shield based on raw defense, then also the ability to resurrect himself if he dies. This might even give you a lesser incentive to bring healers along due to how good Gepard is at tanking. Besides all his defensive prowess, Gepard is also good at freezing enemies which can be helpful against strong enemy types.
- Clara: Clara is a powerful tank that is focused on countering. She is more susceptible to damage but can counter multiple times to get a higher damage output. However, the main issue with Clara is her poor defense unless you manage to snag her Light Cone somehow. Clara's ultimate includes a damage reduction and a taunt, but her mediocre defense make her really difficult to use. Clara pairs really well with characters that can provide her a shield, some players may even find Clara to be totally broken, however using Clara at this stage in the game is highly subjective.
- Yanqing: Yanqing is a single-target attacker who deals high damage, much like Seele. However, he is much slower and relies on his abilities to maximize his potential. What sets Yanqing apart is his dependence on being shielded at all times to maintain his Soulsteel Sync buff, which exponentially increases his damage output. The buff is lost whenever he takes damage, so it's best to pair him with a tank or a character who can provide a shield.
Low Priority
- Himeko: In the prologue story, Himeko joins as a trial character and players get a chance to witness her combat performance. However, Himeko's viability is limited unless you have a proper team lineup that can exploit enemy weaknesses. If you encounter a whole team that is weak to fire, Himeko can handle it alone. But, having other allies with skills that can exploit enemy weaknesses will trigger Himeko's unique passive ability, which results in a powerful AOE follow-up attack. Without relying on this powerful passive, Himeko still has one of the strongest AOEs in the game.