
Dissidia Final Fantasy NT Move Lists & Characters: the cast, their moves list and combat strategy
Dissidia Final Fantasy NT has a fascinating roster of memorable characters and fan-favorites from each mainline entry. In the full game, you'll have access to all the playable characters right away.
Every single character in Dissidia Final Fantasy NT has a unique moveset and set of mechanics that pay homage to their respective game. It's easy to mash out the basics but understanding what each character is capable of and where they shine is the key to success both on and offline.
If you want to know about which characters are in the game in short without the move lists and read about the planned DLC characters, hit up our Dissidia Final Fantasy NT roster page.
But for now, let's get stuck in to the character move lists. All of the characters in Dissidia Final Fantasy NT fall into one of four roles: Vanguard, Assassin, Marksman, and Specialist. Let's talk about those first.
Character Classes, Types and how it impacts character tier lists
Vanguards tend to be on the frontline that have a healthy amount of offensive and defensive power. They're on the slower side, but each of their attacks deal a respectable amount of damage as they withstand a good amount of punishment.
Assassins, on the other hand, are much quicker. They may not do as much damage as Vanguards, but they're able to traverse around faster in exchange. Their attack chains are more combo oriented with more hits that add up in no time.
Marksmen are exactly as their name implies. These characters attack safely from a distance and often provide supporting fire for their allies. Enemies will have to think twice on how they approach your team thanks to them.
Specialists are a weird bunch; each of these characters have a very unique playstyle that affect the battle in a variety of ways. There's no easy way to generalize this role, so check down below on how these characters work in combat.
Three of the four classes act in a triangle of effectiveness: Vanguards will usually beat Assassins, but Assassin characters will usually beat Marksman characters. Marksmen are best against Vanguard characters. Specialists are unique, and so are out on their own - so rather than focusing on tier lists, consider focusing on team composition and how your characters face off against the enemy team's.
Warrior of Light (Final Fantasy)
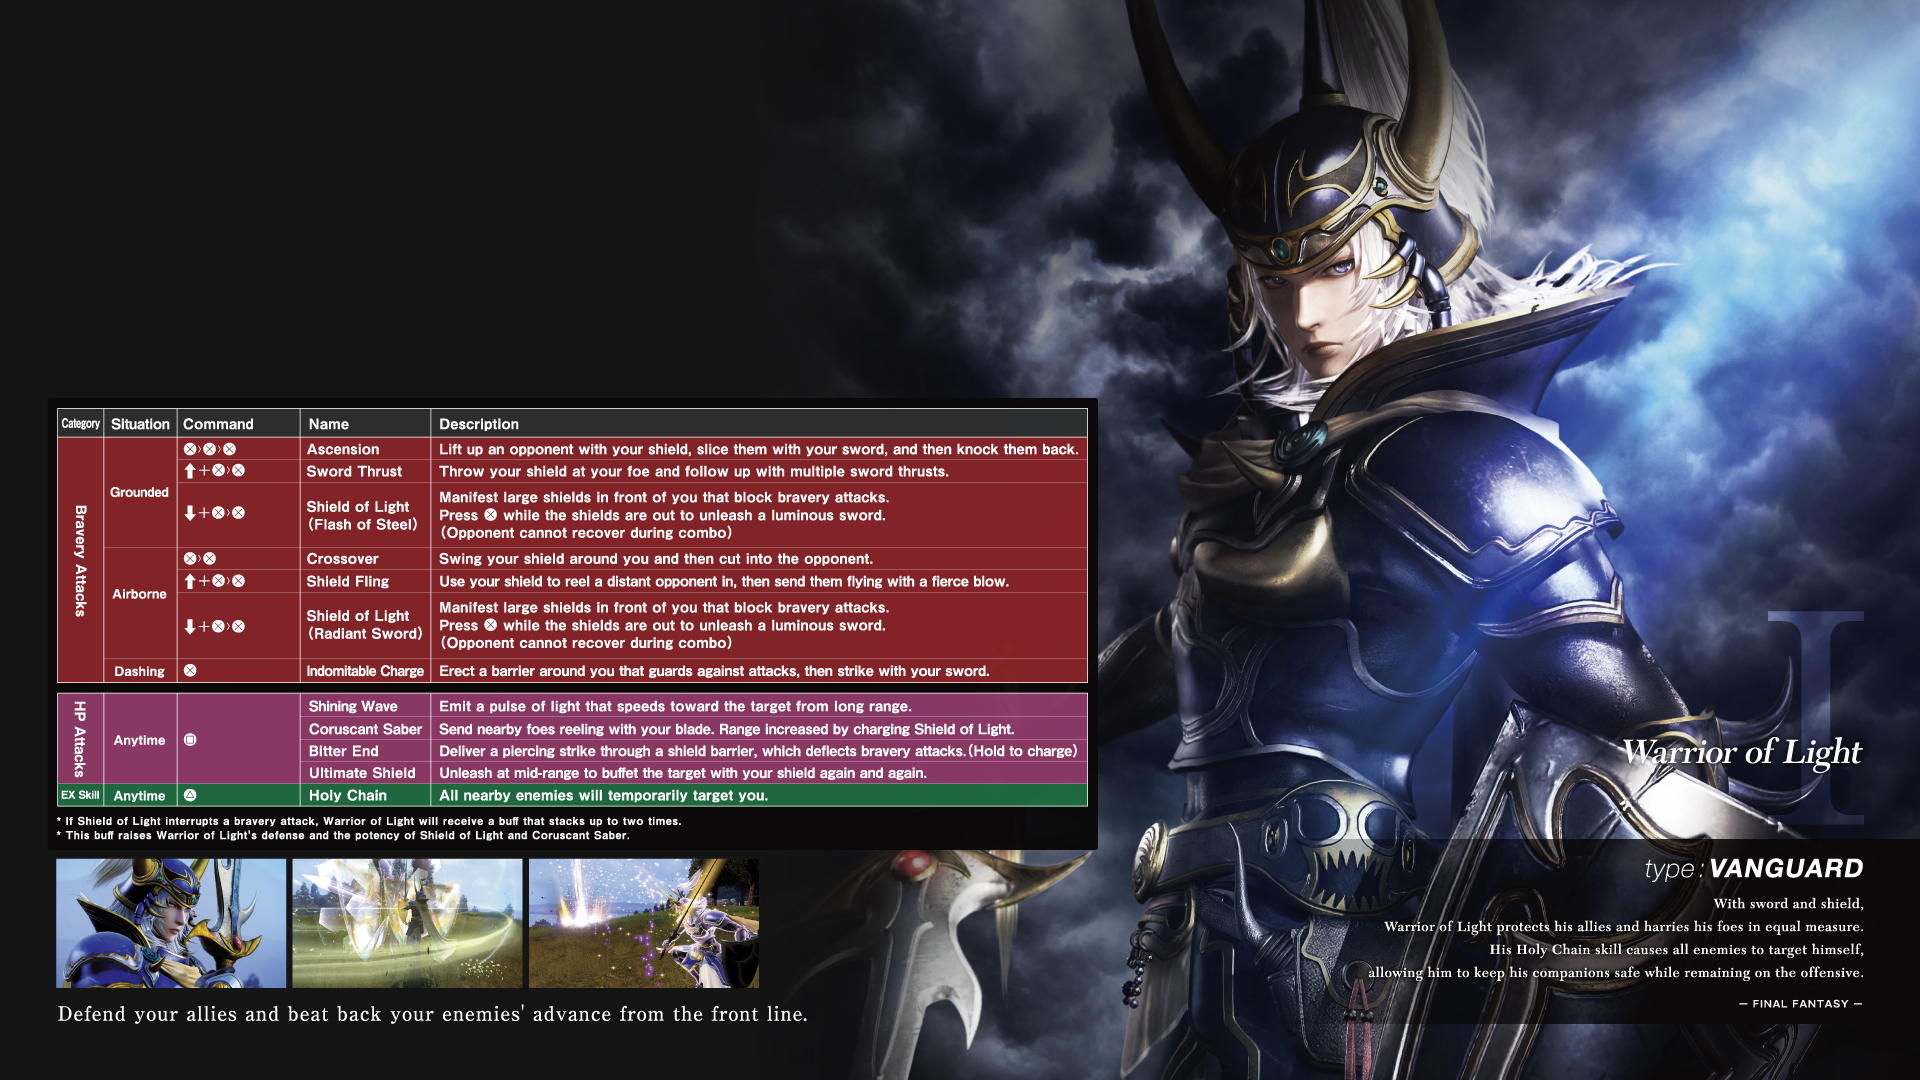
Role: Vanguard
Being the main character in a fighting game, Warrior of Light has a fairly basic gameplan in Dissidia. His simple attack strings do a decent amount of damage and makes him an ideal beginner-friendly character. While Warrior of Light is tailored for up-close melee combat, he can throw out some projectiles to cover his approach.
His self-defense is excellent thanks to Shield of Light attacks that summon shields to guard him before attacking. If opponents hit the Shield of Light on Flash of Steel and Radiant Sword, they’ll block Warrior of Light and give him a defense buff to summon more shields in his next Shield of Light activation.
Warrior of Light’s Holy Chain EX Skill serves as a taunt equivalent to enemies. It will force them to lock onto him for a few seconds allowing your allies to act freely without fear of being locked onto.
Garland (Final Fantasy)

Role: Vanguard
Garland is another straightforward character that serves some of the highest damage attacks in the game. His battle plan revolves around his unique Deranged Soul ability that manifests as consecutive attacks strike foes. This temporary, powerful buff not only raises the damage on Garland’s bravery attacks, but it also ups the range or speed of them in some cases. Deranged Soul can also be leveled up to enhance his abilities even further.
On the ground, Round Edge is a great way to cover Garland’s rear and flanks; it’s can also hit multiple opponents if you’re surrounded. Reel can catch enemies that’re a bit further away and using it during Deranged Soul will increase the range it extends out.
If Garland is in the air, Garland’s Twin Swords attack makes for a great combo starter. You can chain this into itself if a wall splat occurs. Chain Cast is also a devastating attack that covers a wide vertical arc. To maximize Garland’s damage output, Lance Drill is one of his highest damaging moves especially when his Deranged Soul is at max level.
Garland’s EX Skill is a command grab that does more damage the longer you hold onto a foe. It can also level up his Deranged Soul buff for a bit.
Firion (Final Fantasy II)
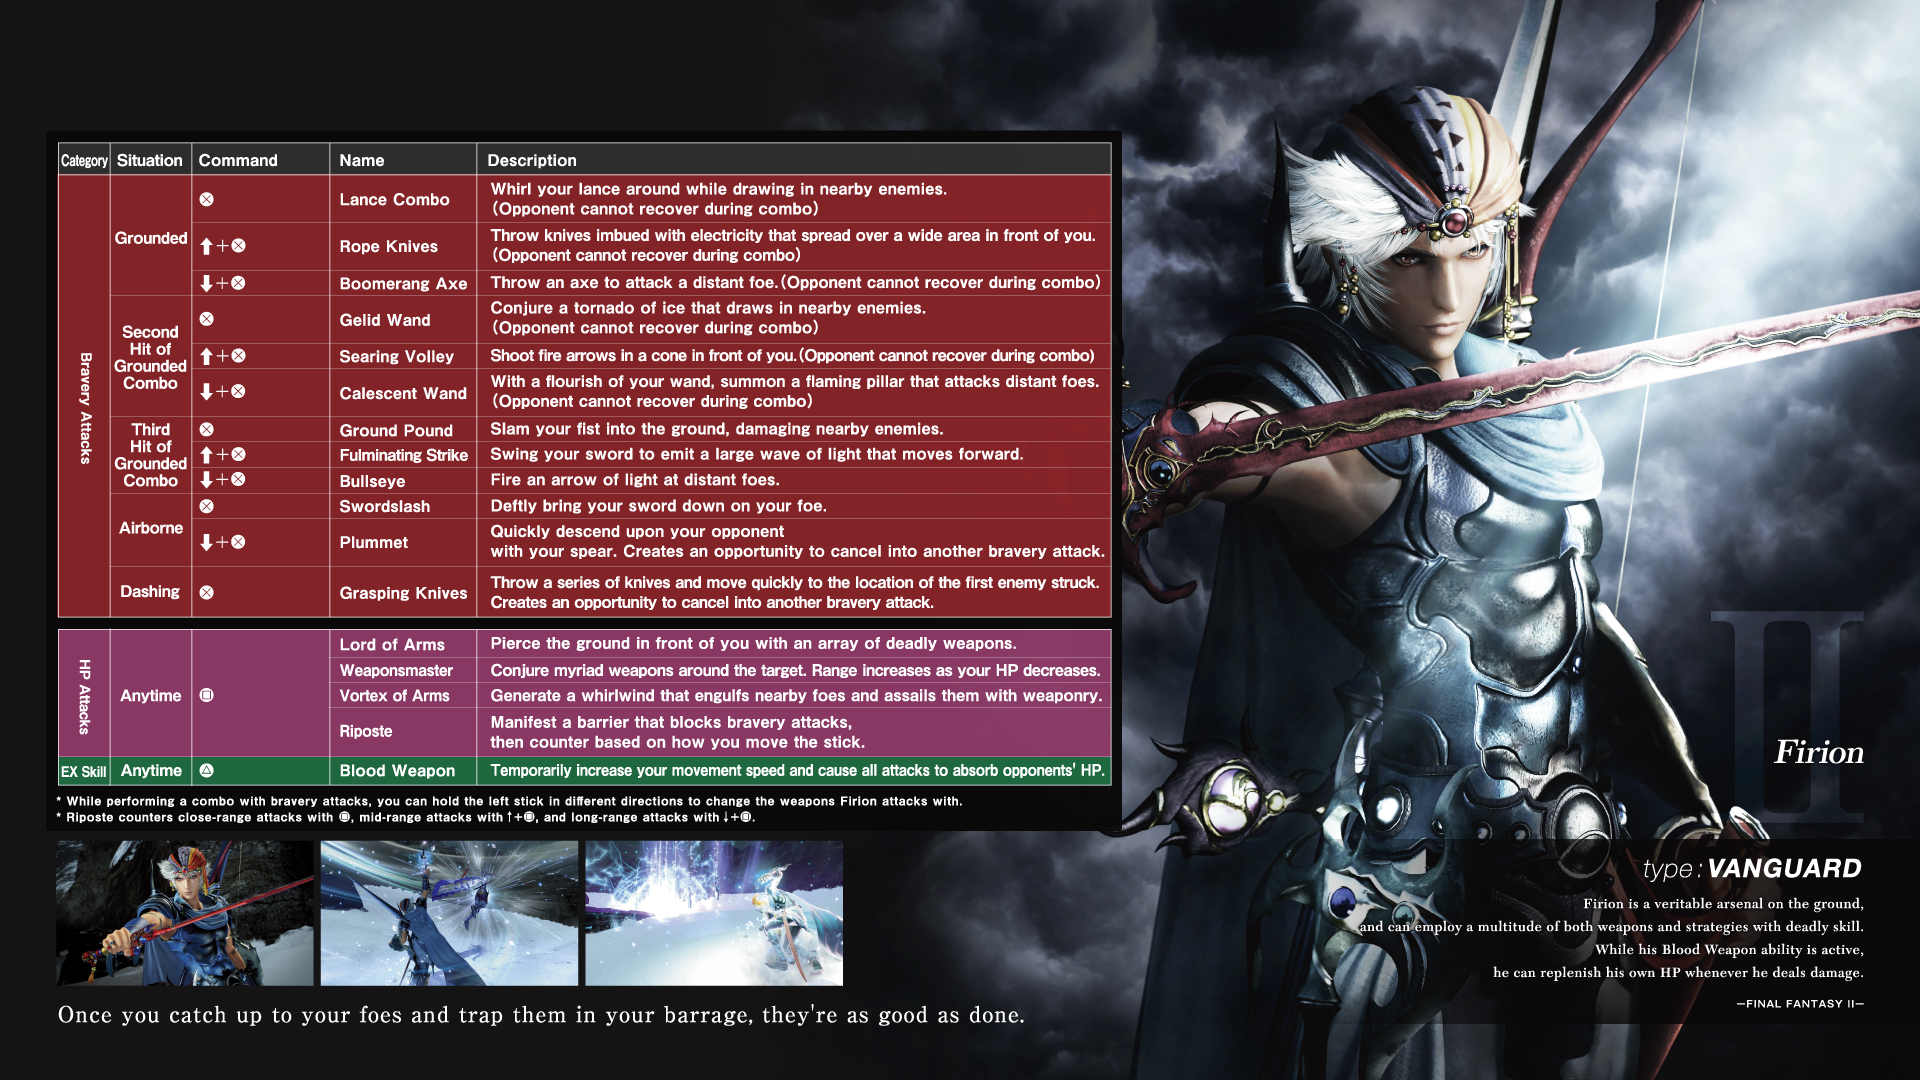
Role: Vanguard
Firion shines when he’s on the ground. His fierce AoE attacks cover the ground so opponents have to be mindful of their relative position to him. With that said, anytime Firion finds himself in midair is asking for trouble due to his slow movement and lack of tools to effectively deal with anything up there.
His bravery attacks have unique combo chains on the ground. Different bravery attacks will come out depending on the direction of your analog stick before you attack. Master this to keep your foes guessing on where and how you’ll be attacking.
With Firion’s diverse weapon-set, he can begin and continue his assault in a plethora of ways. Rope Knives and Boomerang Axe make for great starting moves at mid range into his Searing Volley. His three combo finishers of Bullseye, Fulminating Strike, and Ground Pound knock opponents away.
Thanks to his Blood Weapon EX Skill, Firion can absorb HP damage on his bravery combo chains for a limited amount of time.
Emperor (Final Fantasy II)
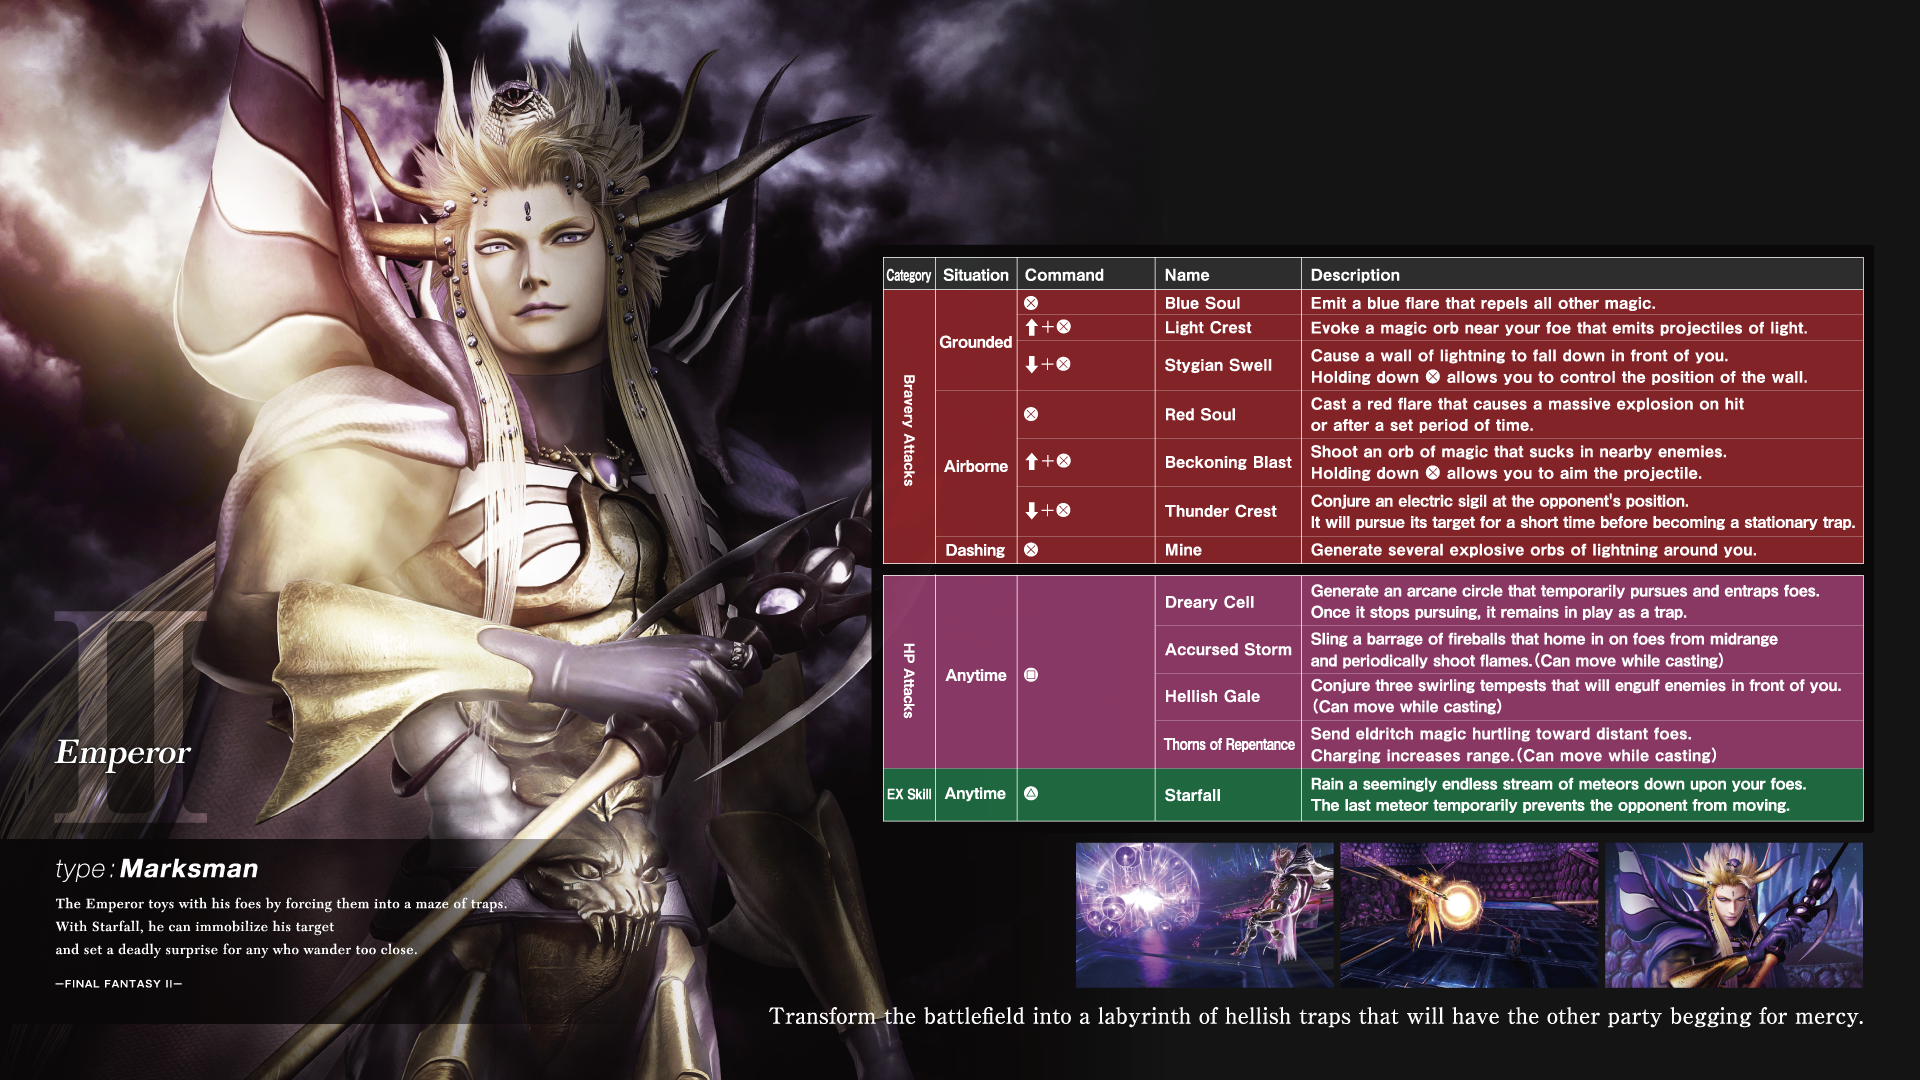
Role: Marksman
If you’ve played the Emperor before in the previous Dissidia Final Fantasy games, you’ll feel right at home with his playstyle in NT. He is still a master at manipulating the battlefield with his reliance on setting up a plethora of traps. If you’re fond of zoning characters in other fighting games, you may want to check the Emperor out.
The Emperor’s main goal in battle is to lay down as many traps as he can. Almost all of his attacks can be set up as traps and it’s important to know how much of them you can lay down at once and how long they’ll last. For instance, he can fire off one Blue Soul and two Red Soul orbs without any of them disappearing.
If someone closes in, the lightning wall from his Stygian Swell will knock enemies back; you can also control its range by holding in its attack button. His Beckoning Blast can not only be used as a standard mid-range projectile attack that you can aim when charged, but it can attach itself on surfaces for a long time to serve as a trap instead. Emperor’s Starfall EX Skill is a little tricky to land but if it connects, it’ll pin its targets down for a few seconds.
In the right hands, the Emperor is an absolute menace to deal with. One that can maintain a Blue Soul, two Red Souls, and a Light Crest along with a Stygian Swell and Mine to protect itself is one of the toughest characters to approach. It takes some finesse to setup properly but with the right team comp, the Emperor is nearly untouchable.
Onion Knight (Final Fantasy III)
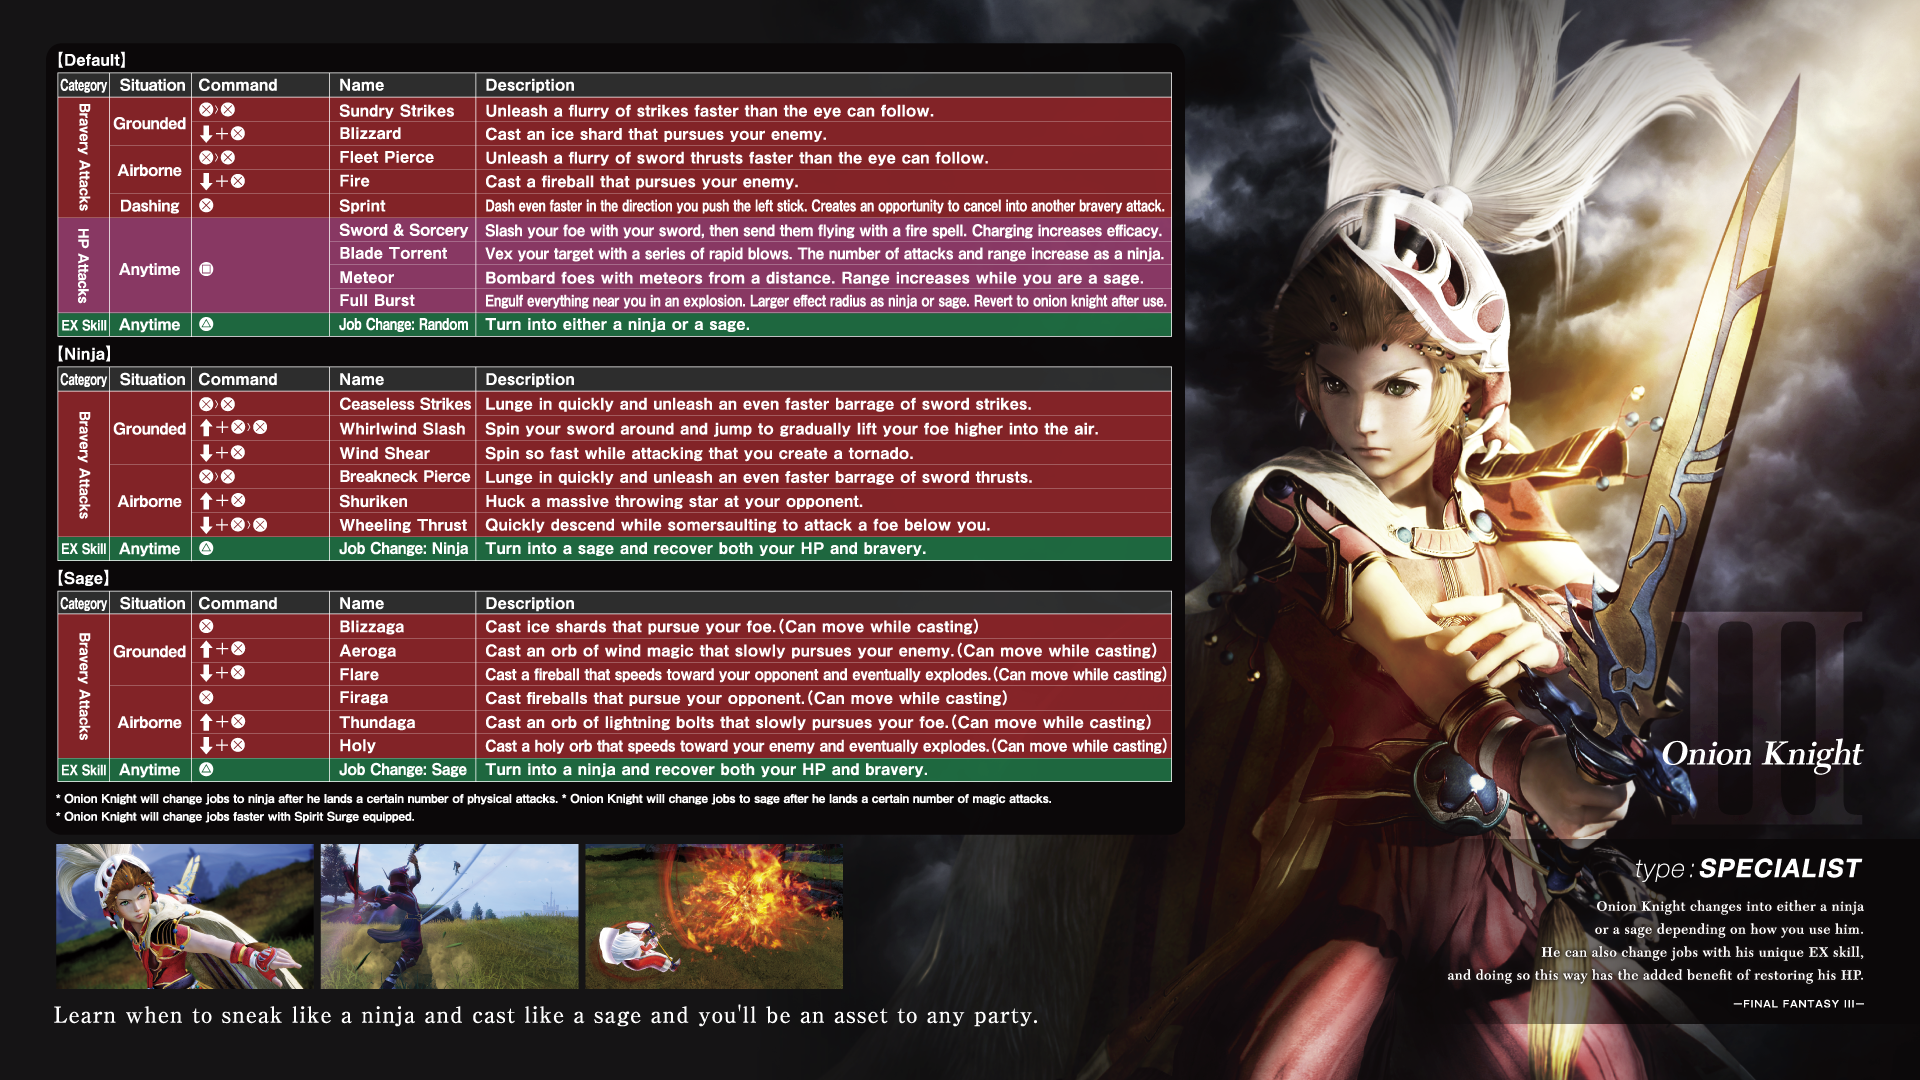
Role: Specialist
Onion Knight is an odd character that takes on multiple roles thanks to his unique job changing ability. His Onion Knight, Ninja, and Sage classes all specialize in different things, but none of them are necessarily outstanding at one specific task. Changing jobs mid-battle either requires using his Job Change EX Skill or repeatedly landing the same types of attacks as Onion Knight. He’ll change into a Ninja if a lot of physical attacks connect, while his Sage job manifests with magical attacks.
The base Onion Knight job is arguably the weakest of them since it’s a jack-of-all-trades distilled inside an already established jack-of-all-trades character. His Ninja class has increased speed, a triple jump, and specializes in quick, strong attacks up close. Sage, on the other hand, can cast a variety of magical spells while he’s gliding through the air from a safe range.
Your battle plan with Onion Knight entirely depends on who is on your team. Since the Ninja and Sage jobs have great movesets, try to safely change jobs as soon as possible when the match begins.
Cloud of Darkness (Final Fantasy III)
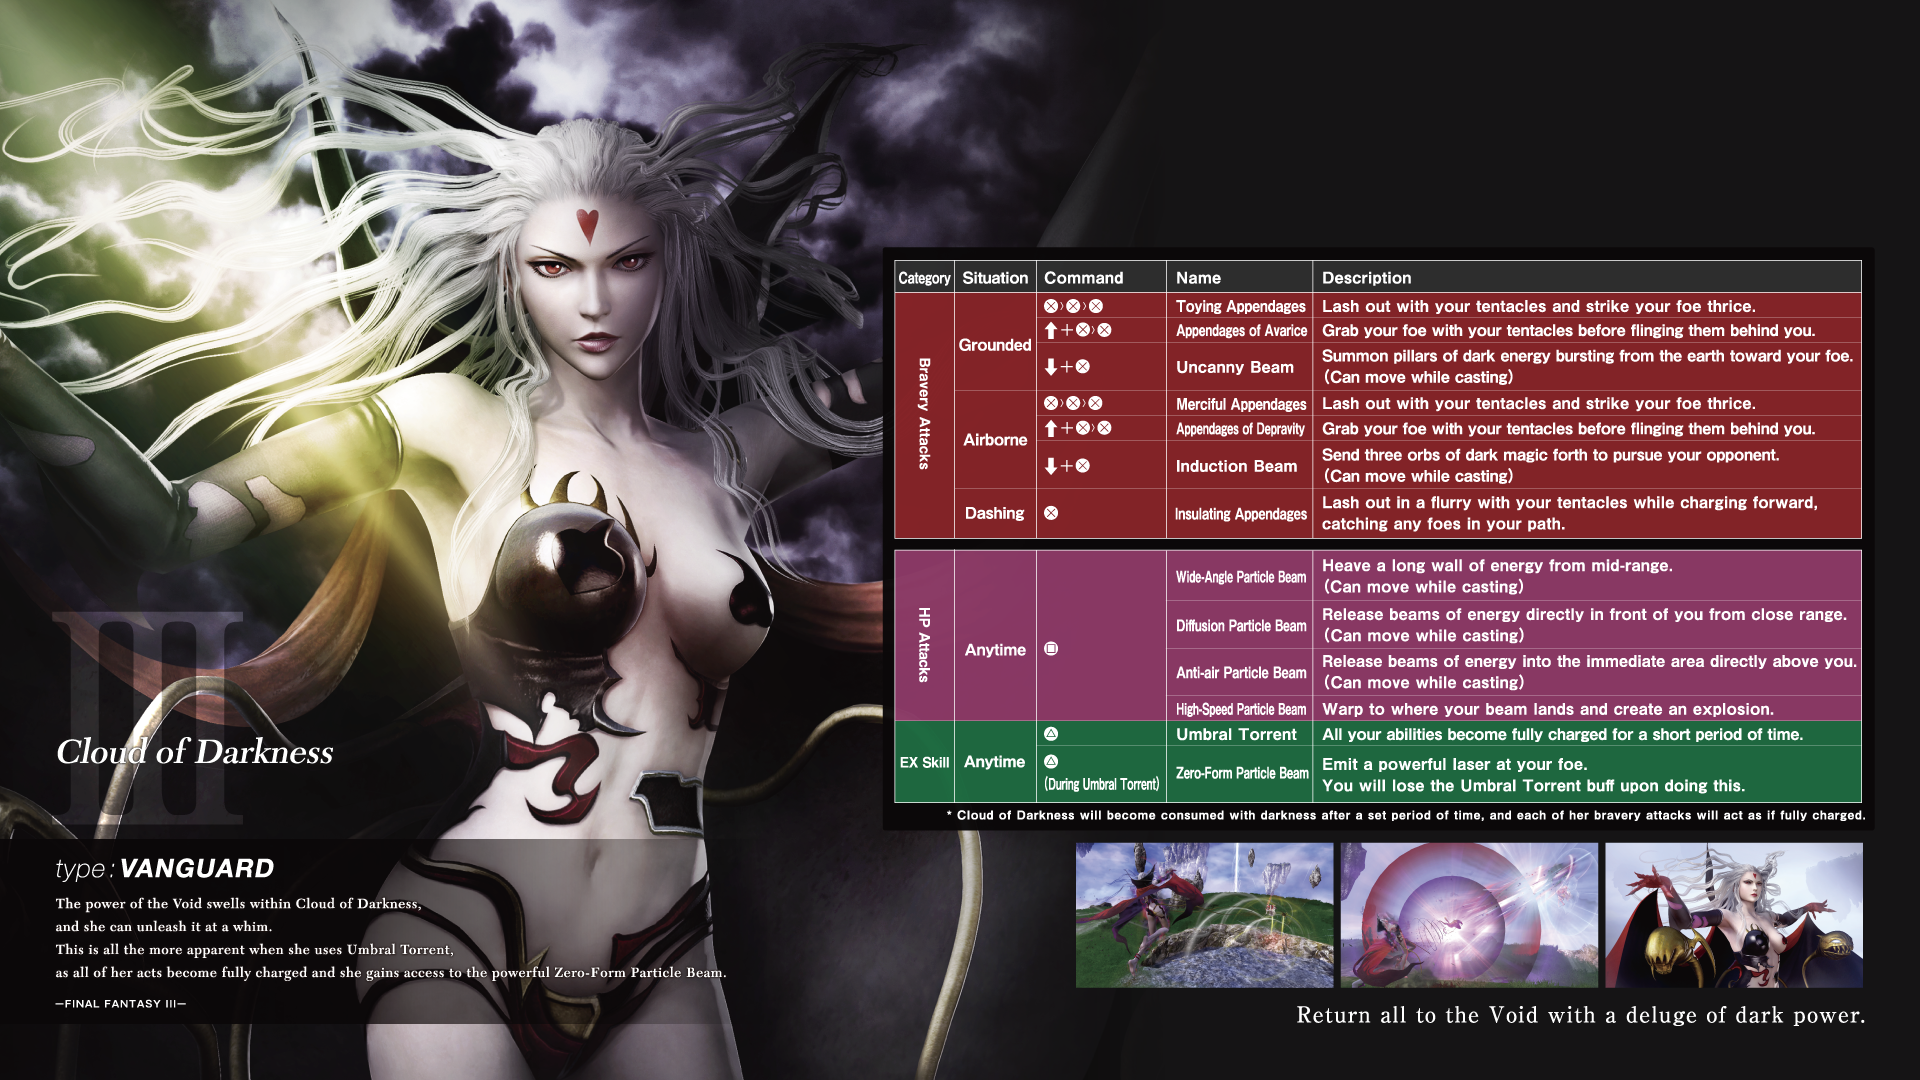
Role: Vanguard
Cloud of Darkness’s unique mechanic in Dissidia NT takes some notes from Terra’s Charge skill. Though it takes longer for Cloud of Darkness’s Charge ability to get primed, she can store it for when it really counts. She’ll only fire off charged version of her attacks if the bravery attack button is held. Thankfully getting hit when waiting to get charged up won’t reset its timer unlike with Terra.
Charged attacks have several benefits including a damage increase, the priority of projectiles fired off, and knockback distance.
If Cloud of Darkness is backed up against a wall, her Appendages of Avarice move can fling enemies behind her for an easy wall splat to continue combos reliably. Uncanny Beam can hit airborne foes, but be wary of its long startup animation.
Her neutral bravery attack chains of Toying Appendages and Merciful Appendages prioritize different planes; Toying Appendages can cover horizontal advances well, while Merciful Appendages deals with vertical approaches. Appendages of Depravity sucks in opponents and pushes them out; the charged version packs quite the punch. Cloud of Darkness’s dash attack, Insulating Appendages, has some super armor properties to safely close in on foes.
Activating the Umbral Torrent EX Skill gives Cloud of Darkness the ability to fire off charged versions of her attacks consecutively without restraint for a limited amount of time. It also gives her access to the devastating Zero-Form Particle Beam HP attack but once you use it, her Umbral Torrent buff will be expended as well.
Cecil Harvey (Final Fantasy IV)
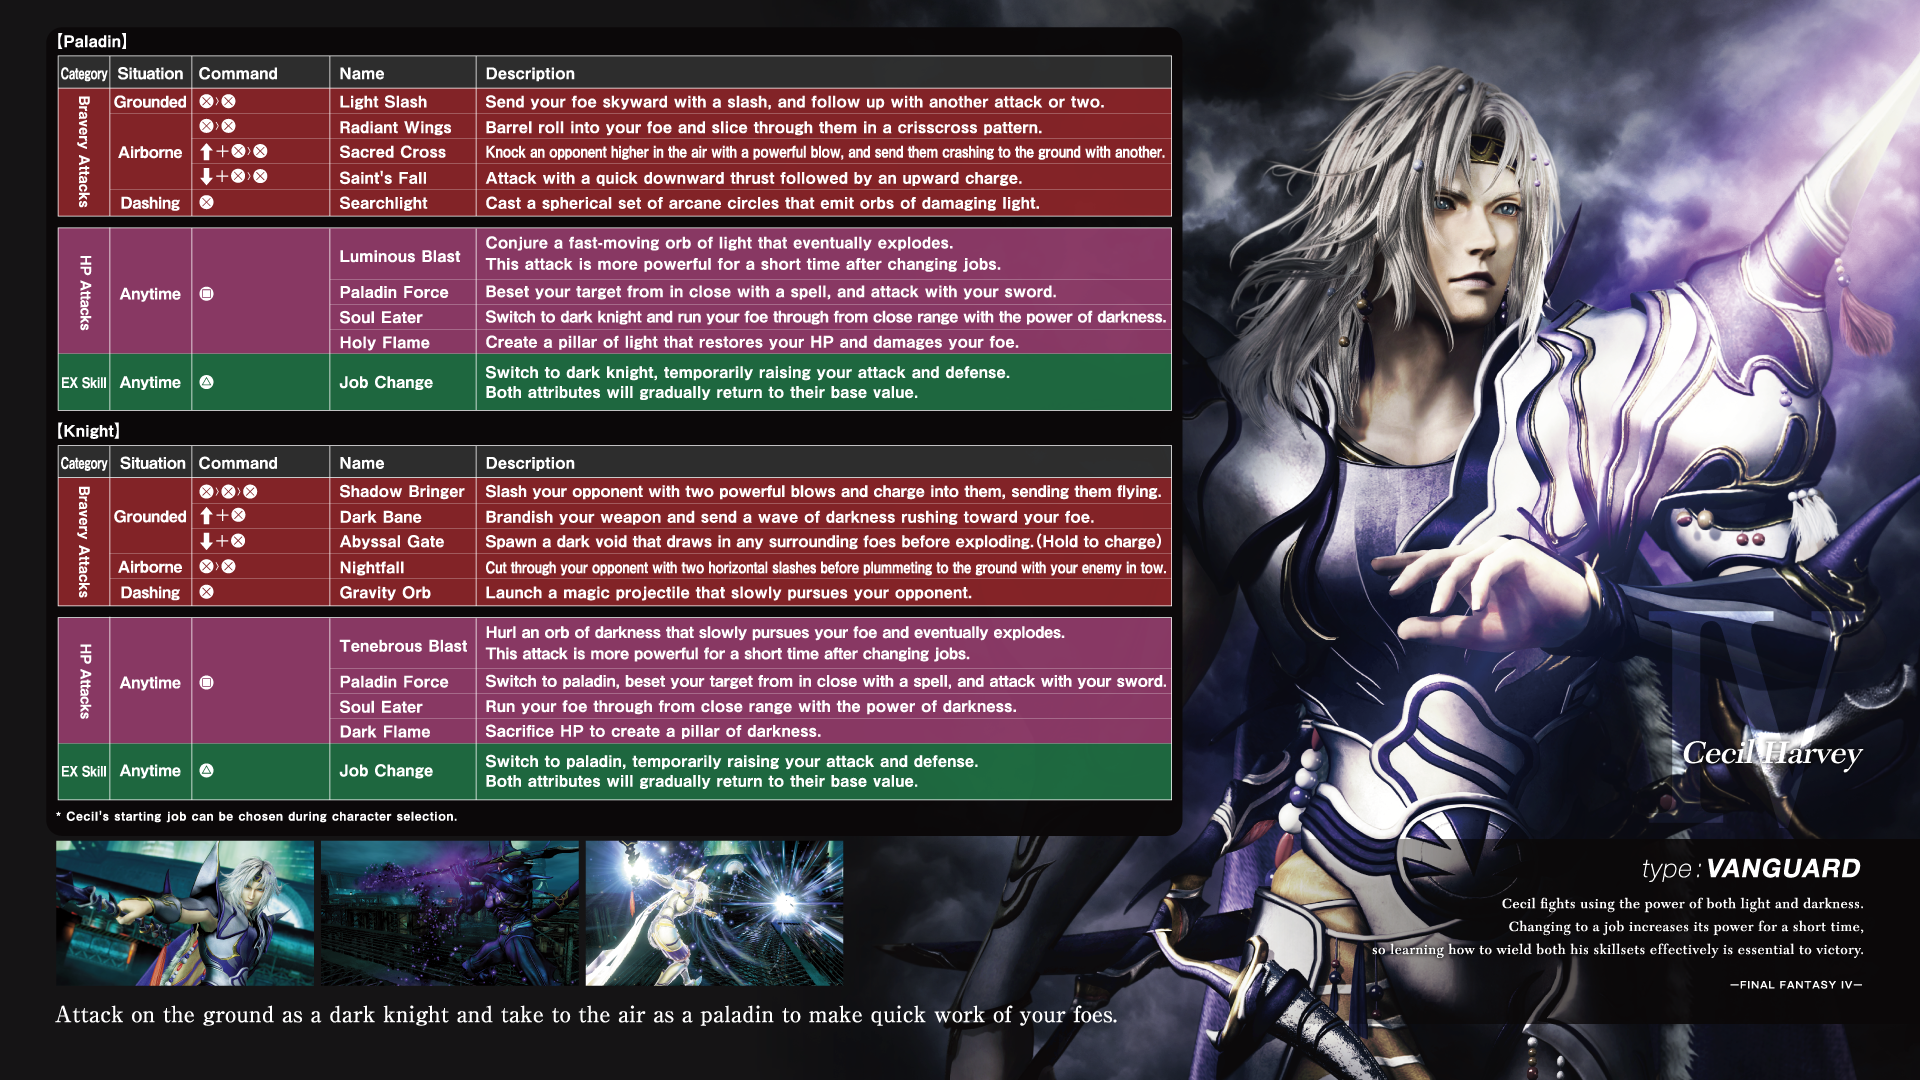
Role: Vanguard
Cecil’s primary mechanic in Dissidia is his ability to change between a Paladin and Dark Knight. Both of them have completely different moves, but a good rule of thumb is that Paladin excels in the air up close while Dark Knight shines on the ground from a distance. Therefore, Cecil can adapt to almost any type of situation as long as players can keep up with what he has to offer. Even though his Paladin and Dark Knight act like an Assassin or Marksman respectively, his mobility as a Vanguard weighs him down.
Changing between Paladin and Dark Knight is relatively simple compared to similar characters like Onion Knight. While both can do it via EX Skill, Cecil only has to land a unique HP attack to switch between them alternatively.
Cecil’s Paladin mode has devastating combos in the air. His Radiant Wings combo chain is a reliable starter that does decent damage. Saint’s Fall is a great downward strike that easily pushes unlucky enemies back to a nearby wall.
In Dark Knight mode, utilize Cecil’s fast Dark Bane shot attack to knockback enemies. It can even hit airborne foes. Throw out an Abyssal Gate from long range; charge it up to make its AoE properties and high damage more of a threat. If you find yourself in the air as a Dark Knight, utilize Nightfall’s super armor to connect it and push the enemy back to the ground.
Kain Highwind (Final Fantasy IV)
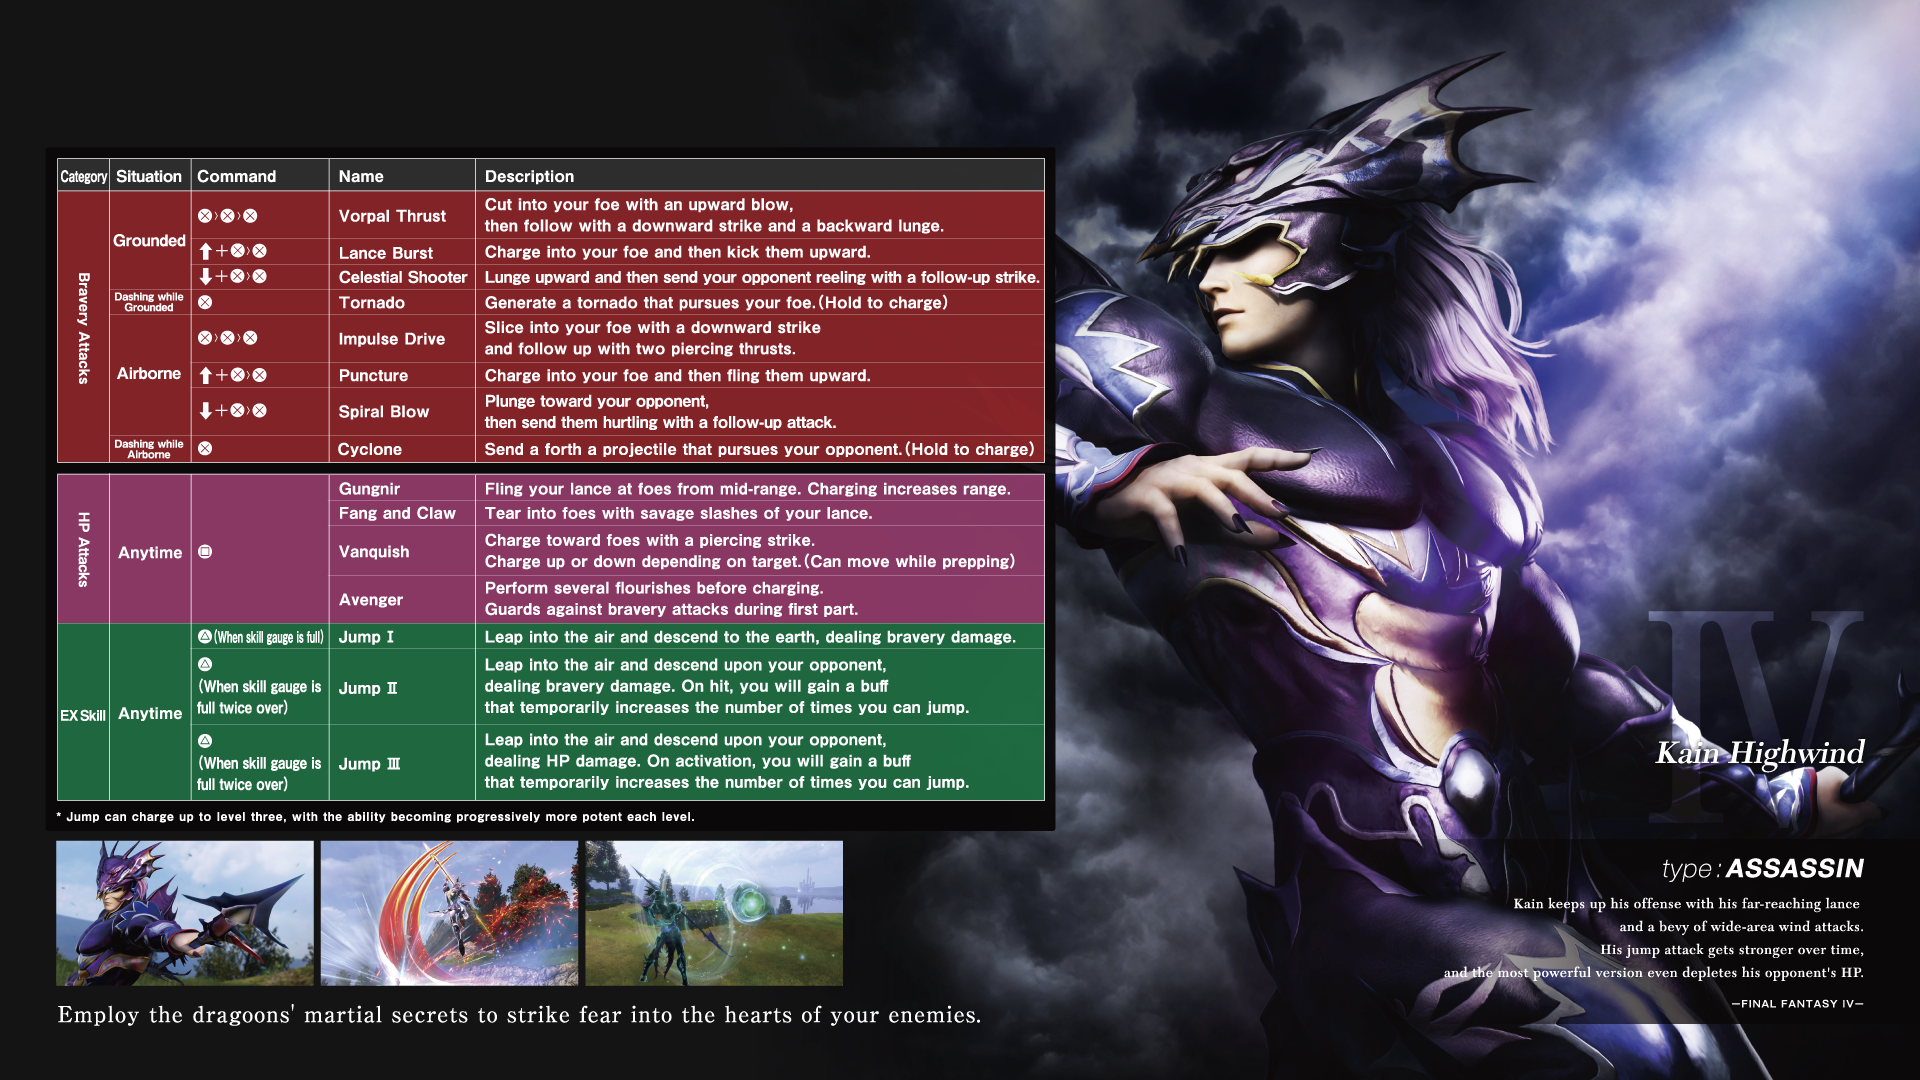
Role: Assassin
When it comes to locking down single opponents, Kain has nearly no equal. Of course, a Dragoon’s core skill is their Jump ability and Kain has different stages to his Jump EX Skill; the more you let it charge, the more devastating Kain’s Jump will be. Jump I is a fairly standard attack, but the real deal lies within Jump II and Jump III.
Jump II will leap over to a target - no matter where they are on the battlefield. It’s pretty much a global teleport so none of your enemies are truly safe from Kain. Jump III turns this ability into a HP attack so if Kain has enough bravery to take out someone, Jump III will make quick work of them if they forget about Kain’s ability for a split second. Additionally, both Jump II and Jump III give Kain a brief buff that raises the amount of times he can Jump too if they hit.
Kain usually doesn’t do too well on the ground, but Lance Burst can close in somewhat decently. Celestial Shooter will plop him into the air and catch airborne opponents as he rises. His Tornado travels more swiftly than you might expect and you can charge it to make it better. Impulse Drive will be Kain’s main starter to get combos going.
Golbez (Final Fantasy IV)
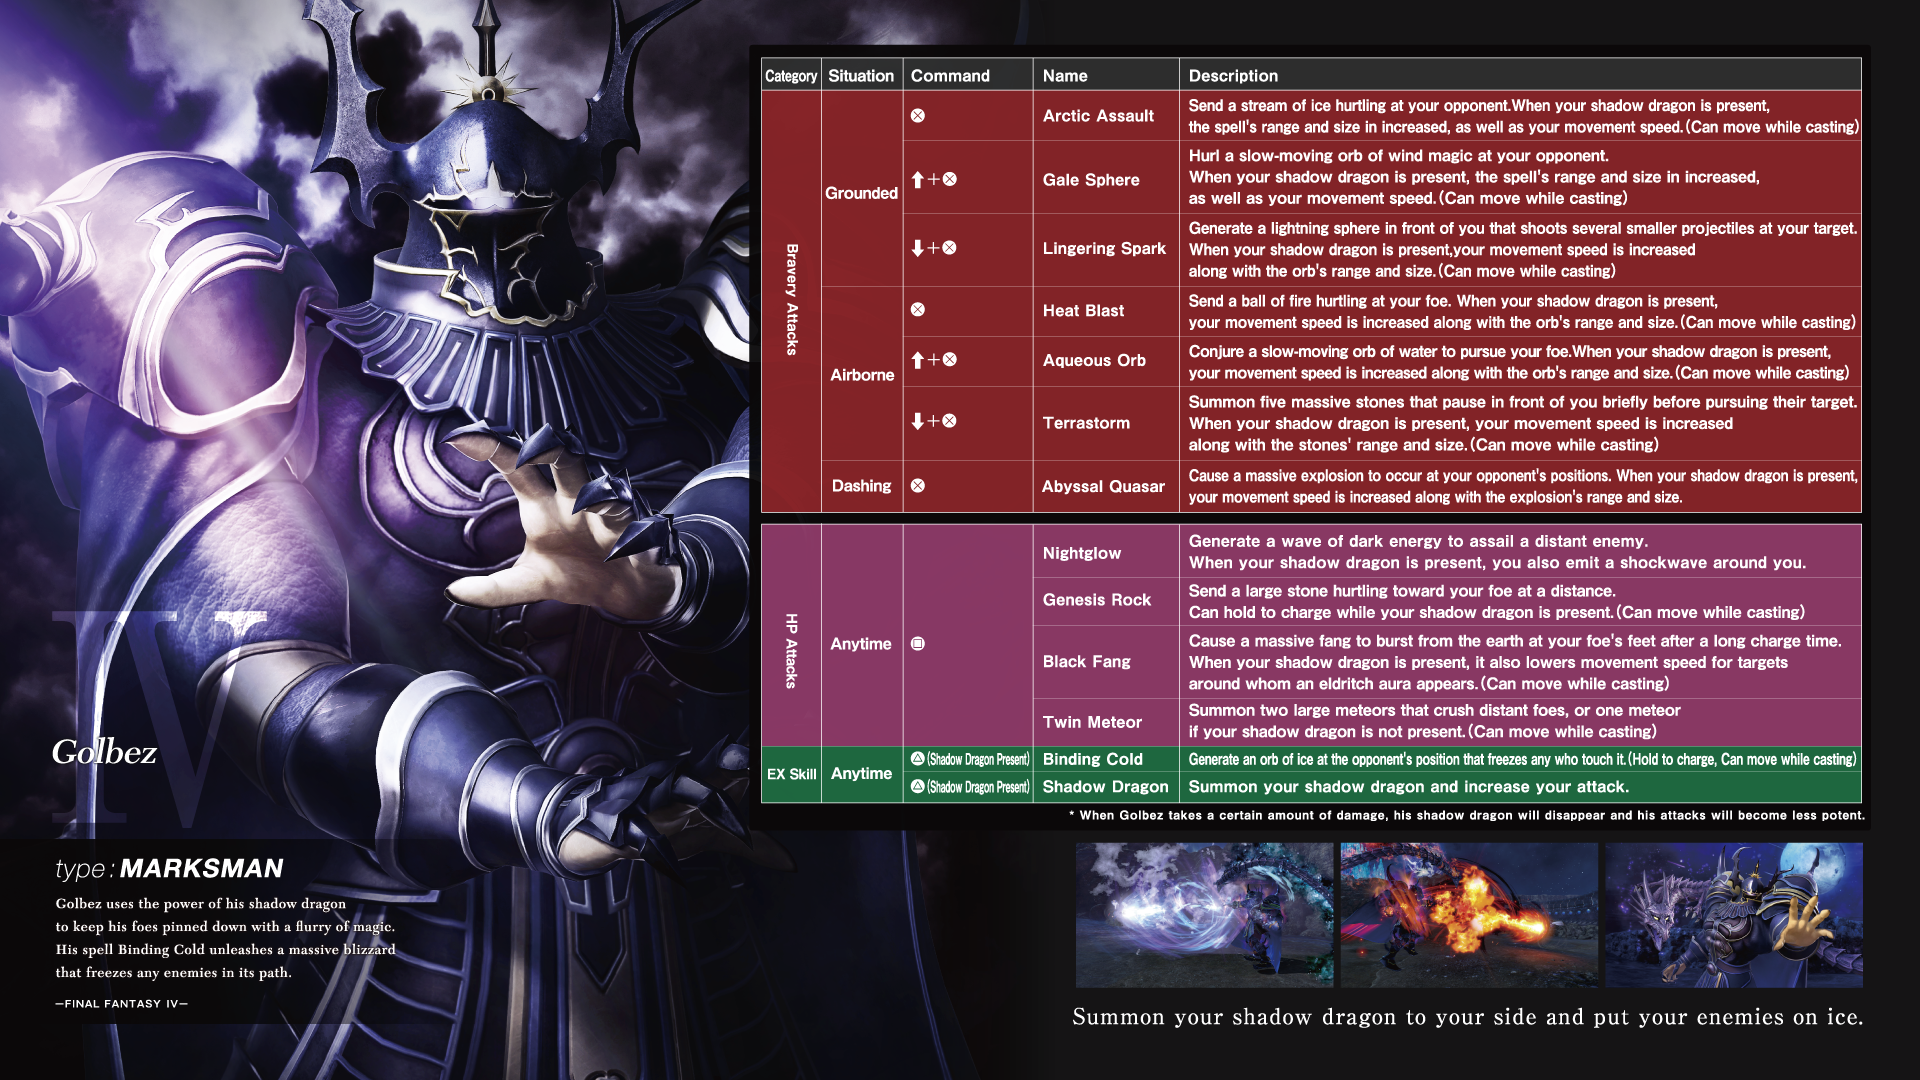
Role: Marksman
Golbez is a solid marksman that shines with his Shadow Dragon. He’s quite strong and relatively fast, but he needs his Shadow Dragon on him to be a constant threat. Without it, Golbez’s tools become lackluster; he loses his dragon if a 1000+ HP attack hits him. Then his useful AoE freeze EX Skill, Binding Cold, is replaced with the option to resummon his Shadow Dragon.
That’s why Golbez players must try their best to keep their Shadow Dragon alive as long as possible. It makes Golbez travel faster as his attacks hit harder, travel longer, and increase the priority on his projectiles.
Other than that, Golbez’s arsenal of spells are a blast to use and they can be used while moving. Arctic Assault and Heat Blast travel fast, Lingering Spark can stun foes, and Terrastorm is decent for self defense or zoning from a long distance. Both Gale Sphere and Aqueous Orb travel slow, but have homing properties to boot.
Bartz Klauser (Final Fantasy V)
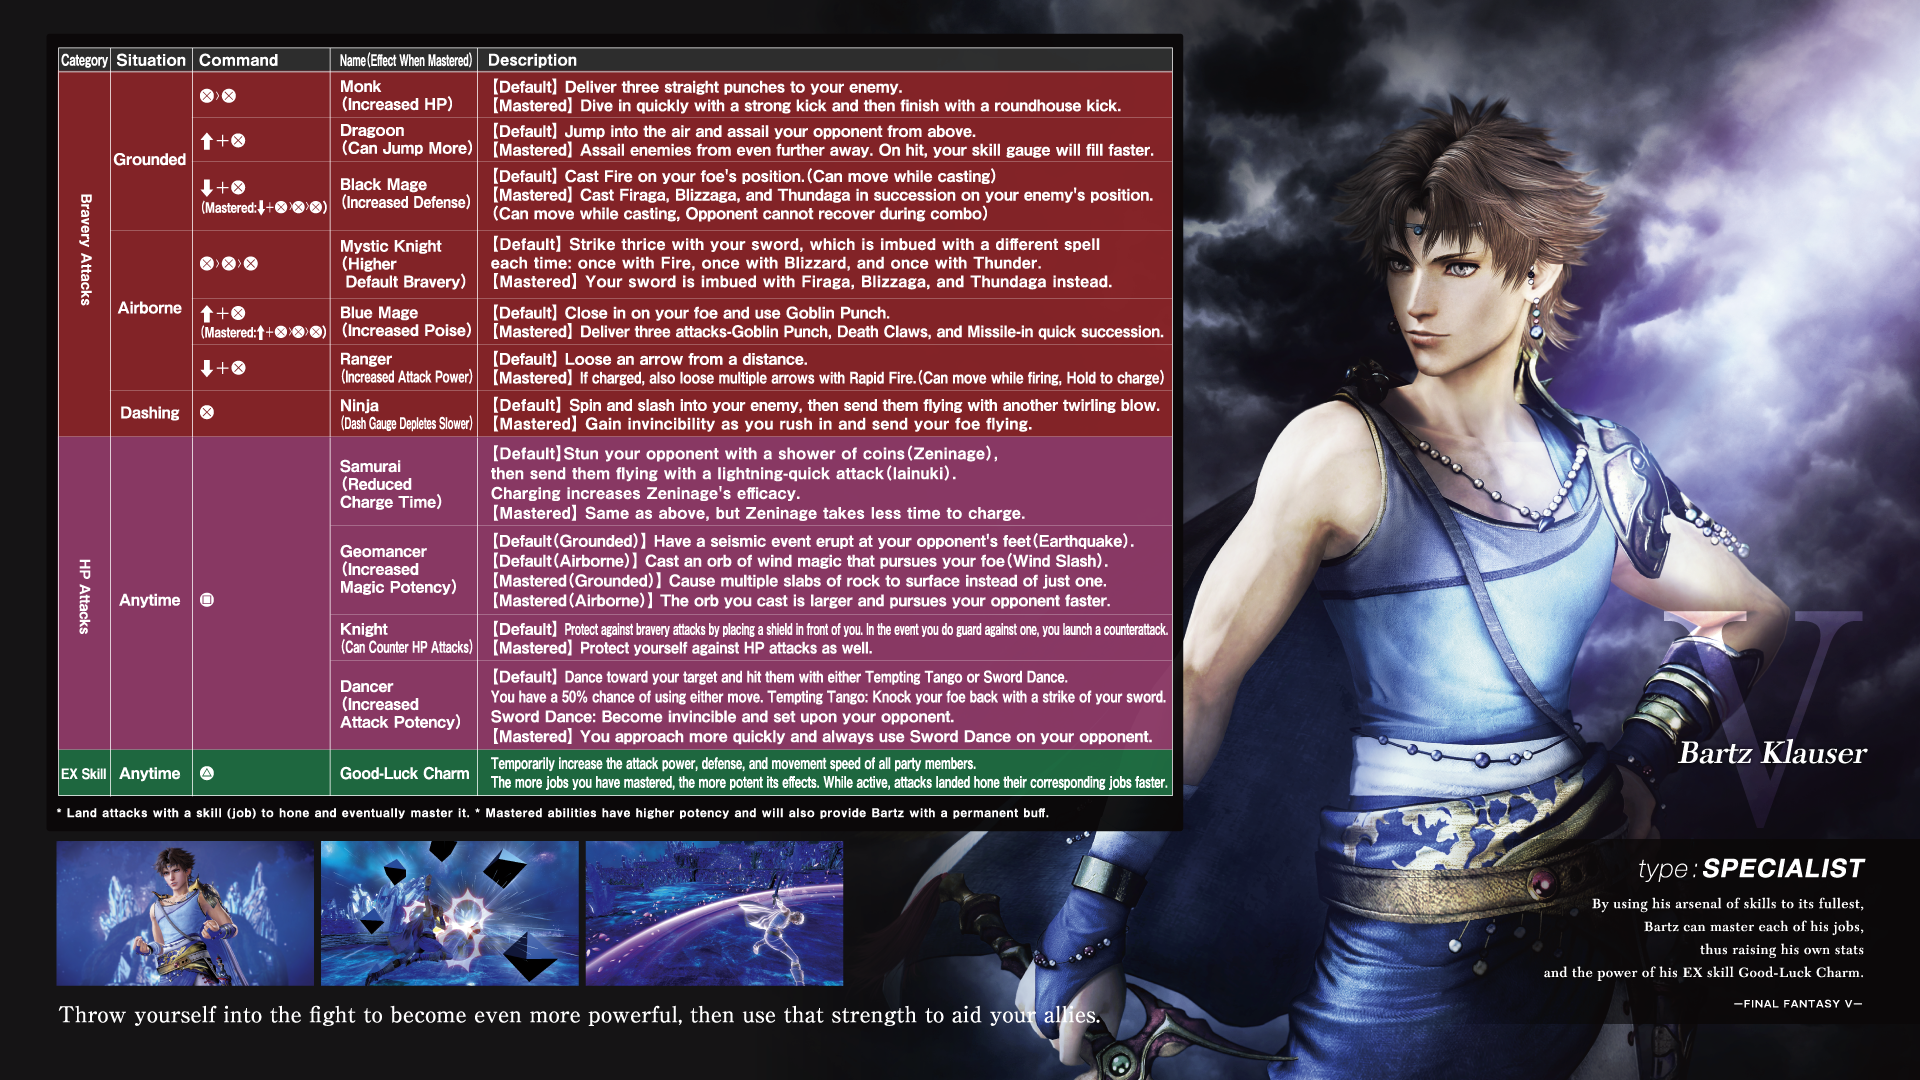
Role: Specialist
Bartz is a very special character in Dissidia Final Fantasy NT. All of his bravery and HP attacks are based on a job from FFV. Players must actually level up and master his individual moves to buff Bartz up. Therefore, Bartz is quite a versatile character but he requires time to build up his full potential in battle. Leveling up and mastering his jobs require hitting enemies with them a certain amount of times. If Bartz is able to master all his jobs, the buff effects he gets from them is doubled!
Obviously when it comes to his moveset, using all of them is advisable until each one is mastered. His Dragoon leap is very fast, which makes it an awesome tool to instantly dodge and counterattack in one fell swoop. Bartz’s ranged Black Mage elemental attacks is decent at harassing faraway foes giving allies a bit of breathing room. In the air, Bartz can start combos with his Blue Mage attack and can then be followed up with his Mystic Knight job move. His attack as a Ranger starts off weak at first, but mastering it gives it a substantial attack boost plus more projectiles per volley.
Your teammates can also enjoy a few of Bartz’s buff thanks to his Good-Luck Charm EX Skill. With this, Bartz is able to share his attack, defense, and movement speed buffs from job mastery for a few seconds.
Exdeath (Final Fantasy V)
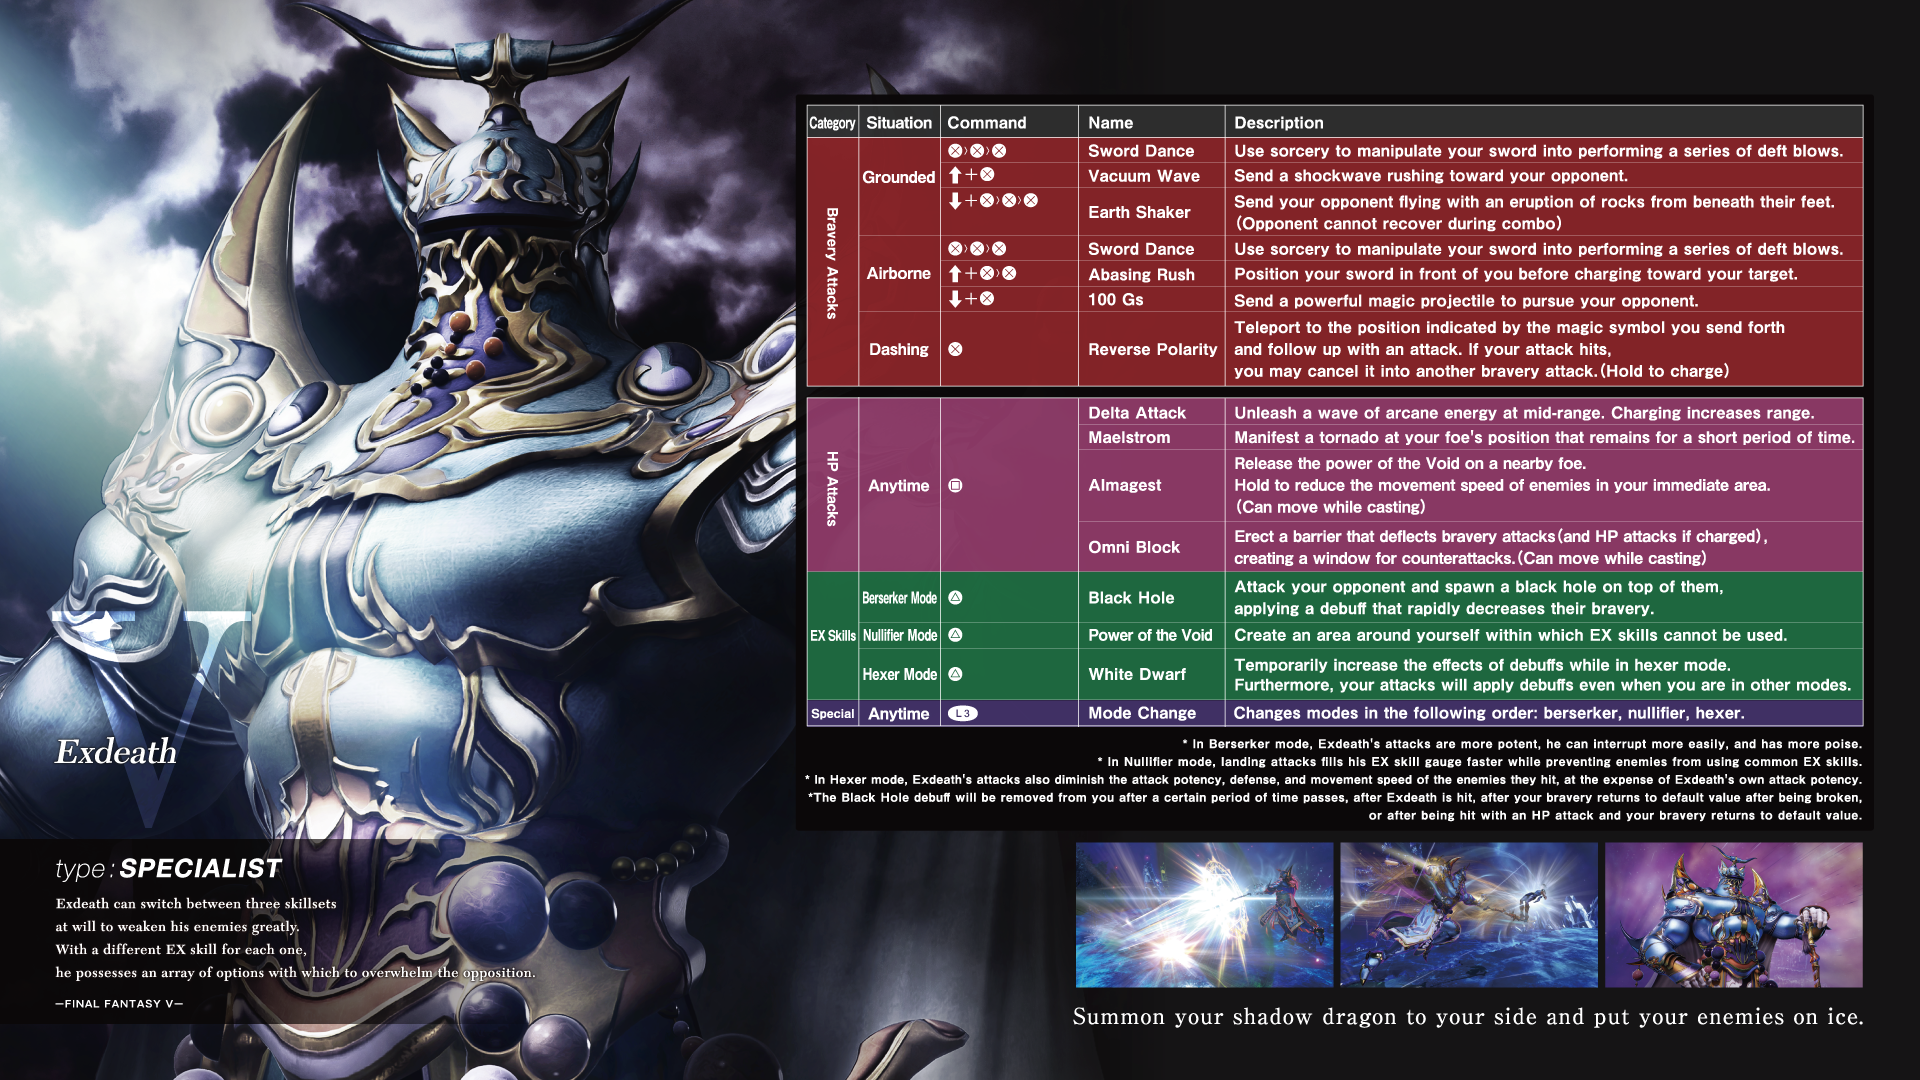
Role: Specialist
Exdeath in Dissidia Final Fantasy NT is a completely different beast from his previous iterations on the PSP. Much like Lightning, he has different modes he can freely switch to during battle - Berserker, Nullifier, and Hexer. He also has a different EX Skill in each mode… unlike Lightning. Note that Exdeath’s mode change always follows the Berserker to Nullifier to Hexer back to Berserker cycle.
Berserker mode prioritizes damage output above all else for Exdeath. He’ll also move further in his attacks for them to connect. His damage is more on the level of Assassins rather than dealing meaty hits like Vanguards. Berserker’s Black Hole EX Skill deals some damage up close and inflicts the Black Hole debuff if it connects; this debuff severely decreases an enemy’s bravery overtime though it can be shaken off by attacking Exdeath or refilling bravery normally through landing a HP attack to cash in the current value and “refreshing” it.
Nullifier mode decreases the cooldown on all his EX Skills anytime his attacks hit as a Nullifier. The final hits on all his attacks (except Reverse Polarity) inflicts an ailment that disables enemies from activating their normal, common EX Skills for a brief period. Nullifier’s Power of the Void EX Skill casts an AoE field around Exdeath that prevents any opponents caught in it from using any EX Skill for a set amount of time.
Hexer mode has the lowest attack potency out of his three modes. In exchange, his attacks inflict a nasty debuff that lowers an opponent’s attack, defense, and speed all at once. Hexer’s White Dwarf EX Skill greatly enhances the debuff values the Hexer grants. Plus, both Berserker and Nullifier can grant Hexer’s debuffs while White Dwarf is active.
If you feel a bit overwhelmed playing Exdeath at first, a good rule of thumb is to use his Nullifier and Hexer modes from a distance and switch to Berserker to really bring on the pain up close.
Approach foes with Abasing Rush and utilize Sword Dance as your basic melee string for up-close combat. Exdeath’s Reverse Polarity dashing attack summons a teleporting circle that you can manipulate the longer you hold down the button. Once you let it go, Exdeath teleports to it instantaneously and if your follow-up attack hits, you can cancel it into another attack directly.
His other bravery attacks are projectiles that benefit him in his Nullifier and Hexer modes. To Dissidia veterans, Exdeath still has a counter move with his Omni Block HP attack that can even block HP attacks if it’s charged.
Terra Branford (Final Fantasy VI)
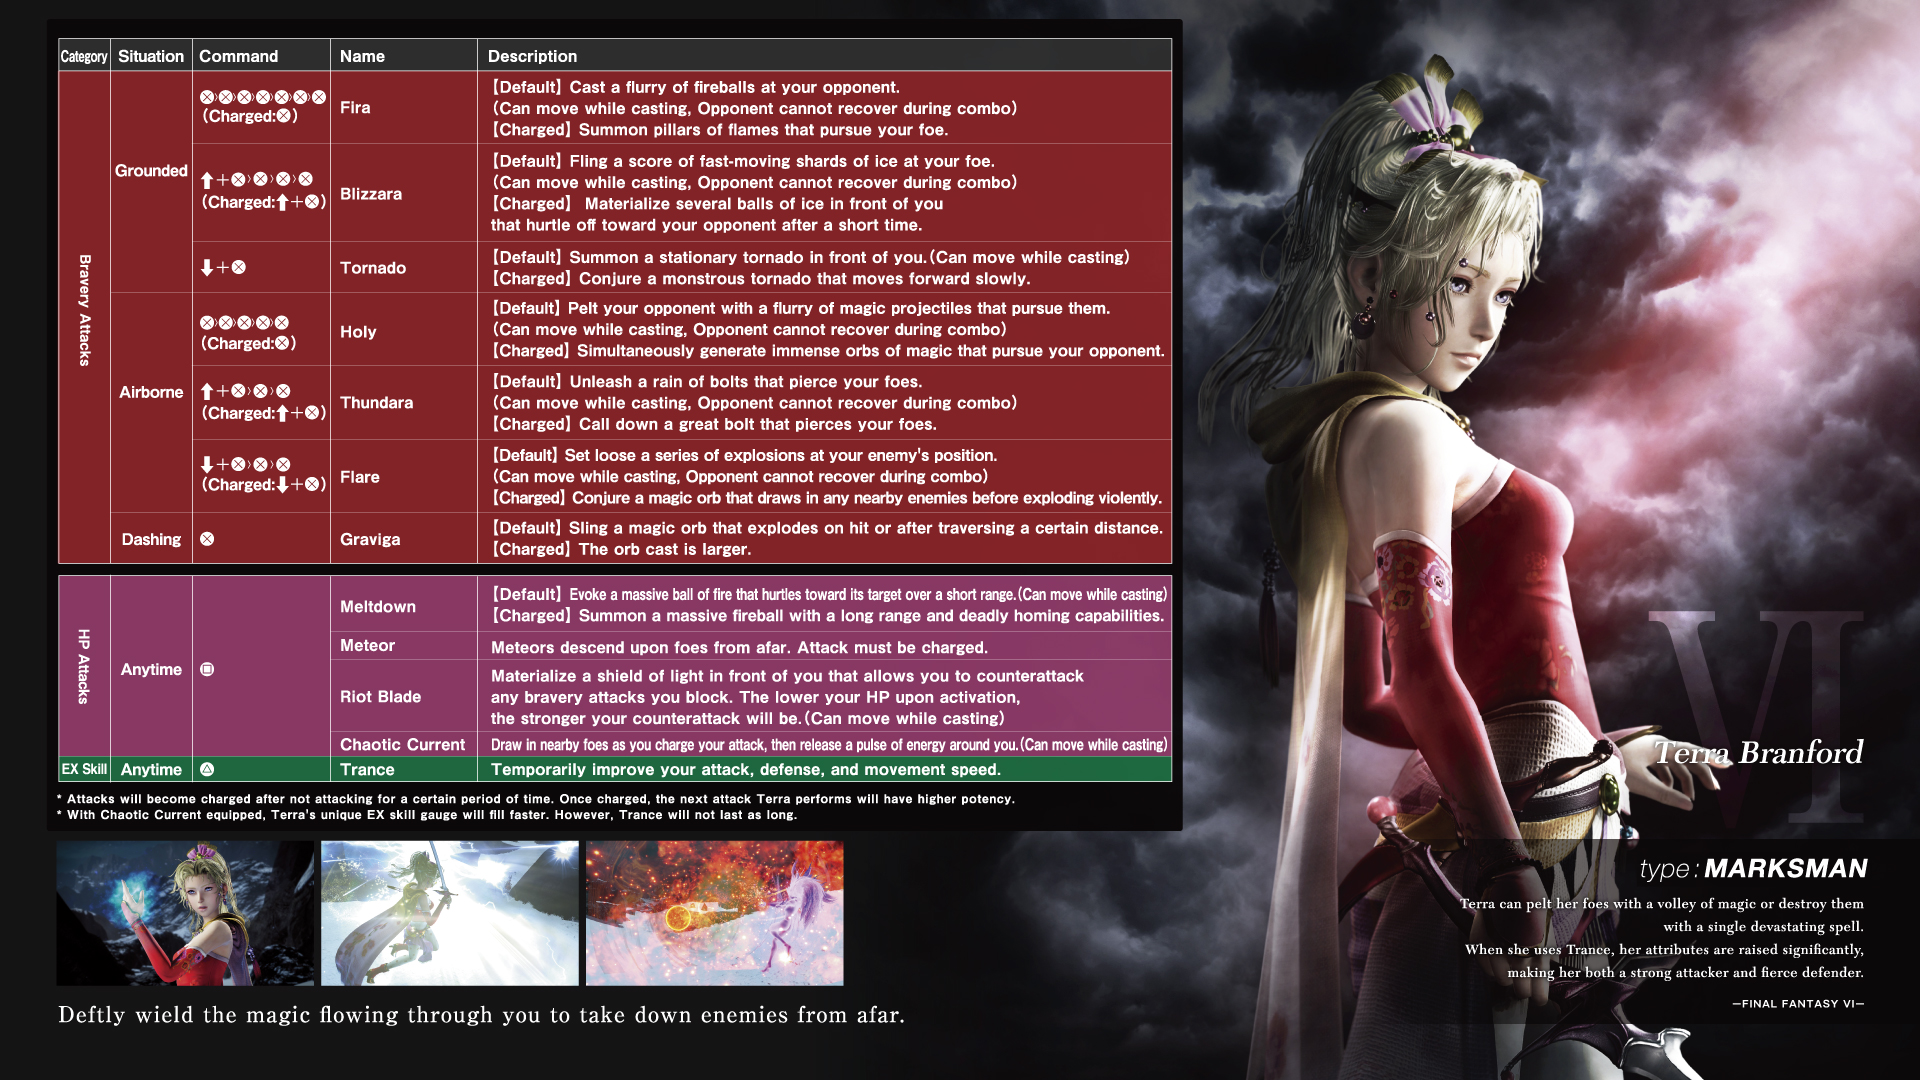
Role: Marksman
Terra is a dedicated long range mage capable of choosing how she wants to fire off her spells. Her Magic Charge ability allows her to opt for more powerful magic attacks as long as she hasn’t attacked or been attacked for about four seconds. Terra’s vast amount of spells can keep foes away from her, but she’ll struggle if she’s forced to fight back in close quarters. Timing magically charged attacks and keeping your distance is key to effectively playing her.
A charged Blizzara is good for getting a few pokes in due to how fast it goes. If there’s someone too close for comfort, throw out a Tornado as you slowly back away. Holy’s charged version lines up and sends out five ball-shaped projectiles that slightly follow foes, as well as eat up any small shots coming your way. Charging up the Flare spell will be crucial due to its big AoE properties after absorbing enemies into it.
Terra can briefly enter Trance mode with her EX Skill. It raises her attack, defense, and speed by a considerable amount.
Kefka Palazzo (Final Fantasy VI)

Role: Marksman
A good Kefka player is unpredictable and terrifying. Kefka excels at long range combat with a few annoying debuffs up his sleeve. He can charge his attacks by holding down the button like Cloud, though it alters his attack properties rather than a straight damage increase.
Catch airborne enemies with Blizzaga Blitz; a charged one will have it travel faster and longer. Plip-Plop Meteor can be a bit unwieldy to use, but it makes for an intimidating tool for zone denial. His Zigzag Firaga is an awesome move that has a chaotic travel pattern. A charged Snap-Crackle Thundaga does a ton of damage if all its shots connect. Meanwhile, Kefka’s Boom-Boom Ultima is an AoE that can be expanded when charged.
If you’re going up against more inexperienced enemies, you can fool them by spawning fake summoning cores with Core Decoy that’ll explode if they approach it. His Liftoff dashing attack may do no damage, but it’s oddly useful to get around swiftly.
Kefka’s Heartless Angel EX Skill is downright amazing if you can charge it up and hit foes with it. This massive AoE will put debuffs on any foe it hits and higher levels of it will stack on additional debuffs. A level 3 Heartless Angel will put as much as six debuffs on all enemies it hits, but if Kefka gets hit - say goodbye to those debuffs.
And for kicks, Kefka can use the touchpad to taunt if his summoning gauge isn’t full and it will increase his bravery value by a little bit per taunt.
Cloud Strife (Final Fantasy VII)
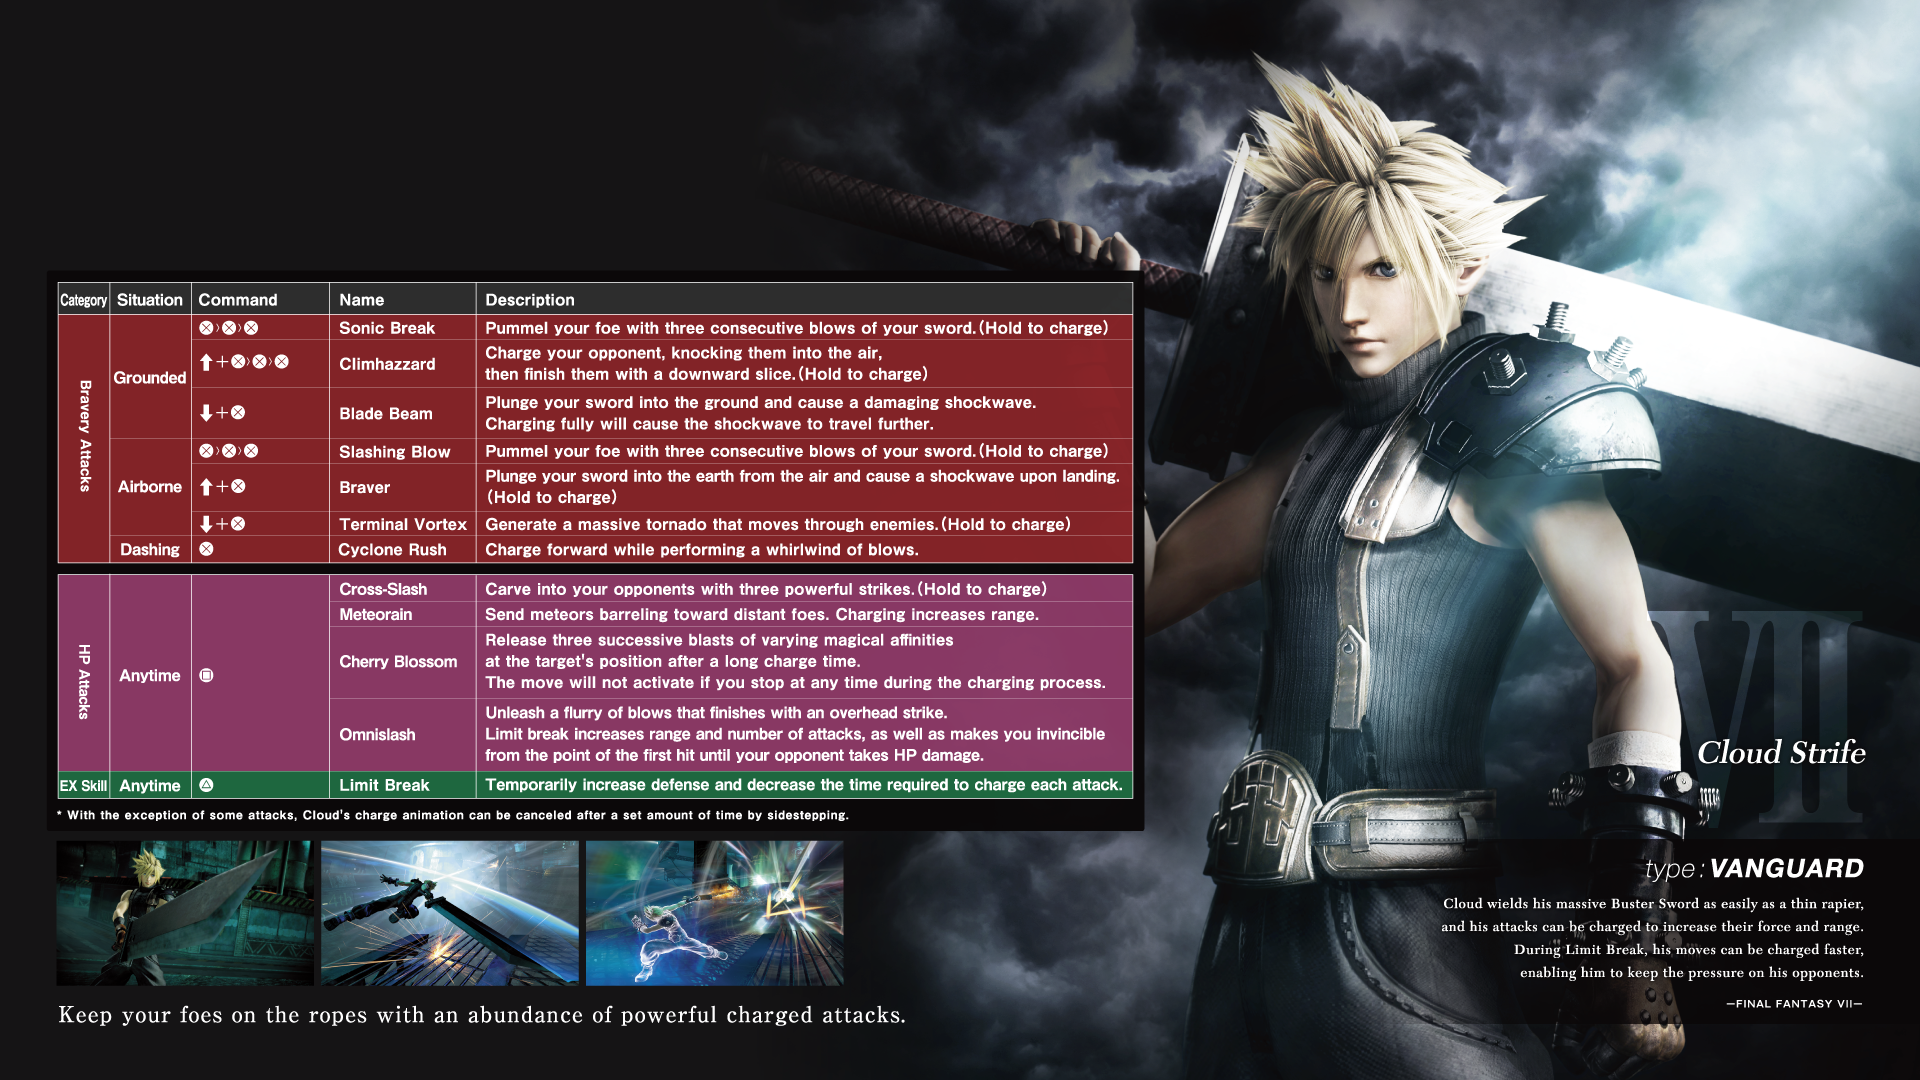
Role: Vanguard
Cloud brings the pain in Dissidia Final Fantasy NT. He is great at closing in on enemies when he’s in their vicinity thanks to his Charge ability. Charge allows him to power-up moves for increased damage, speed, and range which gives him ways to quickly approach and deal heavy damage. Keep in mind that a lot of his moves take a bit to start-up though.
Catch stray opponents with Sonic Break and Climhazzard if they’re on the ground. Slashing Blow can carry opponents in the air while a charged Braver can catch fleeing enemies by surprise.
His Limit Break EX Skill reduces charge time significantly to fire out powered-up attacks in quick succession.
Sephiroth (Final Fantasy VII)
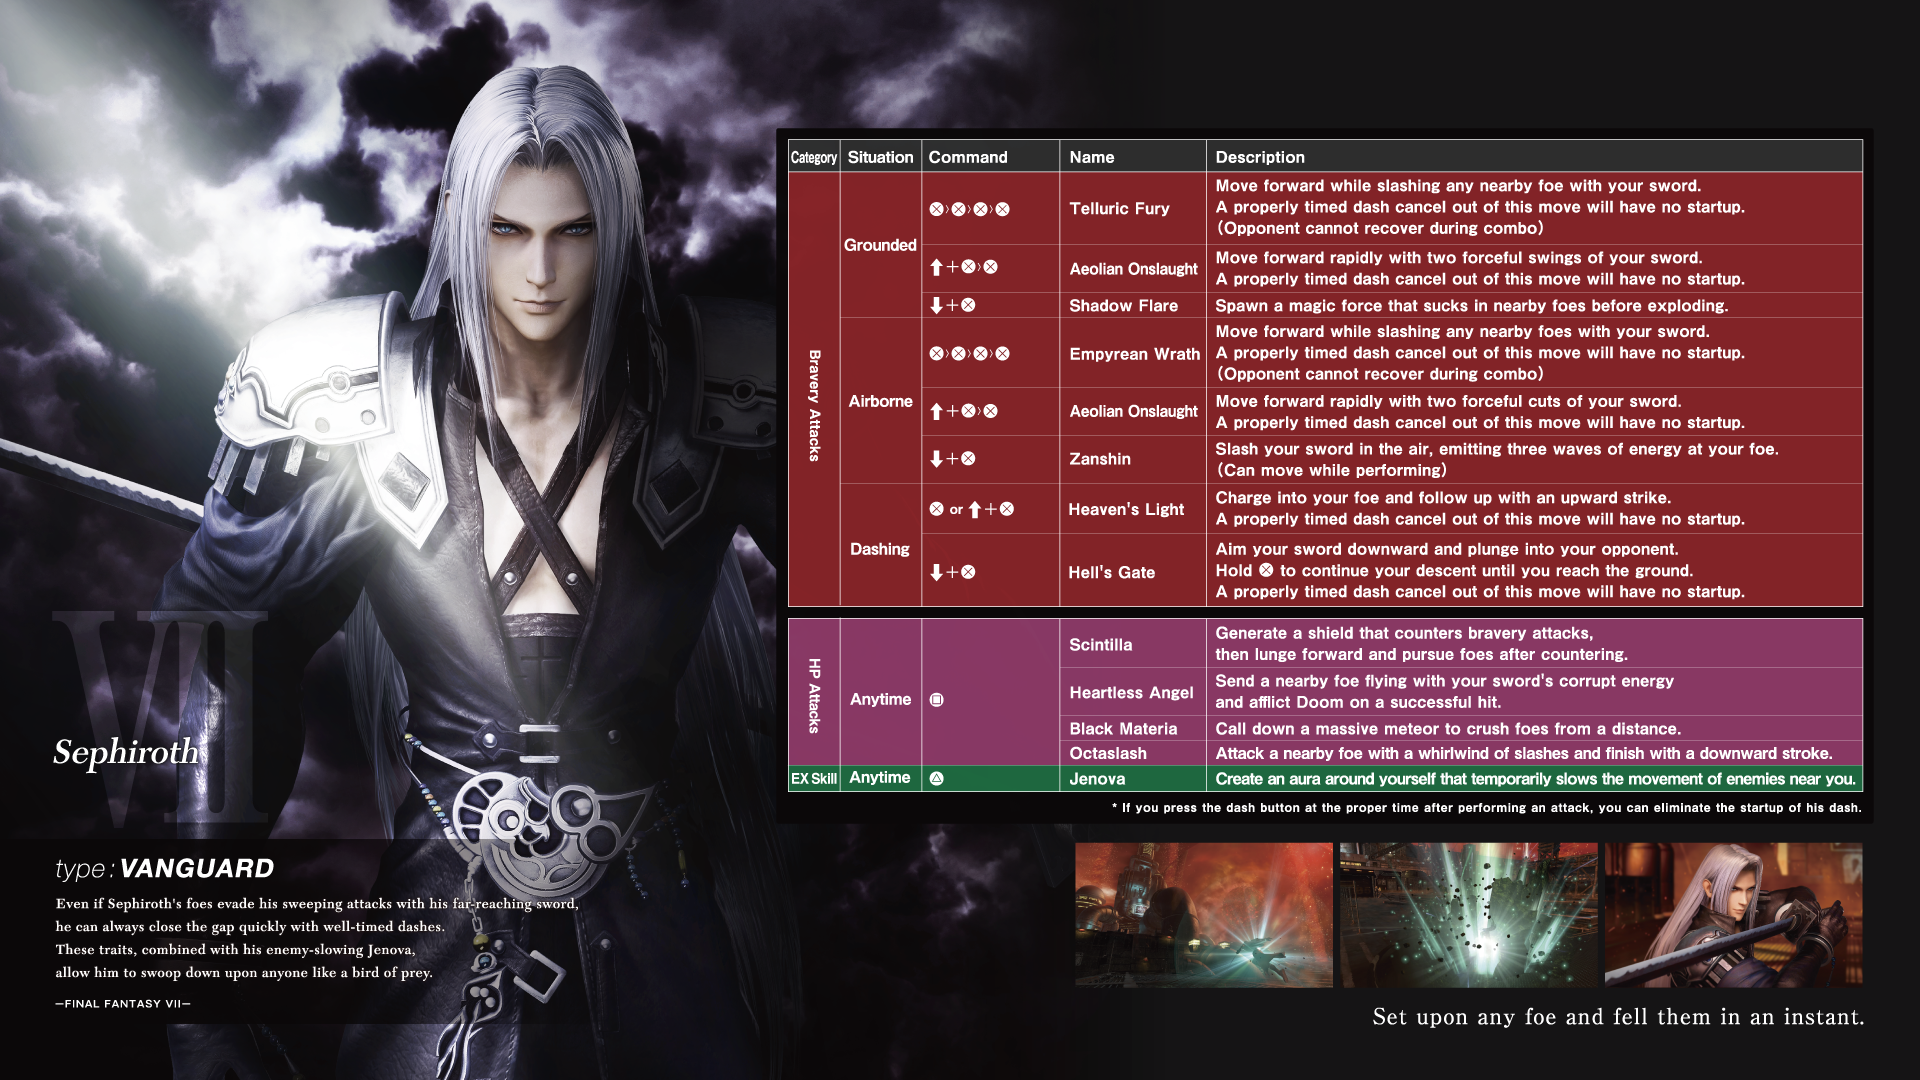
Role: Vanguard
If you’re the type of player that loves dealing high damage with a lot of hits, Sephiroth might be for you! Despite his slow movement speed, his attack range is quite ridiculous and once Sephiroth gets going, it really hurts. In order to get the most out of him, you’ll have to master his Dash Cancel mechanic.
Dashing at the right time after the last hit of a bravery attack cancels out the recovery frames of it. This allows Sephiroth to relentlessly continue his combo or he may just need to disengage immediately to safety. Sephiroth players who can dash cancel consistently and properly are certainly forces to be reckoned with.
Telluric Fury and Empyrean Wrath are excellent moves overall. They approaches foes quickly, have movement patterns that cover Sephiroth’s flanks, and push enemies back a considerable amount for easy follow-ups if they hit a wall. Aeolian Onslaught pushes Sephiroth forward to close gaps on unfortunate opponents that’re near Sephiroth. Zanshin is a good for poking from a distance. His iconic Hell’s Gate move has a small bit of AoE when he hits the ground with it.
Sephiroth’s Heartless Angel HP attack inflicts Doom if it connects. If the opponent is unable to hit Sephiroth to cancel Doom before the timer is up, all of their bravery will instantly be depleted and leave the character broken. However, Sephiroth won’t get the Break Bonus off of a successful Doom.
His EX Skill, Jenova, slows down nearby enemies for a limited amount of time.
Squall Leonhart (Final Fantasy VIII)
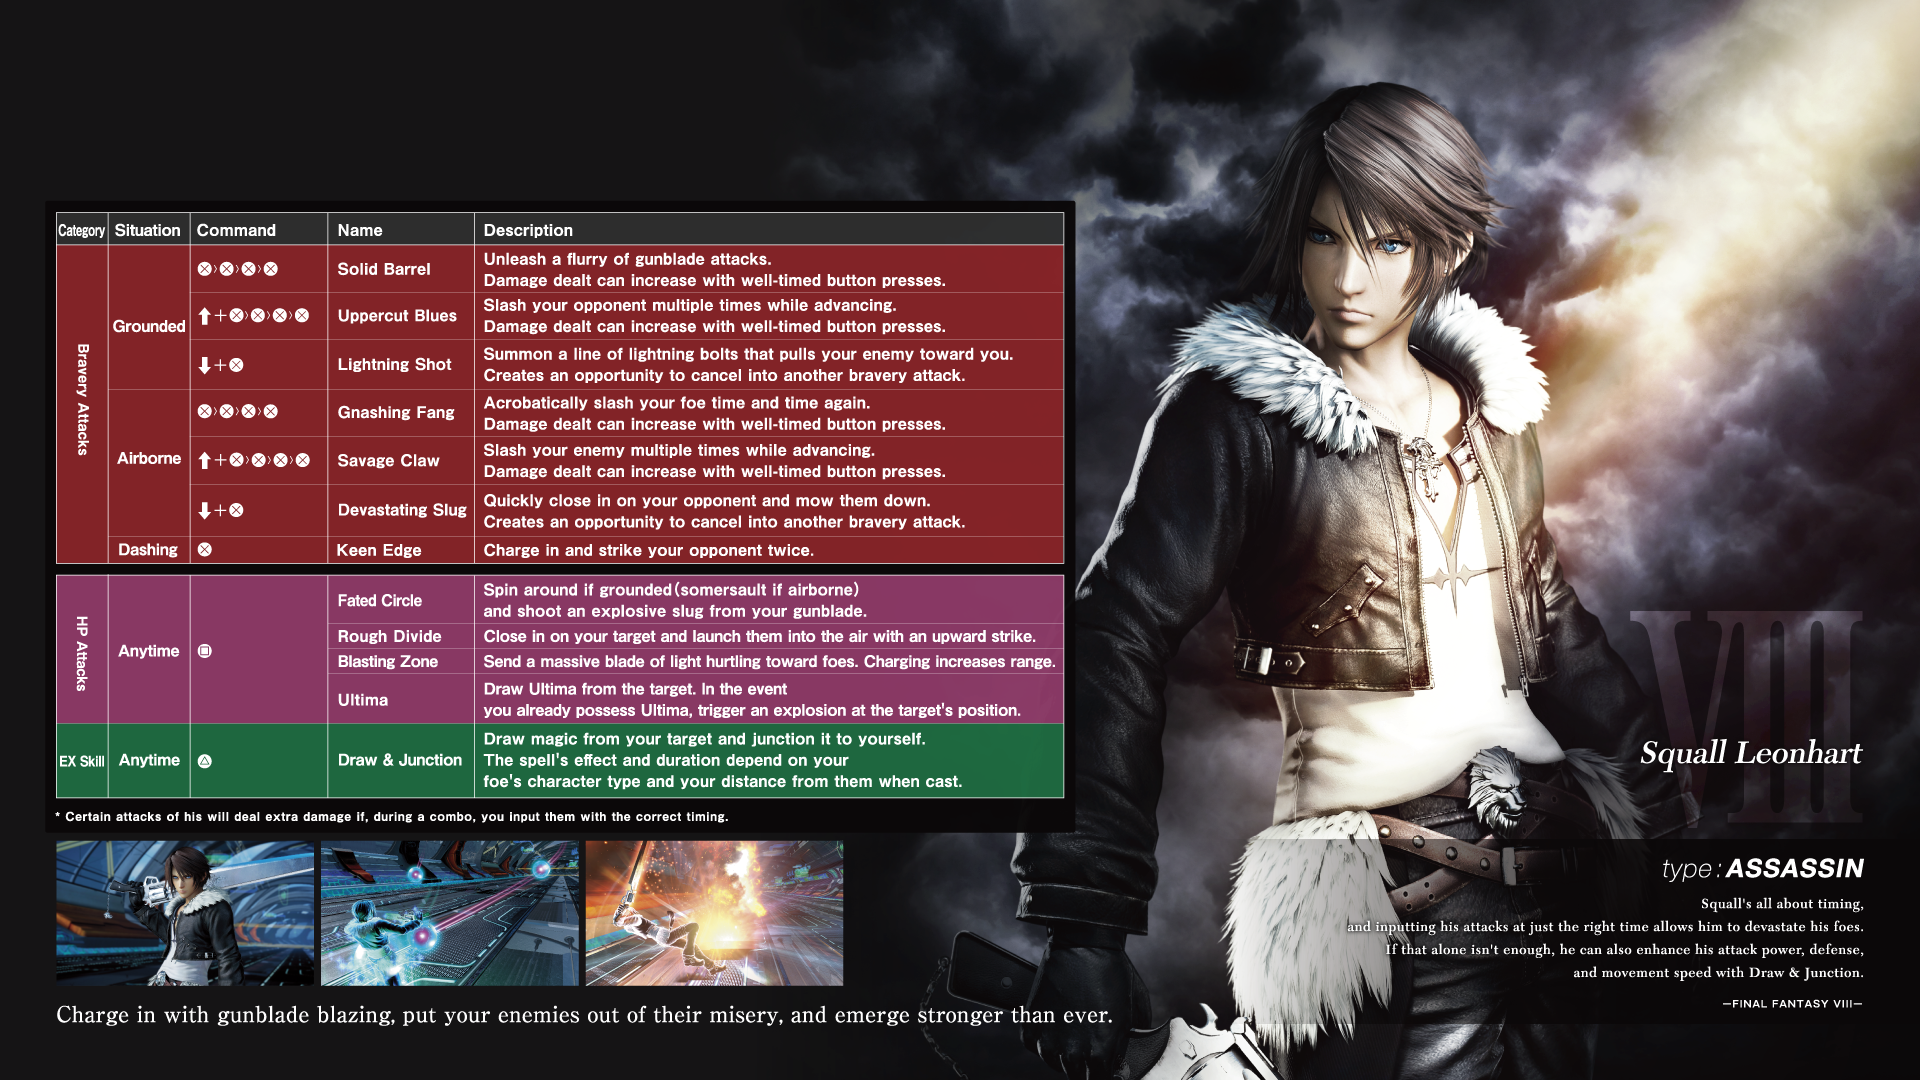
Role: Assassin
Squall is an absolute beast in close-range 1v1 scenarios. Thanks to his Gunblade, Squall is able to strengthen consecutive attacks by firing it right before hits connect. With fast attacks that chain into each other, he can break foes in no time. Players must learn and master his unique Gunblade mechanic to maximize his damage potential.
His Uppercut Blues combo chain ends in a hard knockdown, while Lightning Shot relatively long range sucks in opponents to get sliced up. Savage Claw will nail opponents in the air to nearby walls, which makes Gnashing Fang an ideal follow-up due to the amount of damages it deals. Devastating Slug is a quick way to approach opponents; if it connects, use Savage Claw or Gnashing Fang right after it.
Squall's EX Skill utilizes the Draw and Junction system from FFVIII in Dissidia Final Fantasy NT. He gains status buffs depending on the enemy class he draws from. Vanguards increase his defense, Assassins increase his speed, Marksmen increase his attack, and Specialists randomize what buff he draws and junctions.
Ultimecia (Final Fantasy VIII)
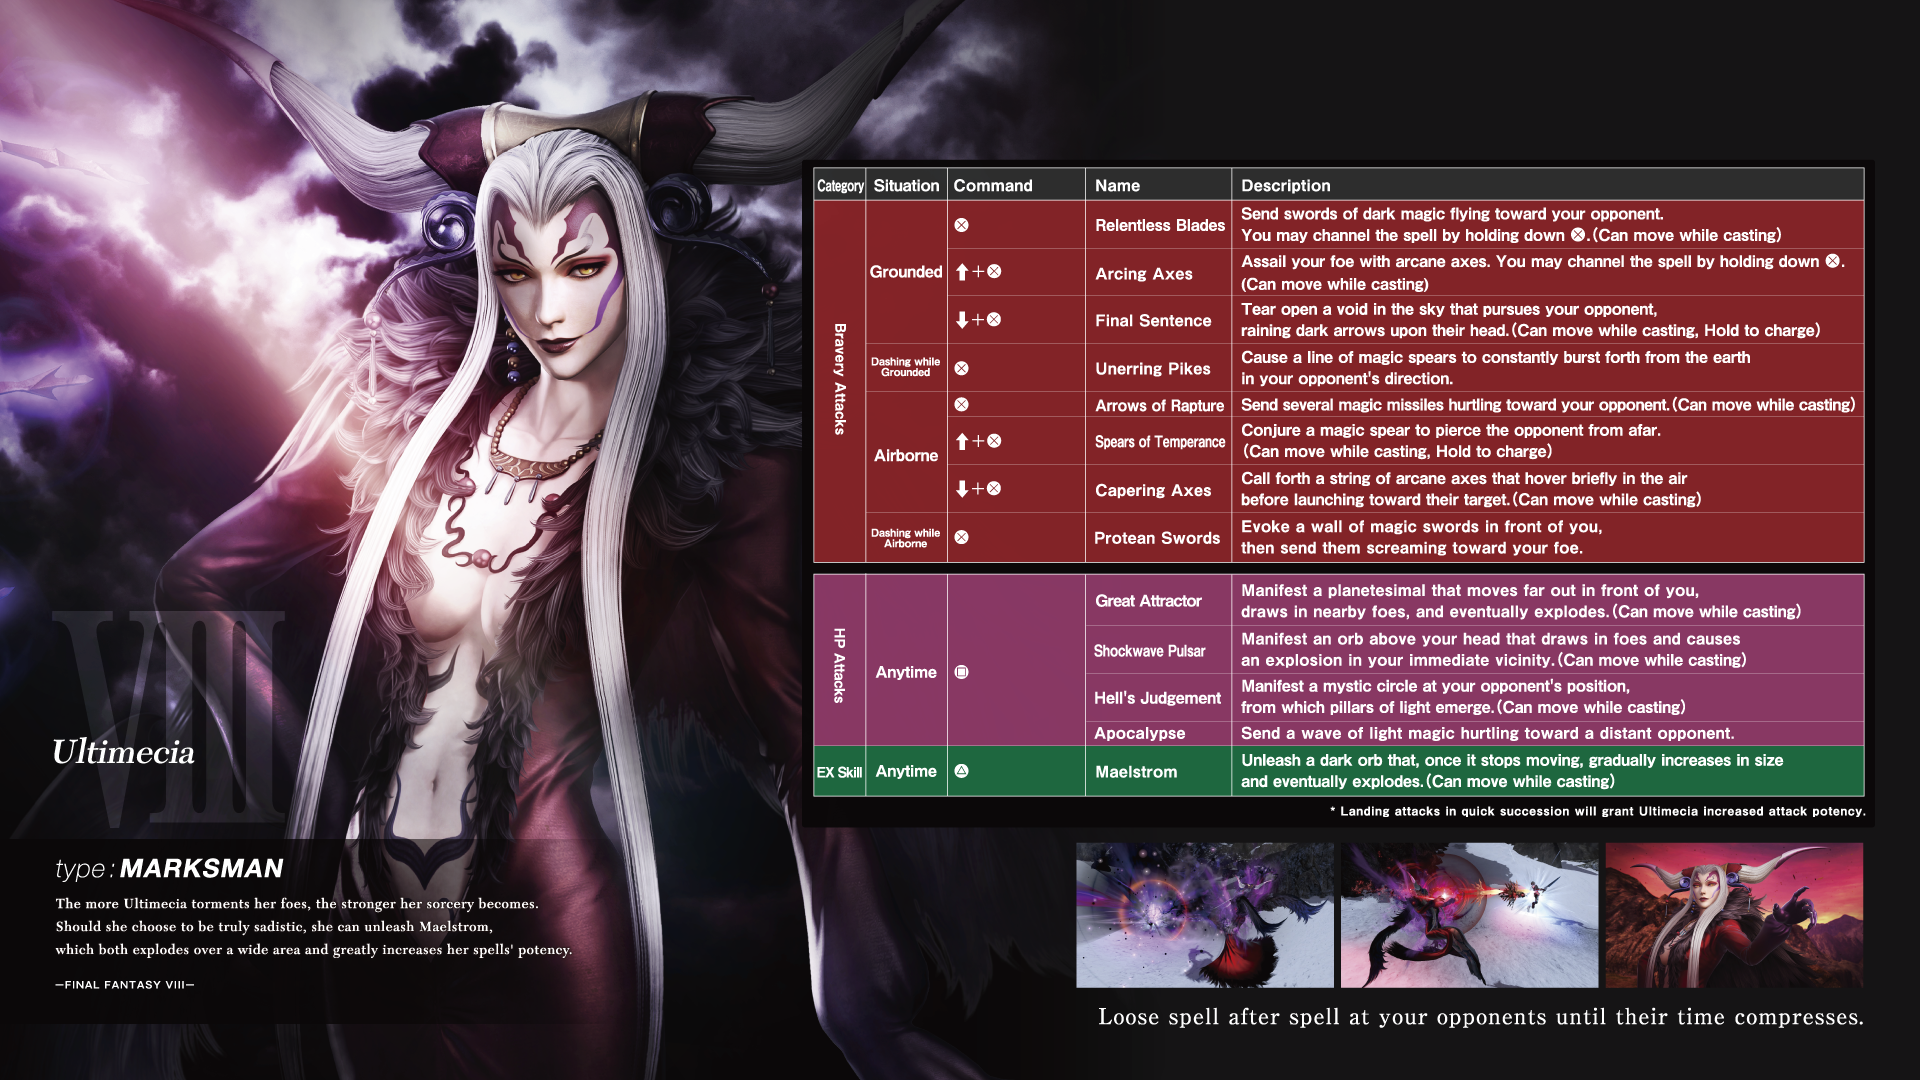
Role: Marksman
Ultimecia is a remarkable ranged attacker that will have opponents constantly dancing around to evade her attacks. Her Maleficium ability works similarly to Garland’s Deranged Soul; successful consecutive attacks give her a buff that enhances her moves even further with increased damage. Even if the opponent guards an attack from Ultimecia, it’ll still count as a hit to build up her Maleficium buff.
Holding the button down for many of her bravery attacks will either extend their duration or delay their execution to improve their damage output.
Relentless Blades, Arcing Axes, Arrows of Rapture, and Capering Axes can be held down to fire off more of them. Sears of Temperance and Final Sentence, on the other hand, can be held back to cast enhanced versions of them. All of her bravery attacks aside from the Unerring Pikes and Protean Swords dash attacks can be fired off while Ultimecia is moving.
Ultimecia’s Maelstrom EX Skill fires out a dark orb projectile that rapidly gets bigger, stuns enemies in place, and explodes to deal HP damage. The higher Ultimecia’s Maleficium level is, the more devastating it becomes as it becomes even more massive, keeps enemies at one spot longer, and deals a ton of damage before eviscerating the health of unlucky opponents.
Zidane Tribal (Final Fantasy IX)
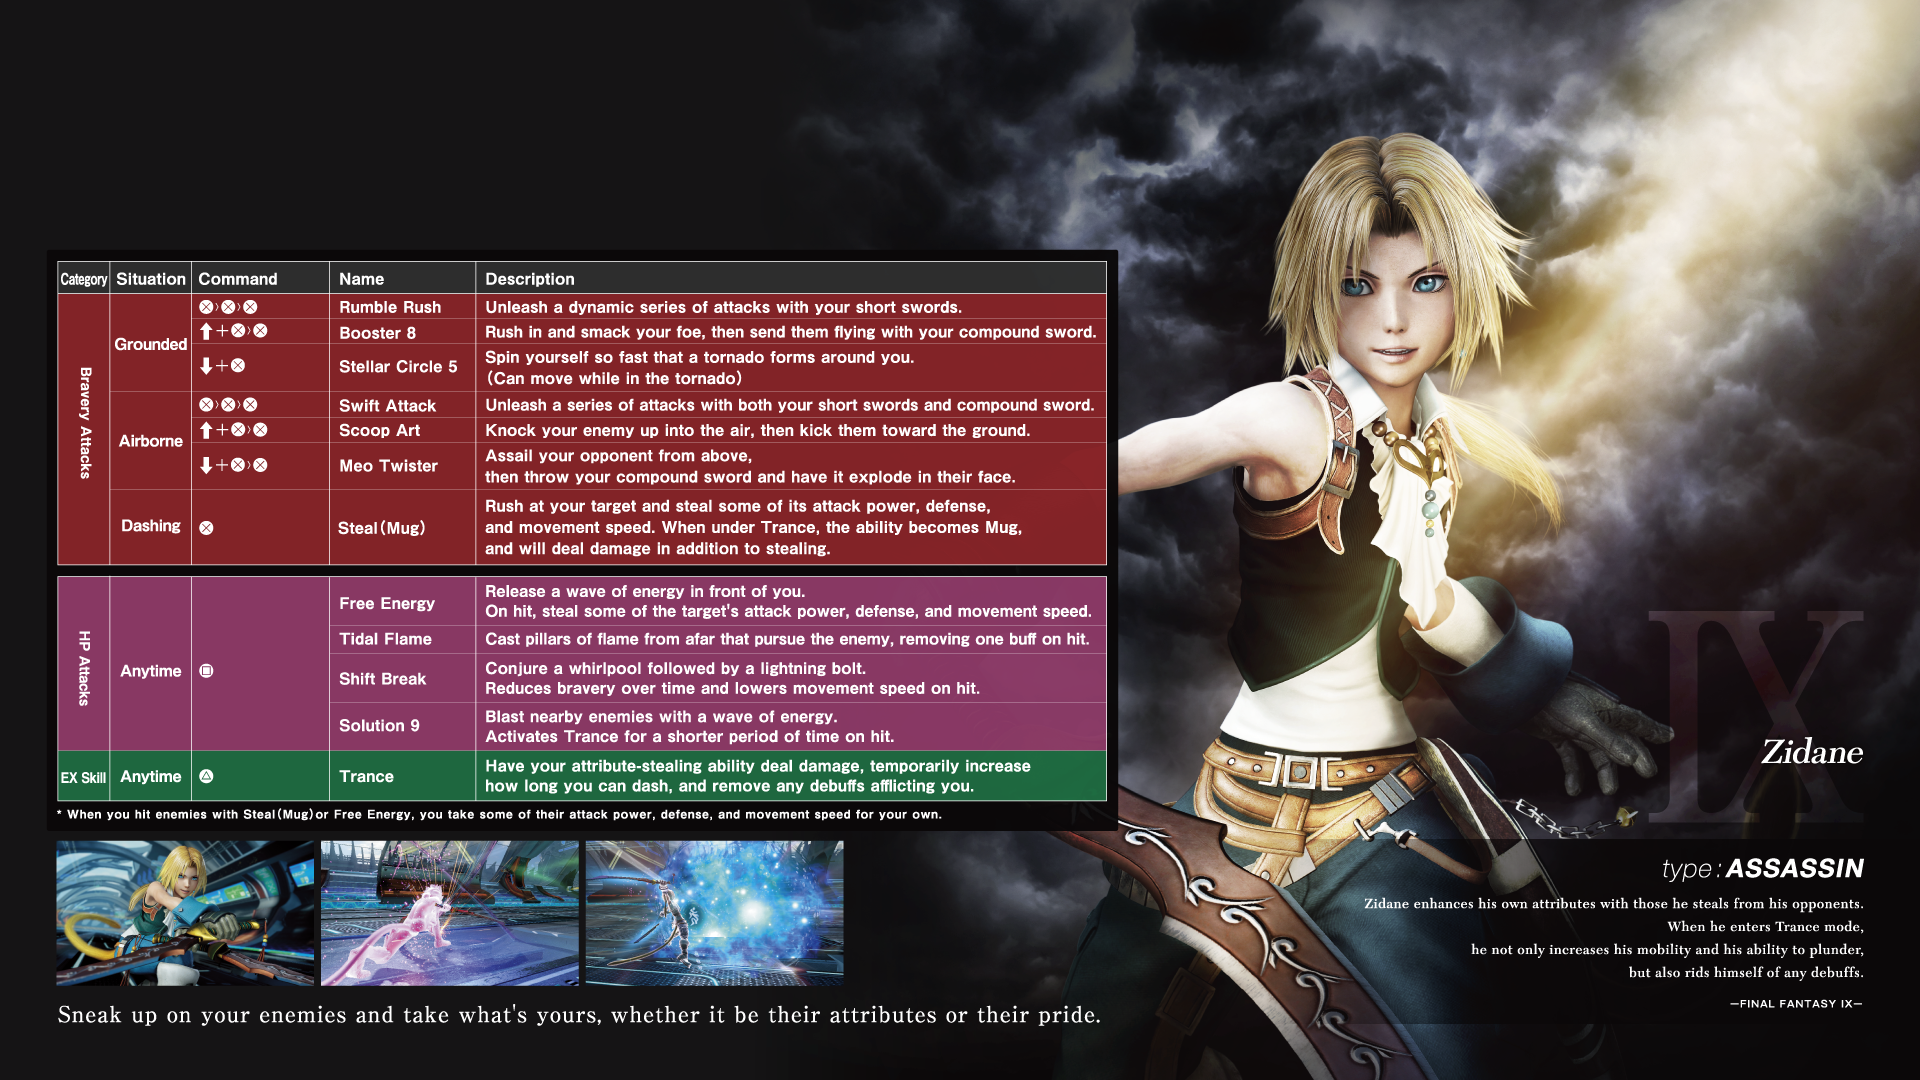
Role: Assassin
Zidane’s primary tactic revolves around a hit-and-run approach. He’s particularly good in the air with swift combos. Plus, Zidane can also debuff enemies as he attacks them. His daggers don’t have the best range, so make sure to stay close to your opponents as much as you can.
Being a cunning thief, Zidane can Steal from opponents through his dash attack or some of his HP ones. He doesn’t swipe an item; instead, he takes away some of the opponent’s speed, defense, and attack power.
Close in on opponents instantly with Booster 8. If you’re right by a summoning core, Stellar Circle 5’s multiple hits can make quick work of it. His Scoop Art attack comes out fast and pushes enemies back to the ground.
His EX Skill allows him to enter Trance for a limited time. It makes him even harder to catch by extending his dash meter and removes any debuffs to nearby allies. Most importantly, it turns Zidane’s Steal ability into Mug, so that attack can now deal damage on top of debuffing.
Kuja (Final Fantasy IX)
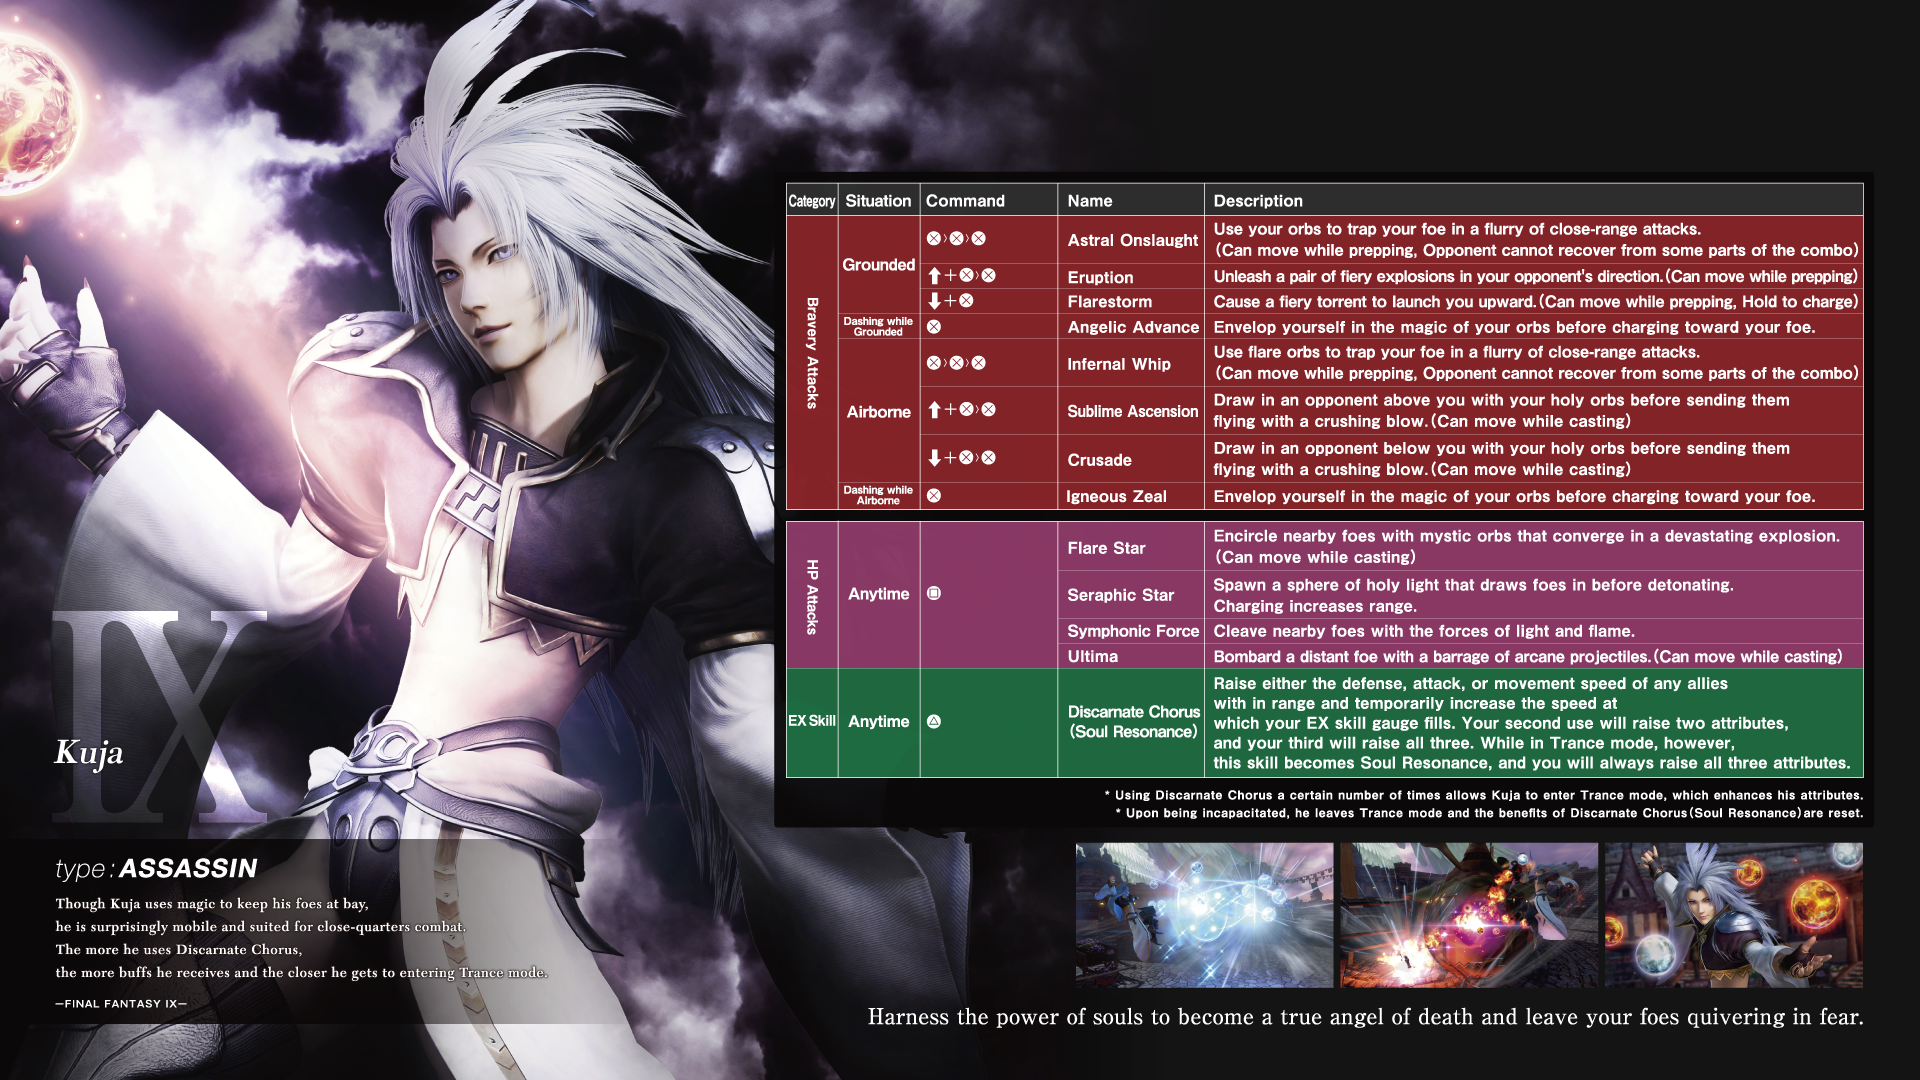
Role: Assassin
Kuja is the only Assassin in the game that relies on magical attacks which him a fairly interesting character to try out. He’s very quick at dishing out attacks, but most of his game plan requires him to be up- lose despite his magical arsenal. Several of his attacks let him still maintain movement as he prepares them; this allows more tactical players to adjust the angle they want to knockback their enemies or position themselves properly for the next combo on the fly.
Astral Onslaught and Infernal Whip can get some random swift hits in though be aware that has no knockback at the end of it. Thankfully, Eruption, Crusade, and Sublime Ascension does. Flarestorm is a bit of an odd move to properly hit with, but it is useful as a way to quickly ascend with Kuja; hold it down to jump further. Beware that Kuja’s dash attacks, Angelic Advance and Igneous Zeal, don’t allow him to freely move as they’re used.
The tricky part about Kuja lies in his EX Skill, Discarnate Chorus. Activating it the first time will provide either an attack, defense, or movement speed buff to allies within range. Additionally, it’ll increase the rate Kuja’s unique EX Skill gauge fills up to activate it a second time.
Using Kuja’s EX Skill a second will give two different (and more potent) buffs to nearby allies now along with the unique EX Skill cooldown reduction again.
Third time’s the charm, right? Unleashing Discarnate Chorus a third time grants all three buffs to attack, defense, and movement speed to all allies hit with it. His third Discarnate Chorus also finally puts Kuja into a permanent Trance mode unless he’s eliminated. This’ll give him a big increase in his movement speed - both normally and when attacking. But this isn’t the end of the line for Kuja’s EX Skill though; he’ll be getting another quick cooldown to use it one more time.
Any EX Skill when in Trance is now the special Soul Resonance EX Skill that gives massive buffs to all your allies within its range. This also comes with the unique EX Skill cooldown reduction so if you managed to live this long with Kuja and the match isn’t over yet, you and your team can reap the benefits in a big way. If Kuja dies at any time during this whole thing, he has to start over from square one.
Tidus (Final Fantasy X)
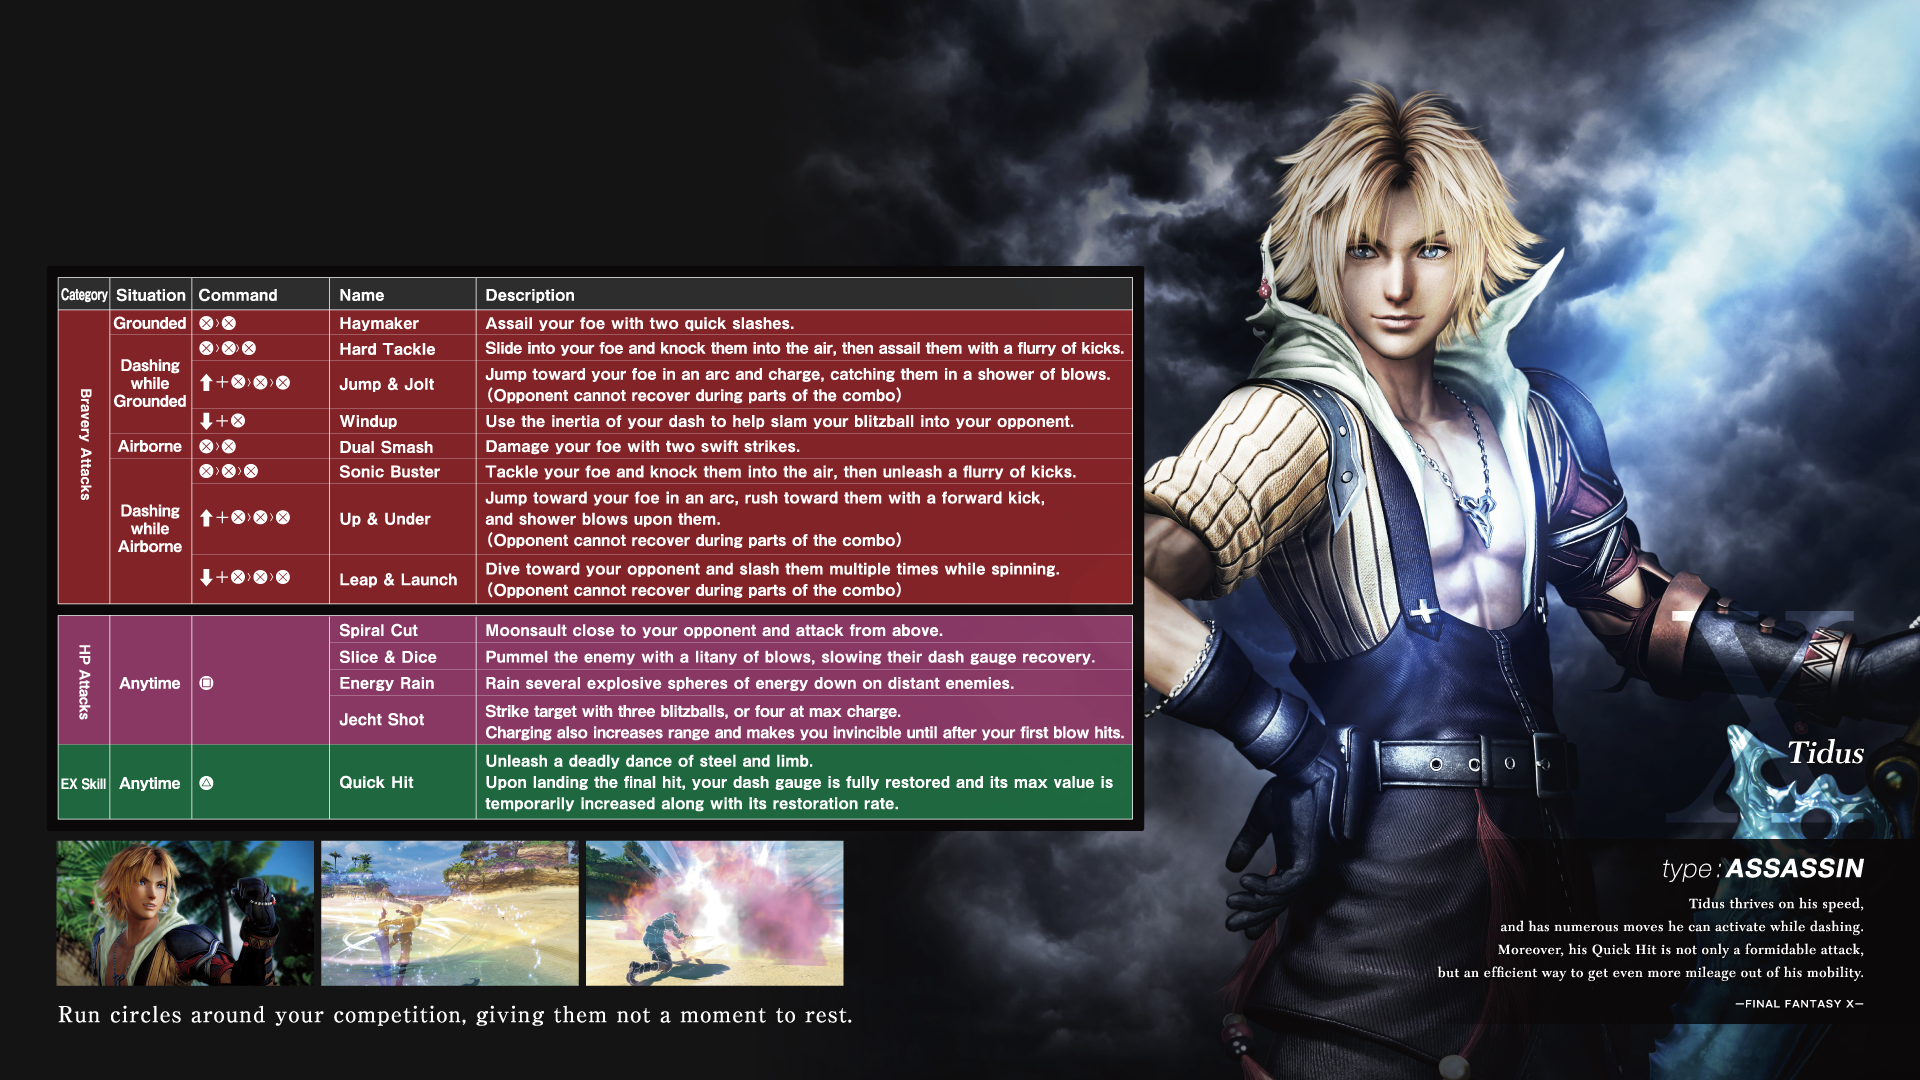
Role: Assassin
Tidus is one of the most mobile characters in Dissidia. His special dash lets you attack swifty no matter if your enemy is on the ground or in midair. Watch your dash meter with Tidus; if he can’t dash, he can’t effectively strike foes. That’s because Tidus is the only character in Dissidia with a unique multiple dash mechanic! While most characters only have one dash attack, he has a whopping six of them! When he’s dashing around, Tidus can immediately ascend or descend into multiple attacks.
His Hard Tackle can knock other characters off their feet as he launches them into the air as they fall. If you’re in need of an overhead approach, utilize his Jump & Jolt. Slice and dice airborne targets with his versatile Sonic Buster.
Maximize Tidus’s potential with his Quick Hit EX Skill; it’ll fully recover his dash gauge. Quick Hit will also increase your overall dash bar and how fast it recovers for a limited amount of time.
Jecht (Final Fantasy X)
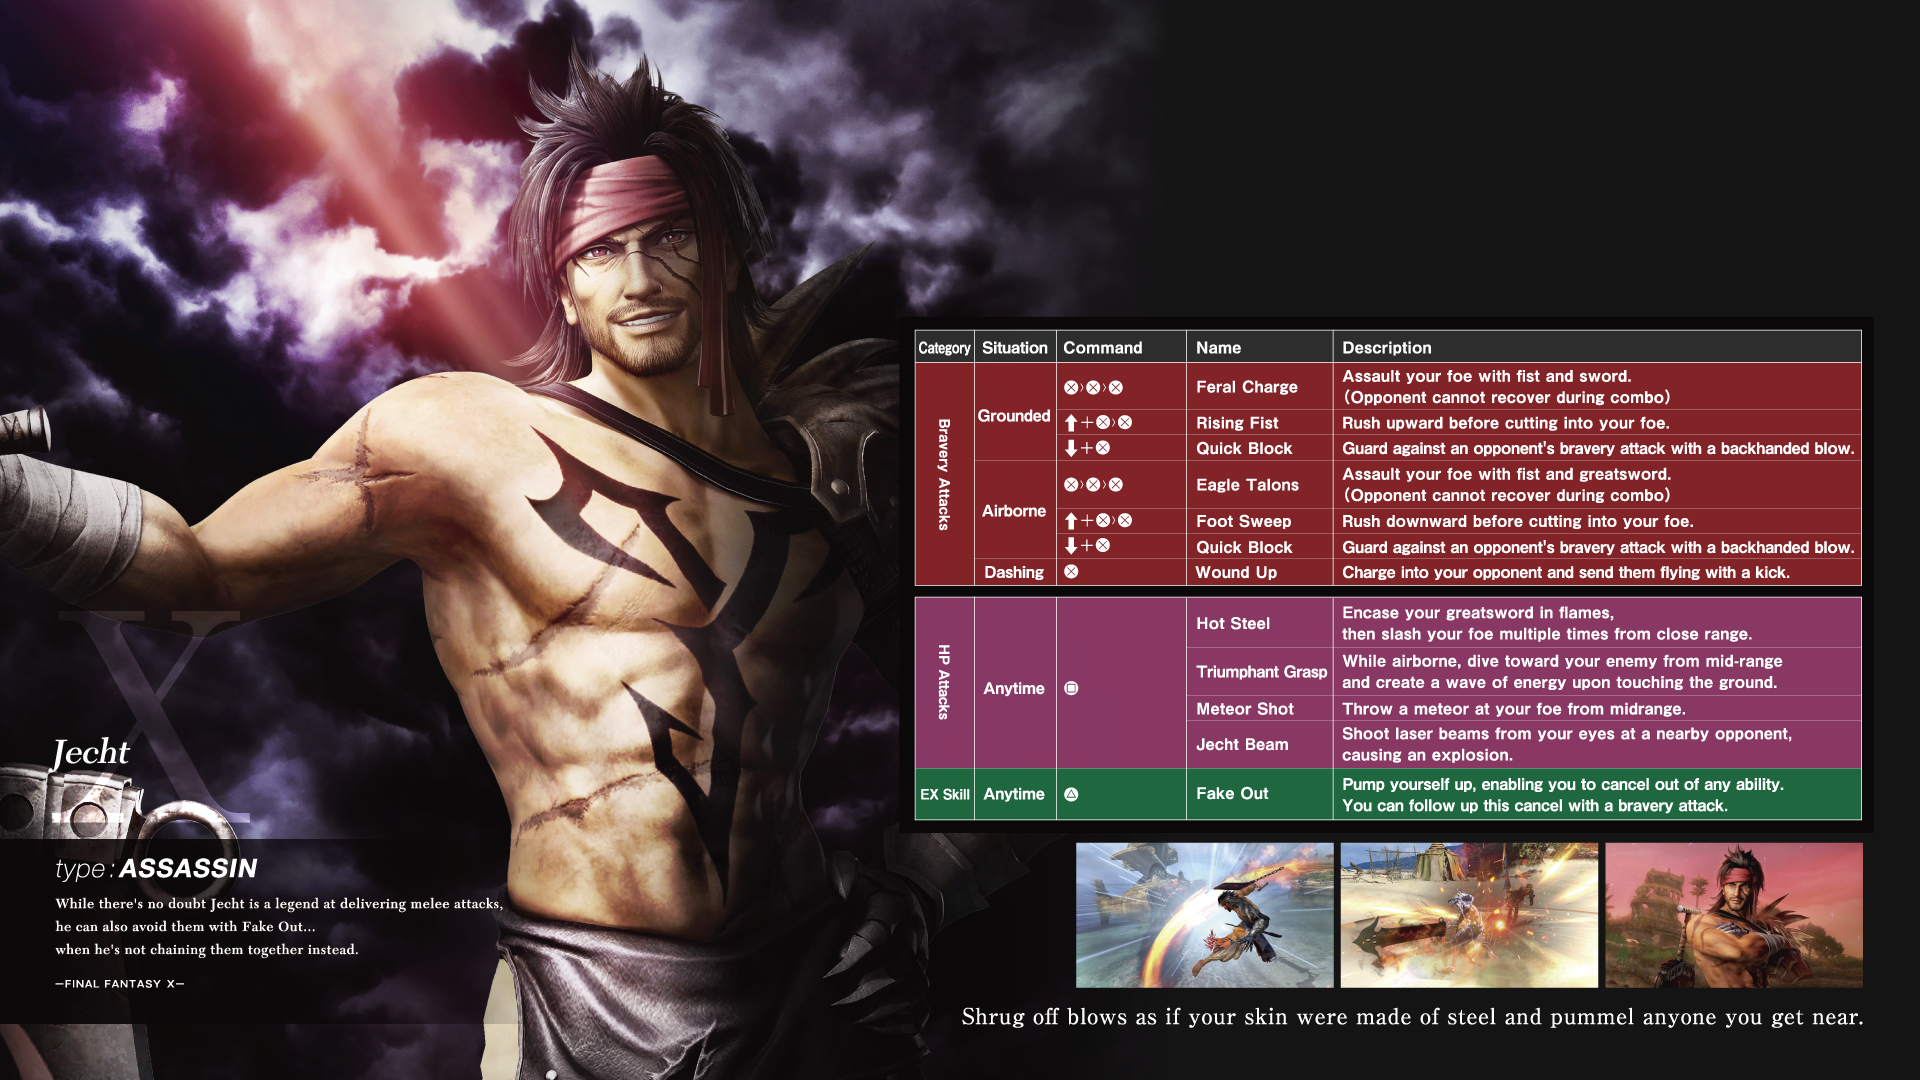
Role: Assassin
Jecht likes to get up, close, and personal on his opponents. Those who use melee attacks against good Jecht players will have a hard time dealing with him by themselves. He strikes fast, but his entire moveset relies on him always being near.
Eagle Talons is one of his easier moves to fall back on; it’s a fairly standard melee string that Jecht can combo after if his enemy hits the wall. Rising Fist and Foot Sweep both travel diagonally up and down respectively to get the jump on unsuspecting enemies from unconventional angles. His Wound Up dashing attack has some super armor properties.
The reason melee-oriented characters in Dissidia should fear Jecht is his Quick Block maneuver. If a melee attack hits Jecht during it, he’ll stun the unfortunate attacker and is free to do whatever he wants from then on.
Jecht’s Fake Out EX Skill allows him to cancel out of anything instantaneously and immediately follow it up with a bravery attack, dodge, or guard. As you can imagine, this is immensely helpful in executing combos that aren’t normally possible. This also has a few unconventional uses, such as nullifying the recovery animation when using common EX Skills or disengaging immediately after a whiffed HP attack.
Shantotto (Final Fantasy XI)
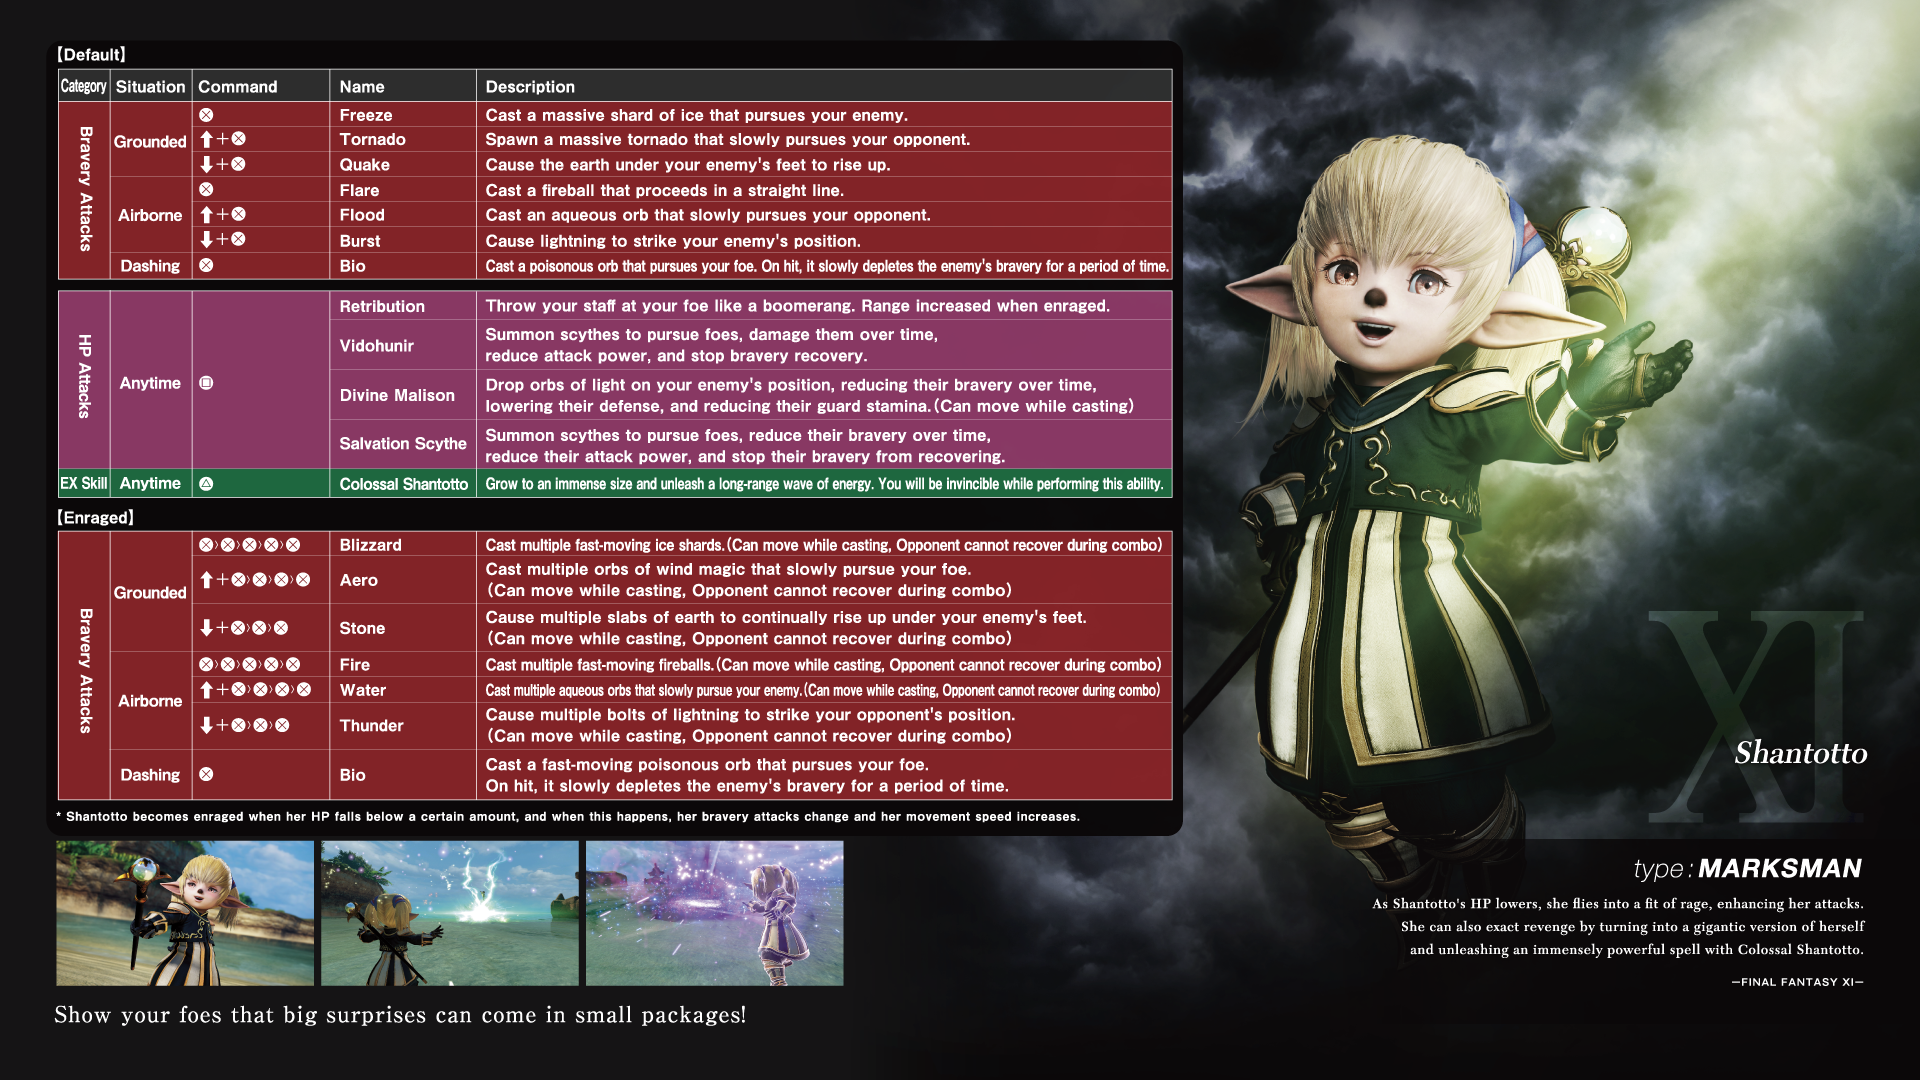
Role: Marksman
Shantotto is long range mage with two distinct modes.Normally, she’ll cast huge powerful spells but if she gets below 2500 HP, little Shantotto will get into her Enraged mode and begin to spew out weaker spells at a higher rate. Her moveset is filled to the brim with AoEs, so enemies will have to pay attention to where her spells are or suffer dearly. It’s imperative that Shantotto maintains her distance though, especially because she can’t manually switch between her attack modes.
All of her spells in normal mode are generally pretty good. They hit hard and cover a lot of ground. Tornado is excellent at fending off opponents nearby. A normal mode Quake can only hit foes on the ground, but the area it hits is absolutely massive. Flare can go through enemies so it can hit multiple times. Meanwhile, Flood in normal mode summons a huge water sphere that slowly follows an enemy; it lasts a long while which makes it tricky to go up against.
Even though Shantotto’s magic is smaller when she’s Enraged, they still hurt! Blizzard fires off multiple projectiles that can combo into each other. Aero fires off four shots that tracks foes. Quake downgrades into Stone and even though it loses its huge AoE, it makes up for it in damage. Fire and Blizzard may lose their unique higher-grade properties from Flare and Flood, but still sting too.
Shantotto’s EX Skill turns her into a giant for a split second! Colossal Shantotto fires off a devastating wave attack that and she’s invincible when casting it.
Vaan (Final Fantasy XII)
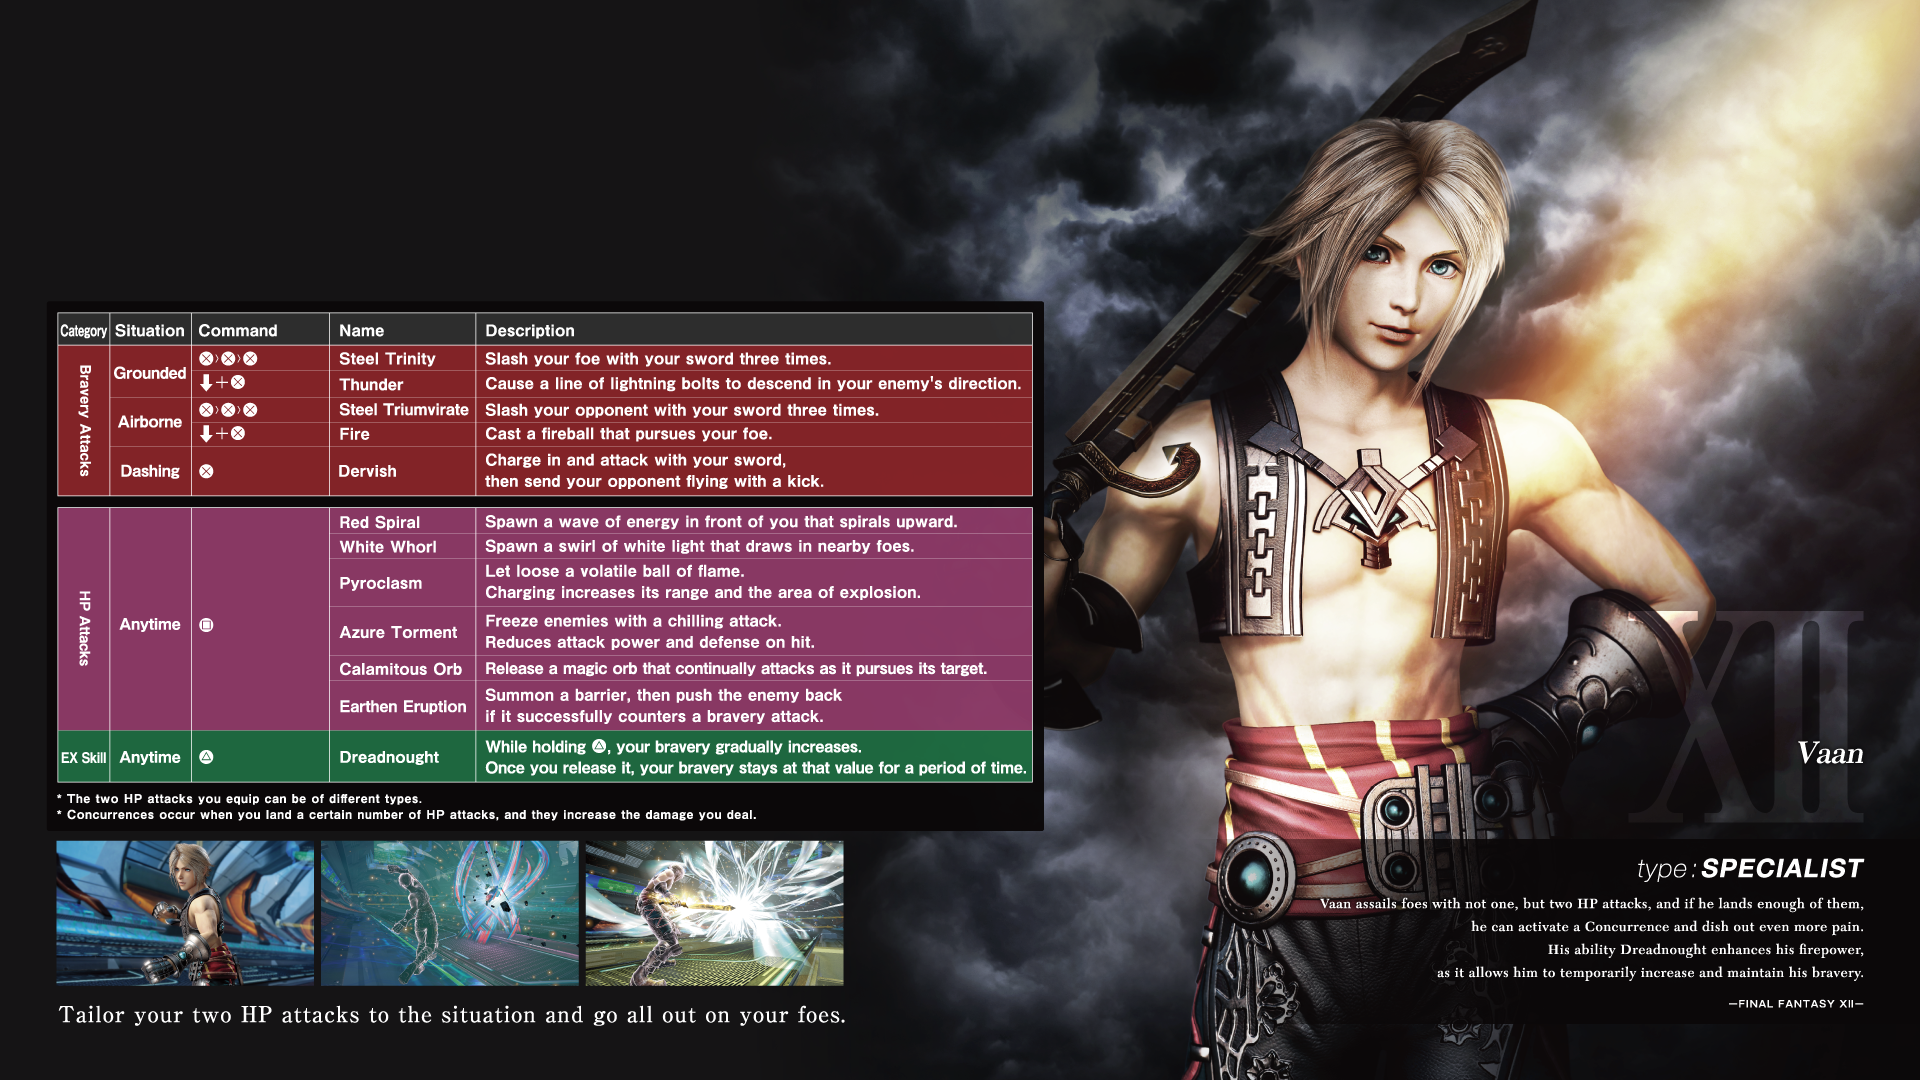
Role: Specialist
Vaan, oddly enough, is the only character in Dissidia that is heavily designed around constant HP attack usage. His bravery attacks are lackluster and he’ll find himself at the risk of being Broken constantly, but he’ll make short work of opponents when it counts. Characters are normally able to choose a single HP attack before battle, but Vaan can equip up to two at the cost of fewer bravery attacks.
Vaan’s unique Quickening mechanic enhances his HP attack-focused strategy. If he hits enemies with a HP attack twice, then his following HP attacks will be followed up with the Luminescence attack automatically. This adds a bit more oomph to your HP attacks. Now if you hit an enemy with a HP attack a grand total of five times, he’ll gain the Black Hole will replace Luminescence and do an outstanding amount of HP damage! If Vaan dies in battle though, his Quickening count will reset and you’ll have to land all those HP attacks again.
To start hitting your crucial HP attacks consistently, have Vaan cast Thunder from mid-range to knock enemies into the air. Then follow up with Steel Triumvirate or Dervish into a HP attack. If you want to get some good hits in from a distance, cast a few Fire spells.
His Dreadnought EX Skill holds him still, but allows Vaan to briefly charge up his bravery amount slowly. If he’s caught by an enemy attack, worry not - Dreadnought freezes your bravery in place for a few seconds as well. Although he can’t increase (or decrease) his bravery when it’s frozen, it also allows him to use HP attacks without it going down. Go nuts.
Lightning (Final Fantasy XIII)
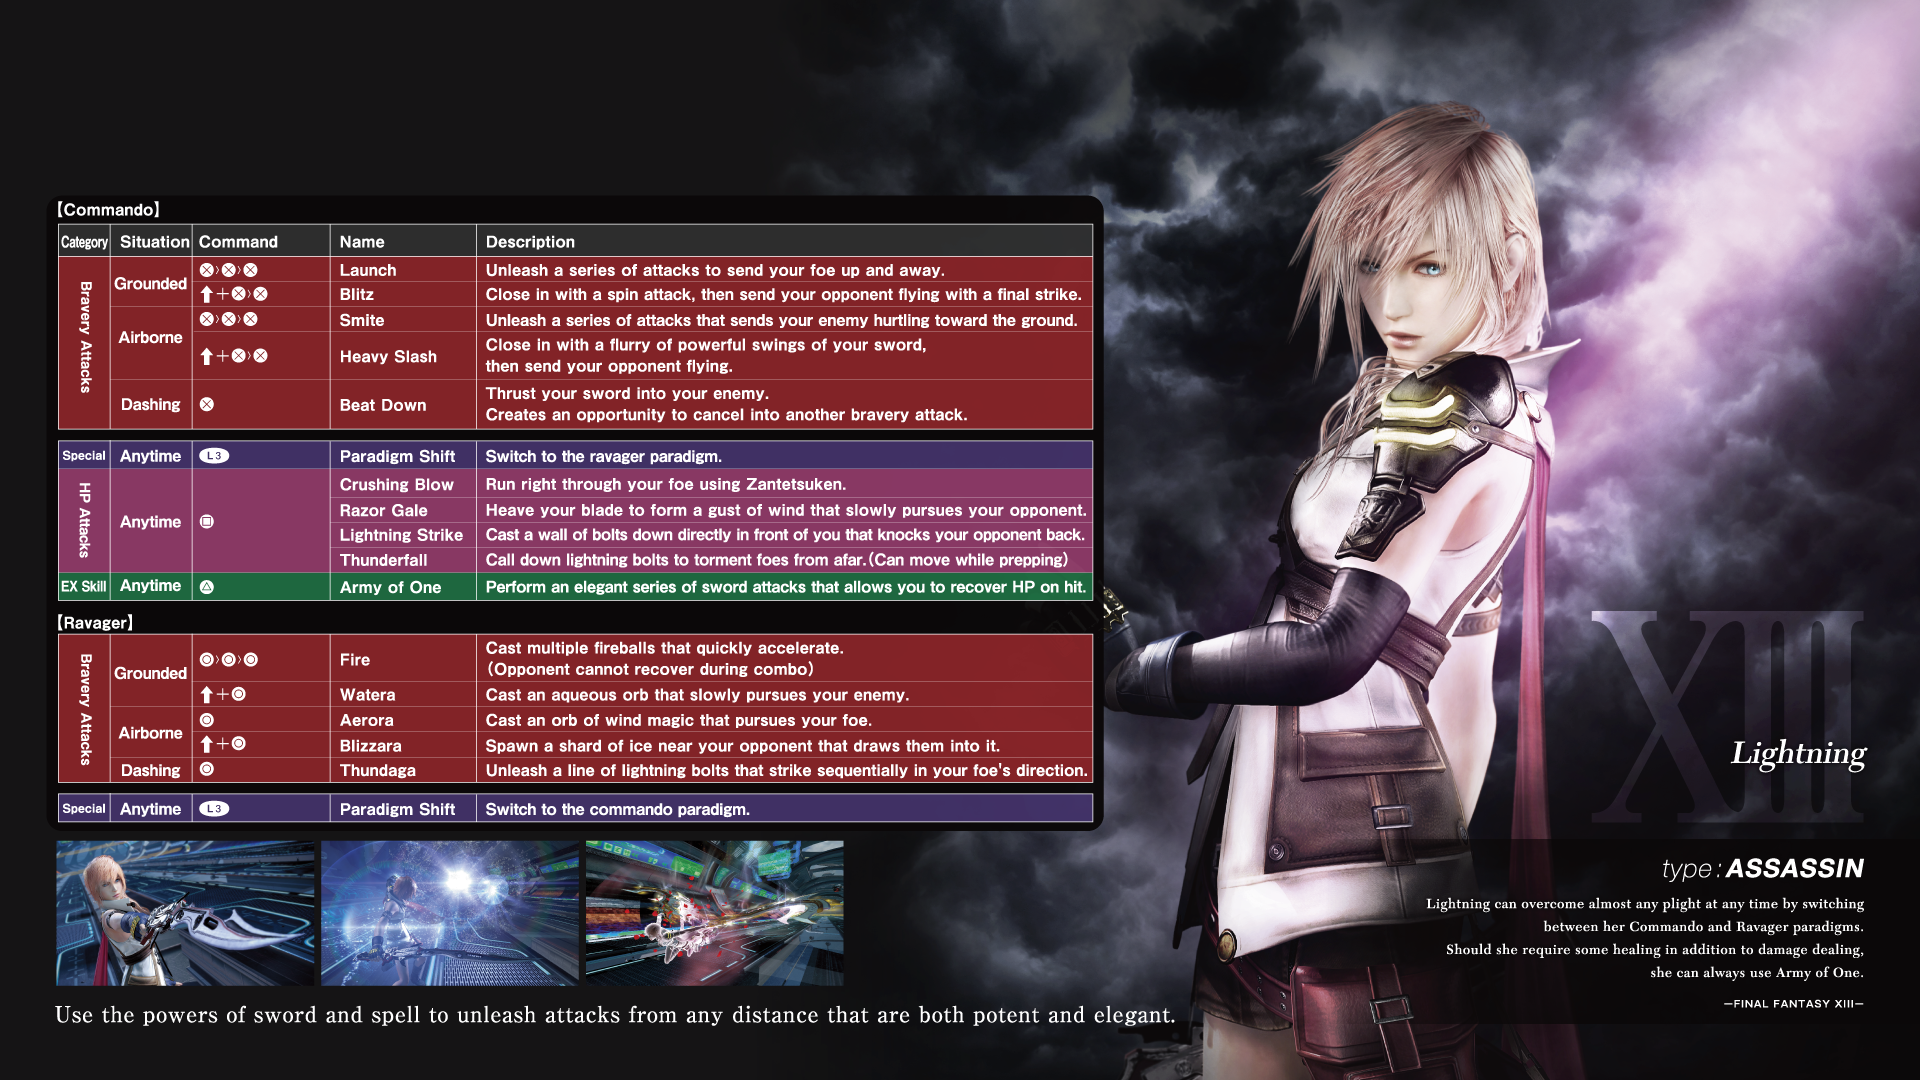
Role: Assassin
Lightning carries multiple roles in battle thanks to her Paradigm Shift mechanic; she can freely switch between the Commando and Ravager roles from FFXIII. Thus, Lightning is actually a strange mix between an Assassin and Marksman thanks to this. Though she’s a jack of all trades and master of none, she’s a versatile character that can adapt to any situation.
Her Commando role can dish out damage, but her attack range is relatively on the low end. Fish for a Beat Down hit confirm to start your combos in Commando. Heavy Slash is decent at extending them.
Meanwhile, Lightning’s Ravager role has many kinds of projectile attacks though their damage leaves much to be desired. Fire shoots out several fireballs to help cover your approach. Aerora keeps the enemy in place with multiple hits, which gives you time to switch to Commando and finish them with a melee string.
The Army of One unique EX Skill is lengthy combo attack that heals you every time the attack hits.
Y’shtola (Final Fantasy XIV: A Realm Reborn)
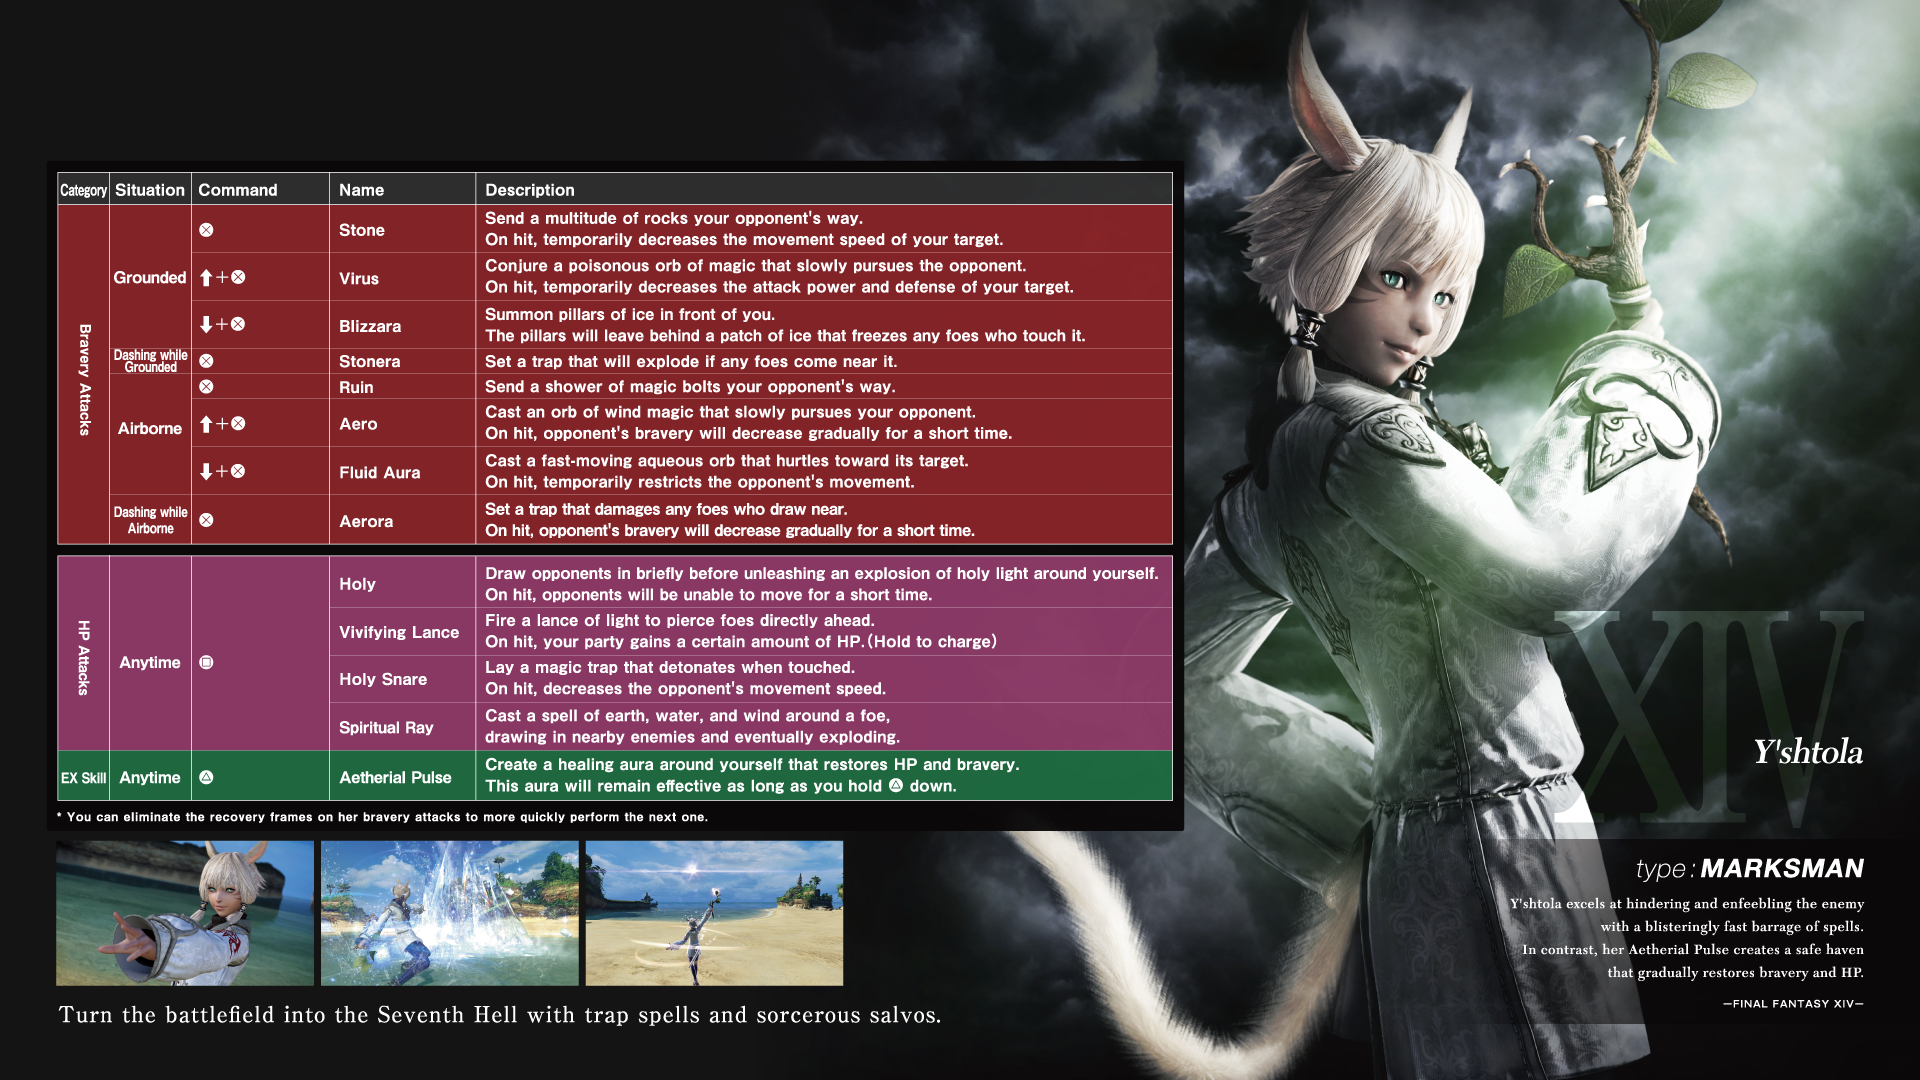
Role: Marksman
Y’shtola takes up a support role thanks to her Conjurer-based moveset. Her main goal in battle is making the enemy team miserable with an array of traps, debuffs, and spells that steer them into a disadvantageous position. Of course, Y’shtola can also support her allies by healing their bravery and HP. She’s not great at defending herself, so it’s up to your team to save you from a sticky situation.
Hit foes with Stone to slow them down! Inflict them with Virus to decrease their attack and defense! If they get too close for comfort, Blizzara will freeze them in place! An Aero to their face starts ticking their bravery down too!
Set up a few Stonera and Aerora traps if enemies are near you. Opponents that collide into a Stonera will be easy targets for your allies to get in and cause pain.
Heal your teammates and pump up their bravery with Y’shtola’s Aetherial Pulse EX Skill.
Noctis Lucis Caelum (Final Fantasy XV)

Role: Assassin
The Crown Prince of Lucis himself descends upon Dissidia Final Fantasy NT with a terrifying array of tools at his disposal. Marksmen in particular should be wary of Noctis because his Warp EX Skill allows him to teleport up to three times in quick succession making him a slippery enemy to lock down. He can Warp at different distances depending on how long he charges before throwing his weapon to teleport - all while being able to choose different directions to warp to. If he immediately follows up into a bravery attack as soon as he emerges from a Warp, he can decrease its cooldown significantly.
His signature Armiger ability summons all of his trusty Royal Arms when his HP falls under a certain amount. Though it’s a bit risky to get, they’re an immense help since they add additional hits to his bravery attacks and thus, more damage.
Reckless Abandon is a solid move to close the gap on foes if you find you and your target on the ground. Cumbersome Swing is a nice anti-air swipe that’ll whack incoming foes if they try to get too close to Noctis.
Aerial Assault comes out very fast, but the distance it travels is unimpressive. Use Warp to make up for this. If you feel that the Warp still isn’t close enough for an Aerial Assault, consider closing in with Noble Charge instead. Heavy Hand brings Noctis back to the ground, so Warp up right before using it makes that movement pattern quite tricky to deal with.
Ramza Beoulve (Final Fantasy Tactics)
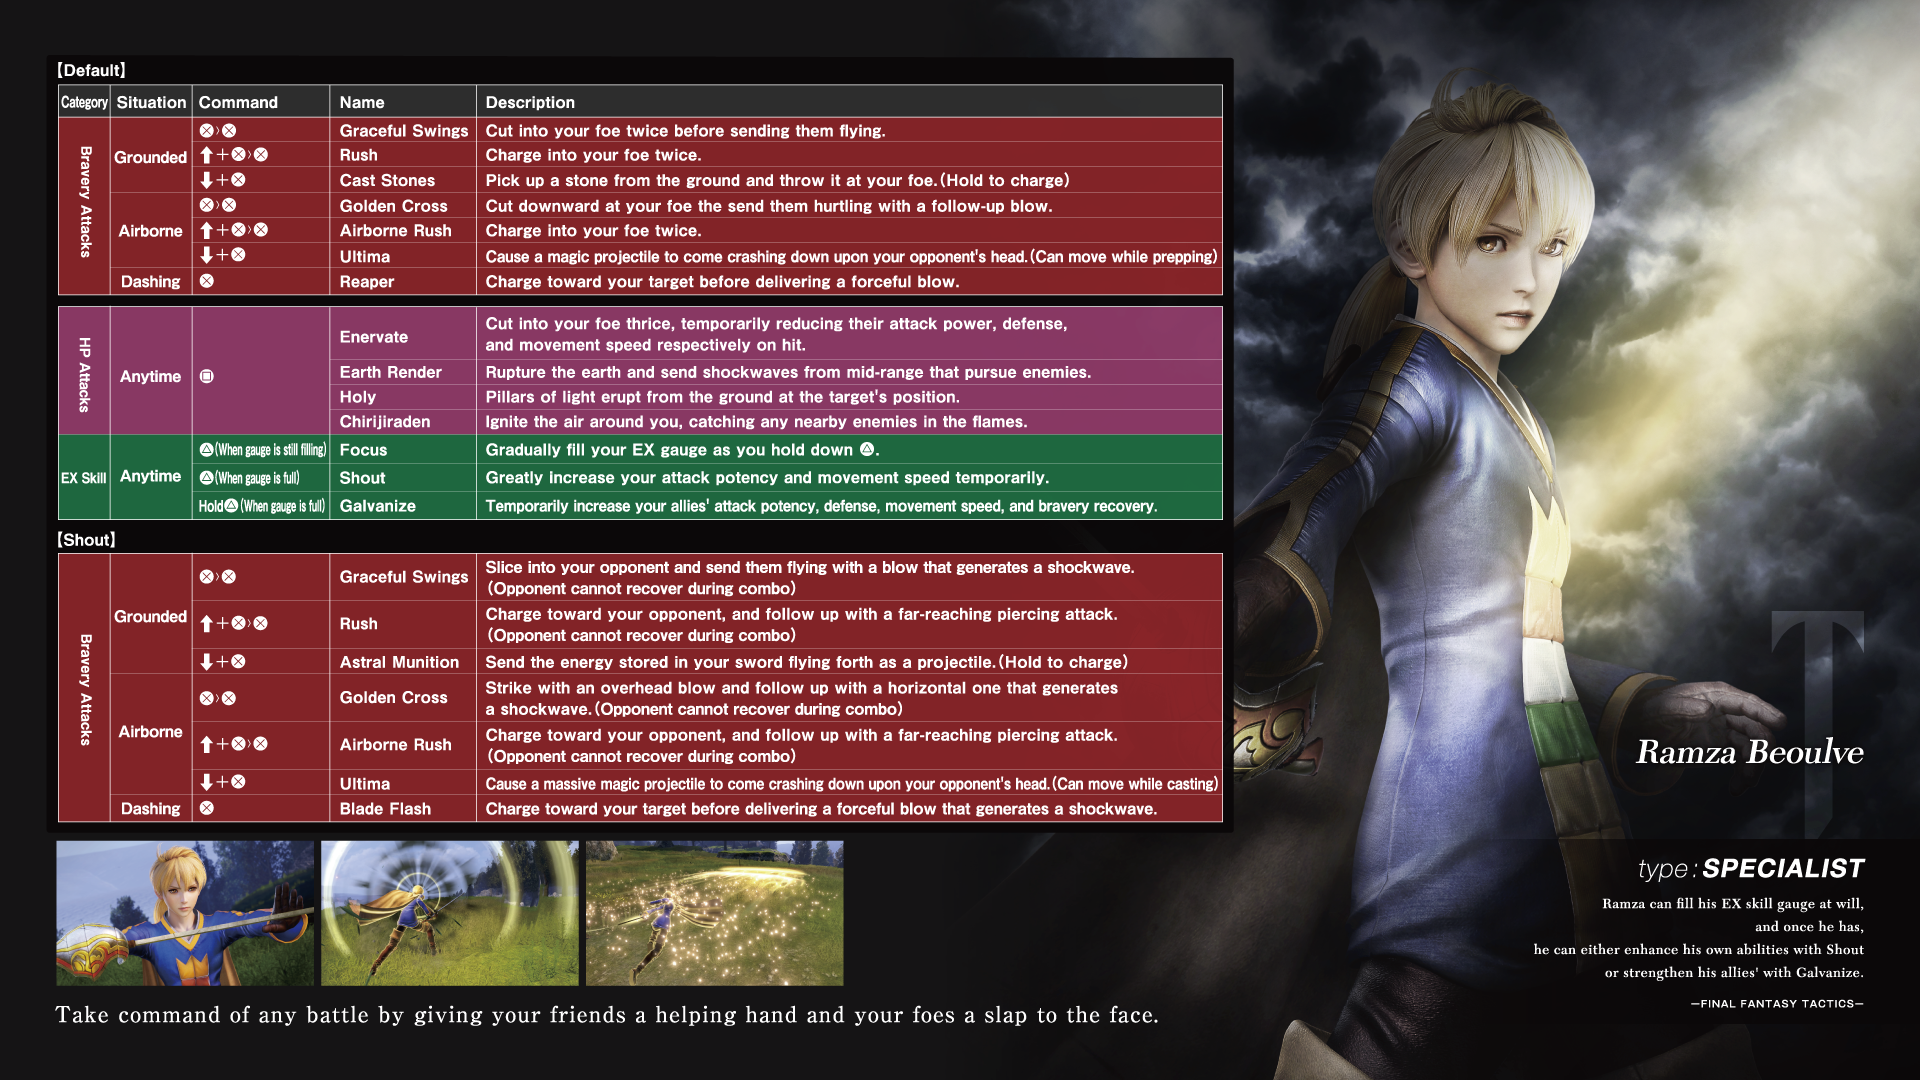
Role: Specialist
Gabranth players from the previous Dissidia entries will be familiar with Ramza’s playstyle. He has the ability to manually charge up his EX Skill. From there, he can choose to strengthen himself with Shout or enhance his allies’ capabilities through Galvanize. When charging his EX Skill gauge with Focus, Ramza stands completely still so be aware where your enemies are before committing to it.
Pressing the EX Skill button when it’s full activates Shout. This makes Ramza a real threat to the enemy team. All of his bravery attacks are severely improved along with some HP attacks. He travels around much quicker and gains the ability to triple jump.
Holding the EX Skill button, on the other hand, uses Galvanize instead. Your allies get some nice buffs to their attack, defense, and speed attributes thanks to it. Their bravery value gradually increases under Ramza’s buff too.
Ramza has a relatively lackluster moveset in his base form; you’ll want to keep Ramza in his Shout form as much as possible. Golden Cross brings the hurt and gives a fast, easy setup for a follow-up combo. Rush and Airborne Rush close in on the enemy swiftly. Cast Stones is an oddly ok projectile attack for what looks like a joke move at first glance. Charging it up before firing it off makes it devastating. Ultima has one of the more apparent improvements in Shoutform that has a big AoE improvement and packs quite the punch.
Ace (Final Fantasy Type-0)

Role: Marksman
Ace is for the sort of player that likes to take chances. His weapons are a deck of cards that he can fire off from safe distances and his mobility for a Marksman is, for a lack of a better term, ace. Ace has a plethora of roles that he can provide for the team - but it all depends on the set of cards he draws.
Before we jump into his moveset, it’s very important to understand Ace’s crazy EX Skill. At its surface, it’s simply either drawing cards with Cut Cards by pressing the EX Skill button or using the cards you drew with Show of Hands by holding the EX Skill button. You can hold up to four cards at once and if you draw pass that, it’ll discard the oldest card you drew.
There are four different colors of cards you can pull - red, black, blue, and yellow. Each color falls into a category type. Red cards are tailored to bring big damage to single opponents; attacks from black cards will paralyze foes; blue cards heal both the bravery and HP of nearby allies; yellow cards buff the attack, defense, and movement speed of allies within range.
The more of a certain card color Ace is holding upon a Show of Hands activation, the better the effect will be from it. For example, Ace will only fire a measly Burst attack if he uses a Show of Hands with only a single red card in his hand. Now if he had three red cards, he’d cast an awesome Mega Burst spell with Show of Hands and that fires off a big explosion right at where the enemy is. This applies to the blue recovery and yellow buff cards as well. The more of them in Ace’s hand before he uses Show of Hands, the greater their effect will be.
Show of Hands will always prioritize the card color that Ace has the most of; if Ace has a hand of blue, yellow, red, blue, then Show of Cards would activate the level two blue spell of Super Charge.
In the case of having equal amounts of a card and color, Show of Cards will activate the color of the latest card drawn. For instance, a hand of black, yellow, black, yellow will have Show of Hands activate the level two yellow spell of Super Force.
Lastly, there’s a cooldown before each card is drawn with Cut Cards but Show of Hands can be activated at anytime even if Cut Cards is on cooldown.
Whew with that said, let’s take a look at some of Ace’s moves. Flourish is neat poke from mid range that does multiple hits. Ante Up is useful for sniping from afar and even has some tiny AoE to damage enemies that are bunched up. Jackpot Shot is definitely one of Ace’s go-to moves to dish out good damage from long range. Smart Cards are slow homing orbs, but you can have two of them out at once.