
Hades Pact of Punishment: Heat, modifiers and how to maximize your rewards
The Pact of Punishment is a large part of the fun of taking on more and more runs in Hades. It's a way of increasing your difficulty with special modifiers. Your difficulty is then measured in Heat - a universe-appropriate way of showing just how much trouble you're in. The good news, however, is that more Heat can lead to better loot - and so you'll want to use the Pact of Punishment to turn things up a notch and get better items.
All of this is part of the path to unlocking all of the Aspects of the Infermal Weapons and part of the overall path towards the True Ending of Hades, which will require you to beat the final boss far more than once. Plus, playing levels over and over again is a huge part of the fun of Hades - and that makes the Pact of Punishment and carefully managing your Heat level a huge part of the experience.
Pact of Punishment & the Heat difficulty meter in Hades
If you thought that beating Hades for the first time was a challenge, just wait and see what the Pact of Punishment does. Once you've beaten the game for the first time, you'll be able to increase the difficulty of your runs in exchange for Titan Blood, Diamonds and Ambrosia. This is essentially the endgame for Hades, and how you'll get the remaining resources you need to upgrade your weapons and the House of Hades.
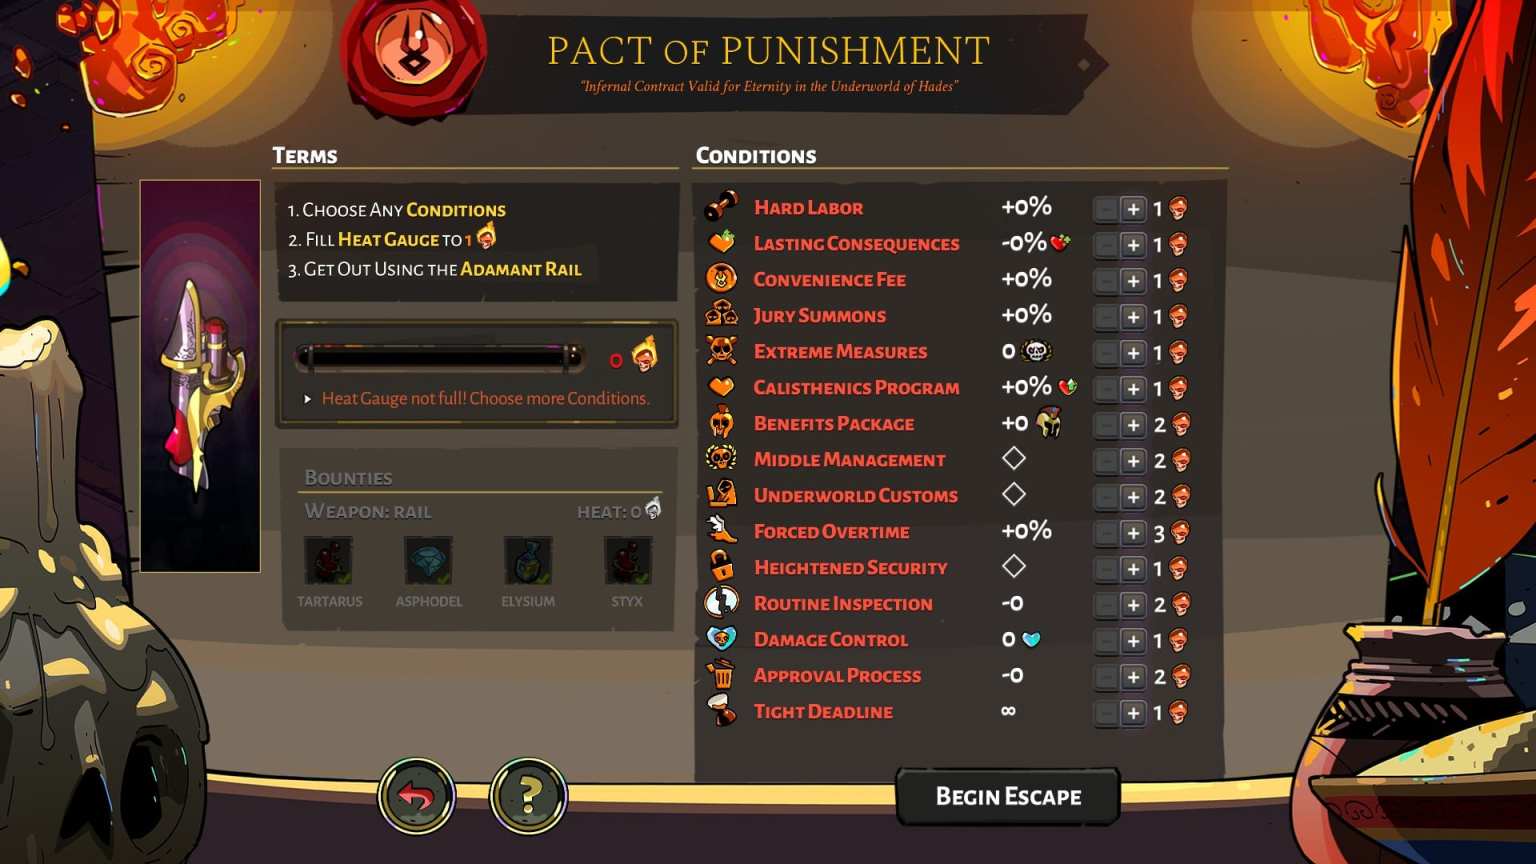
To start doing this you'll need to go to the armoury where Skelly is. You'll notice that the window you usually use to start your run will now be glowing orange and will allow you to interact with it. Here you'll see the Pact of Punishment options and able to modify your run to make it more challenging. Each modifier will give a certain amount of Heat points and each has a certain number of ranks. So if you choose the Hard Labor modifier, the first rank will make your enemies deal +20% damage, whilst the second rank will make it +40% and so on. Heat is also tied to whatever weapon you use for that run, so you'll have plenty of chances to earn extra items.
Each time you add a modifier, your Heat total will rise by a certain number of points to indicate the difficulty of the run. For every one Heat point you add to the total, you'll get the chance to re-earn Titan Blood from the Furies, Diamonds from the Bone Dragon and Ambrosia from Theseus and the Minotaur.
If you want to maximise the amount of these items you can get then don't increase your heat meter by more than one point at a time. Every single time you raise the heat meter you'll be able to get the three pickups again but once you've passed a certain threshold you won't earn rewards anymore. For example, if you raise it to 5 on the first go, you'll be losing out the rewards with that weapon you could have got from Heat level 1, 2, 3 and 4. More heat means better prizes, but don't forget to grab the lesser prizes on the way.
Listed below are all of the difficulty modifiers and their ranks:
Hades Pact of Punishment modifiers & Heat Ranks
Below is each different Pact of Punishment modifier you'll find in Hades. To be clear, each Pact of Punishment has a specific effect on you as well as its own number of 'Ranks', which is an increasing scale of the potency of that pact's effect.
If you take the first Pact of Punishment on our list, Hard Labor, at rank 1, enemies will deal 20% extra damage. At rank 5, however, they'll deal 100% more damage - thanks to the rank ups. The flip side of that is that each rank you take from a pact gives you Heat - so while Rank 1 Hard Labor is worth 1 heat, Rank 5 is worth 5. Some more difficult pacts even have ranks that are worth 2 or 3 heat each! More Heat can of course lead to more rewards - but it'll be a lot harder to reach those rewards.
Anyway, here's the pacts in full...
- Hard Labor: Each rank makes your foes deal 20% more damage.
- 5 ranks total, meaning 100% more damage maximum - double damage
- 1 Heat per rank
- Lasting Consequences: Every rank makes any sources of Health Healing & Restoration 25% less effective.
- 4 ranks total, making for a 100% total healing debuff
- 1 Heat per rank
- Convenience Fee: Each rank raises Obol prices by 40%.
- 2 ranks, for a maximum total of 80% more expensive
- 1 Heat per rank
- Jury Summons: Each rank makes you face 20% more enemies in standard combat encounters.
- 3 ranks, for a total maximum of 60% more enemies
- 1 Heat per rank
- Extreme Measures: Each rank arms 1 Underworld boss with new battle techniques.
- 3 ranks total for up to 3 buffed bosses
- 1 Heat for the first rank, 2 Heat each for the second and third
- Calisthenics Program: Enemies gain 15% extra Health to their life for each rank.
- 2 ranks, for a maximum bonus of 30% extra enemy health
- 1 Heat per rank
- Benefits Package: Grants armored enemies 1 extra perk per rank.
- 2 ranks, for a total of +2 perks to each armored enemy
- 2 Heat for the first rank, 3 Heat for the second
- Middle Management: Adds either 1 Elite Enemy or another distraction to mini-boss battles.
- 2 ranks total, for a maximum of 2 extra enemies or distractions per mini-boss
- 2 Heat per rank
- Underworld Customs: Each rank requires a sacrifice of 1 Boon on leaving each Underworld region.
- 2 ranks max, for a total of 2 Boons lost
- 2 Heat per rank
- Forced Overtime: Each rank makes enemies move and attack 20% faster.
- 2 ranks for a total enemy speed buff of 40%
- 3 Heat per rank
- Heightened Security: Makes Traps and Magma deal 400% additional damage, making them deadly.
- Only 1 rank, and that one rank is worth 1 Heat
- Routine Inspection: Each rank deactivates 3 Talents from the Mirror of Night. The dectivations start from the bottom.
- 4 ranks total, meaning 12 talents can be removed.
- 2 Heat per rank
- Damage Control: Each rank gives enemies 1 Shielded Health, making them immune to one bit of damage.
- 2 ranks total, meaning foes can avoid 2 attacks with 2 Shielded Health
- 1 Heat per rank
- Approval Process: Each rank reduces potential choices by -1 whenever you receive Boons and upgrades.
- 2 ranks total, meaning you can lose 2 choices.
- 2 Heat for the first rank, 3 Heat for the second
- Tight Deadline: Each rank reduces the time you have to clear each Underworld region by 2:00, starting at 9:00.
- 2 ranks total, making for a minimum time allowed of 7 minutes.
- 2 Heat for the first rank, 3 Heat for the second