
Genshin Impact Flameplume Starflowers: Smelting Fireworks guide
The Lantern Rite 2022, Fleeting Colors in Flight, wouldn't be much fun without fireworks, so Genshin Impact’s first big portion of the festival asks the Traveler to craft a healthy supply for the occasion and rewards them with Affluence Talismans. Naturally, there’s some degree of RNG to this, but a few tactics outlined here may help to take the frustration out of the ordeal.
After obtaining the Launch Tube Gadget from the main quest, select it from the inventory menu and begin the Flameplume Starflowers: Production Challenge activities. Even if you don’t use the exact rotations for Parts I - III shared here, make sure to check out the tips section to make things easier and get you closer to Perfect Quality.
- Smelting Fireworks Explained
- Tips
- Part I: The Mountain Clouds Let Down Golden Rain
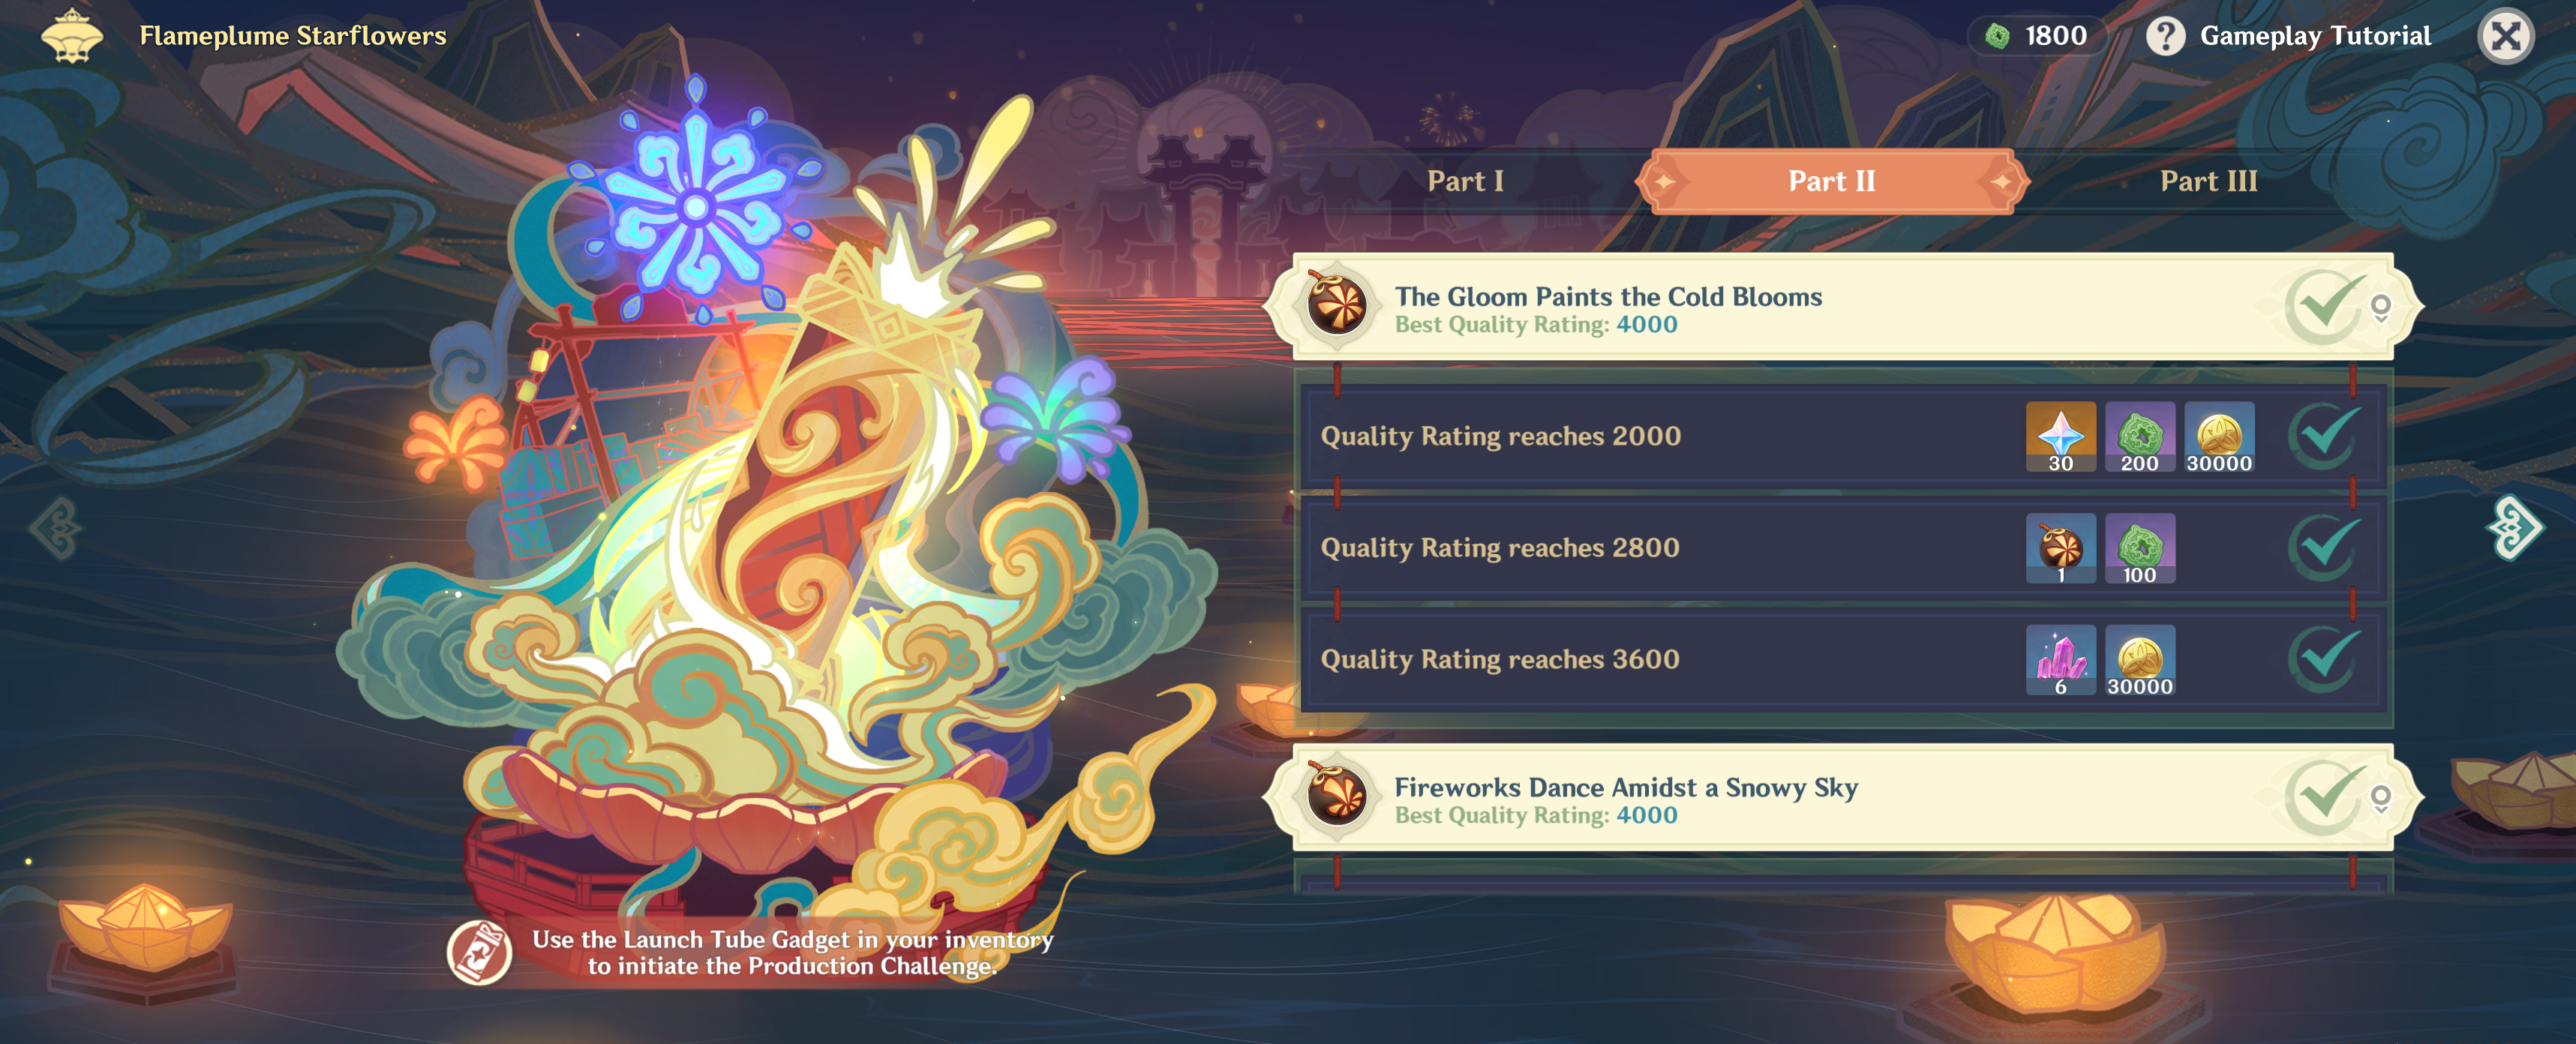
- Part II: The Gloom Paints the Cold Blooms
- Part III: Golden Calendula Swirl
Flameplume Starflowers: Production Challenge Explained
There's quite a bit going on at first glance, but the different bars and meters on the Production Challenge window aren't too bad after some tinkering. Keep watch on the Flame Strength in the upper right corner, and adjust the Smelting Technique as you go to balance the bars under the Parameters Overview and max out the Quality Rating. For a thorough breakdown, read through the explainers below.
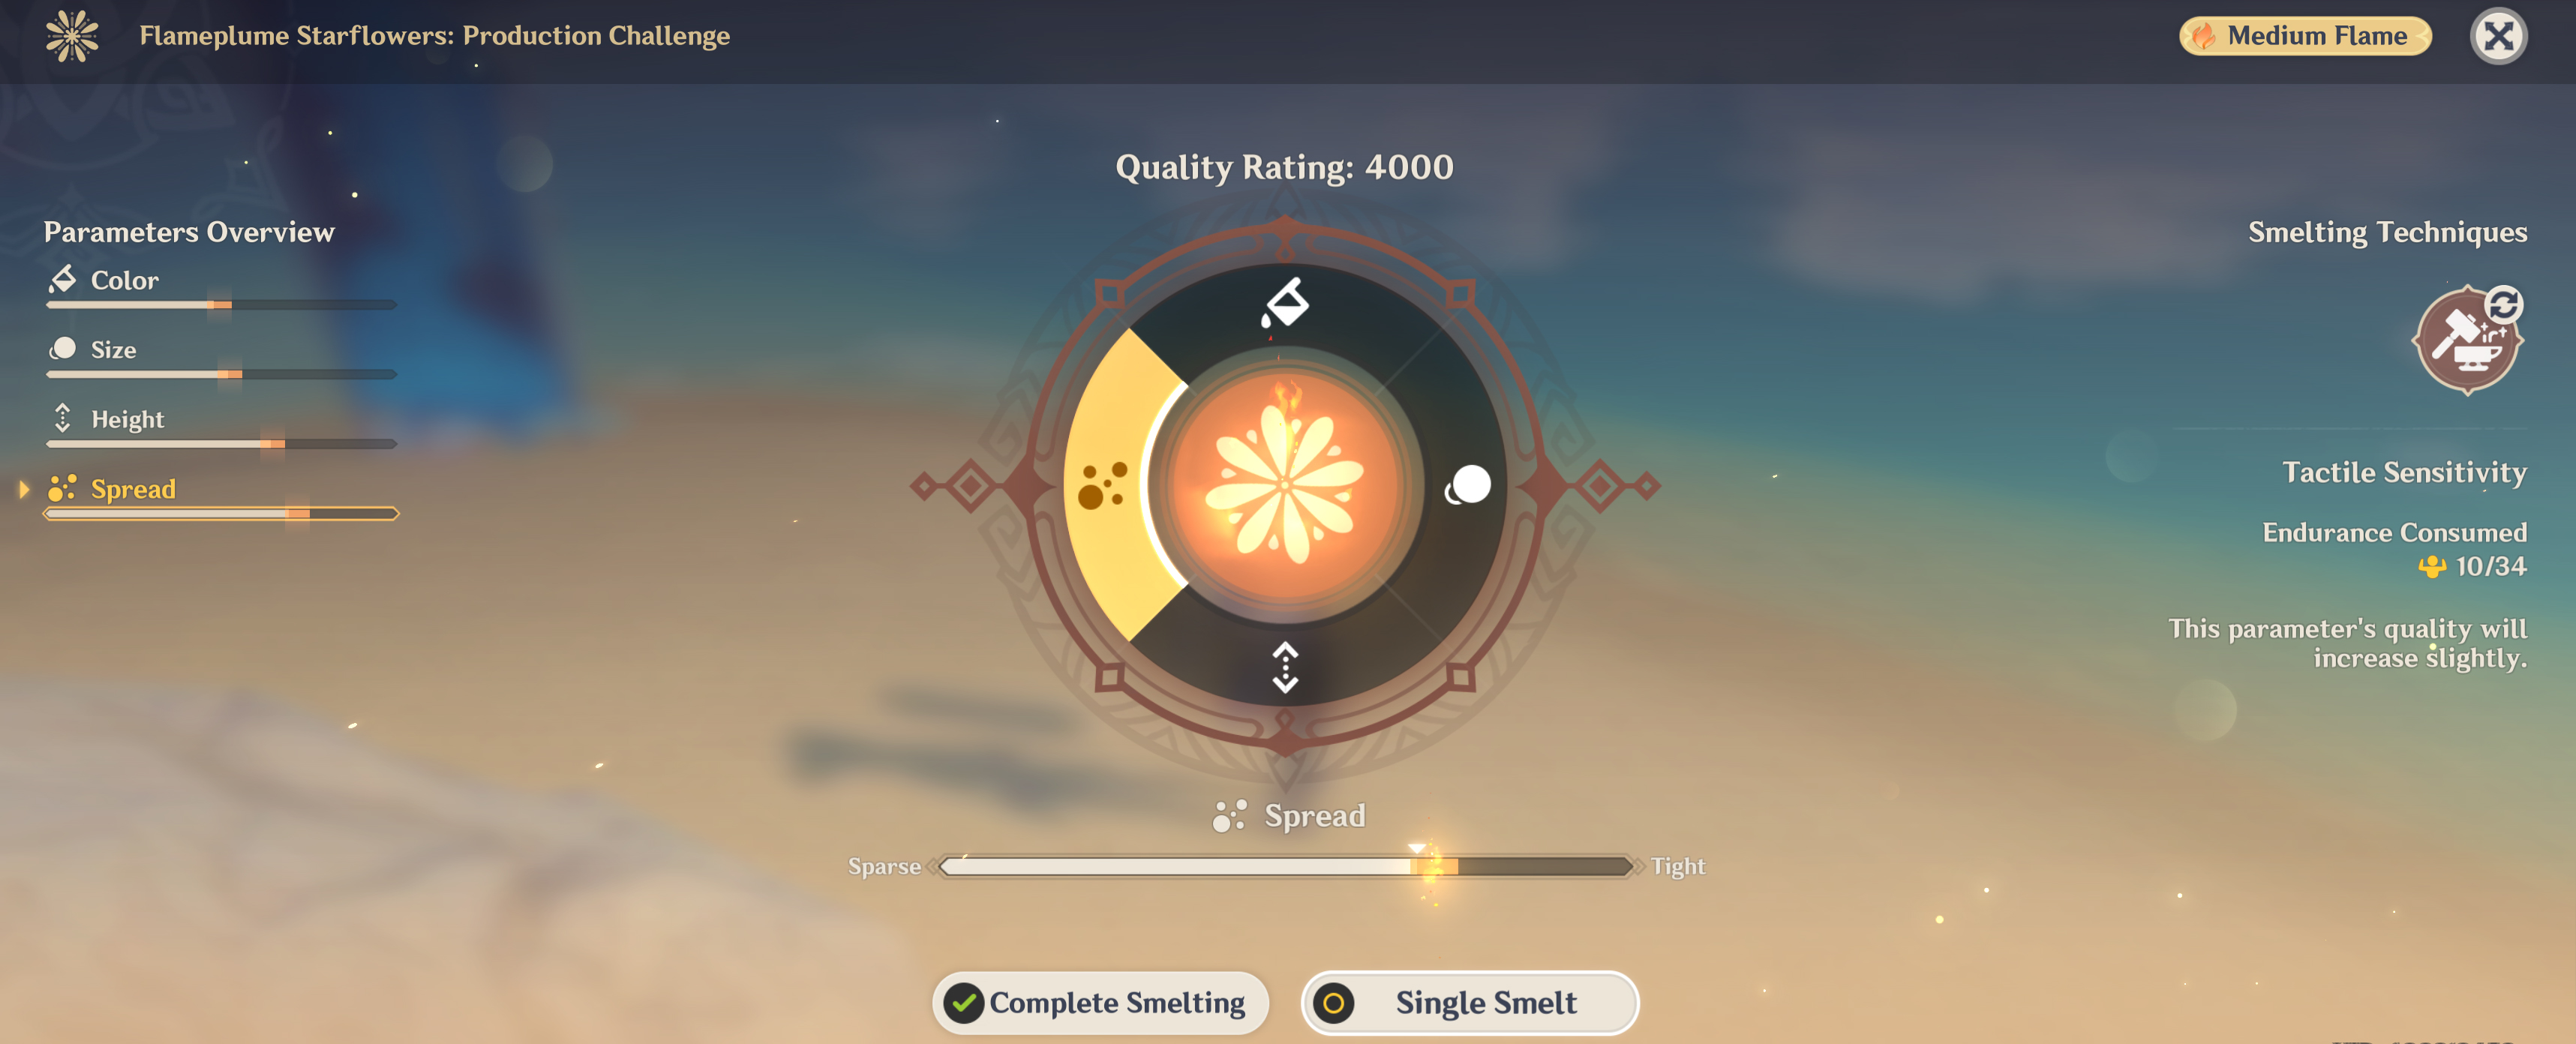
Quality Rating
- Every set of fireworks has a point threshold to reach perfect quality, but you don’t need to hit that for most rewards. Every craft has three sets of rewards available at varying quality ratings. So, get as close to perfect as possible, complete the product, and retry until you’re satisfied.
Flame Status
- Flame status affects how much a Smelting Technique restores to Parameters, so pay careful attention to this status. Flames can be Low, Medium, or Strong, and the bonus to quality only applies under Medium or Strong.
Parameters Overview
- There are three bars in the left corner, Color, Size, and Height (and more as the event progresses), adjusted by clicking the sides of the wheel in the middle of the screen. Change the Smelting Technique and click Single Smelt to increase the parameter quality until it's within the range of the orange bar. When all of the bars are correct, select Complete Smelting. Parameters max out in every category at 1,000 points.
Smelting Technique
- This can be changed from the double arrow button. Different techniques yield varying results to quality; make sure this is adjusted before every smelt, so there isn’t too little or too much added to parameters with every turn.
Endurance Consumed
- Using Single Smelt consumes endurance, and once this is depleted, the smelting process is over. Different Smelting Techniques also have varying costs.
Tips for Smelting Fireworks
Smelting fireworks can be a bit of a pain. However, in our attempts, a few guiding approaches kept us completing the tasks with less headache.
- There’s a lot of RNG to it; restart if you’re trying to hit the 1,000 point threshold on a parameter early in the rotation and try again. Then, when you hit it, continue on with the rest of the smelting.
- Don’t bother trying to hit Perfect Quality immediately. It’s way easier to go through, build additional endurance through completing Fireworks the best you can, and then go back to earlier crafts.
- Hit Complete Smelt, don’t worry about actually exiting. If you’ve got a high score, don’t waste it. It’ll give you the chance to go ahead and pick up more items while you work for higher-quality products.
Mountain Clouds Let Down Golden Rain - Max Quality 3,000
Medium Flame
- Size: Nitpicker
- Size: Nitpicker
- Color: Nitpicker
Low Flame
- Height: Nitpicker
- Color: Tactile Sensitivity
- Color: Tactile Sensitivity
The Silver Night is Full of Stars - Perfect Quality 3,000
Medium Flame
- Size: Decisive Boldness
- Size: Decisive Boldness
- Height: Decisive Boldness
Low Flame
- Height: Decisive Boldness
- Color: Decisive Boldness
- Size: Tactile Sensitivity
The Gloom Paints the Cold Blooms - Perfect Quality 4,000
This is where focusing on completing one parameter before moving on to the next became helpful. After changing the temperature, this strategy just relied on hitting the orange 1,000 point threshold before moving on to the next parameter. If it overshot or undershot it with the Smelting Technique, we just started the process over.
In our attempt, every turn where 1,000 points were reached is annotated in parenthesis below.
Change temperature with Raging Fire
Strong Flame
- Spread: Decisive Boldness (1,000 point threshold)
- Height: Decisive Boldness (1,000 point threshold)
- Size: Decisive Boldness (1,000 point threshold)
- Color: Decisive Boldness
Change temperature with Low-Temperature Processing
Low Flame
- Color: Tactile Sensitivity
- Color: Tactile Sensitivity (1,000 point threshold)
Fireworks Dance Amidst a Snowy Sky - Perfect Quality 4,000
Again, working towards the 1,000 point marker and restarting when it was missed on the turn seemed to help most here in speeding things along.
Change temperature with Raging Fire
Change temperature with Raging Fire
Strong Flame
- Spread: Decisive Boldness (1,000 point threshold)
- Height: Decisive Boldness
- Height: Decisive Boldness (1,000 point threshold)
Medium Flame
- Color: Nitpicker
- Color: Tactile Sensitivity
- Color: Tactile Sensitivity
- Color: Tactile Sensitivity (1,000 point threshold)
Change temperature with Low-Temperature Processing
Low Flame
- Size: Tactile Sensitivity (1,000 point threshold)
Golden Calendula Swirl - Perfect Quality 5,000
Nailing perfect quality for the Golden Calendula Swirl is probably the hardest encounter among the bunch. Restarting every time Color did not max out at the orange bar immediately seemed to save time, and then our next target was hitting the 1,000 point mark next for Size. We’ll update this with additional strategies as they’re discovered.
Change temperature with Raging Fire
Strong Flame
- Color: Decisive Boldness (1,000 point threshold)
- Size: Decisive Boldness
- Rotation: Decisive Boldness
Medium Flame
- Size: Tactile Sensitivity (1,000 point threshold)
- Height: Nitpicker
- Spread: Nitpicker
- Rotation: Tactile Sensitivity
Low Flame
- Height: Tactile Sensitivity
- Height: Tactile Sensitivity
- Spread: Tactile Sensitivity
- Spread: Tactile Sensitivity
- Rotation: Nitpicker (1,000 point threshold)
- Spread: Tactile Sensitivity (1,000 point threshold)
- Height: Tactile Sensitivity (1,000 point threshold)
Kindled Trees by the Moonlit Window - Perfect Quality 5,000
Completing the Golden Calendula gets you the Smelting Technique Let Fortune Lead, which can proc a chance to take quality to the orange bar. I found it easiest to restart repeatedly until every parameter triggers the ability.
If that’s taking too long, we also found luck using Let Fortune Lead on most of the parameters, then playing with formulas to fill the others out with all of the extra endurance.
Medium Flame
- Rotation: Let Fortune Lead (1,000 point threshold)
- Height: Let Fortune Lead (1,000 point threshold)
- Spread: Let Fortune Lead (1,000 point threshold)
- Size: Let Fortune Lead (1,000 point threshold)
- Color: Let Fortune Lead (1,000 point threshold)