
Bravely Default II Walkthrough - Chapter 2 | Wiswald, Wiswald Woods, Magical Institute of Inquiry, and Wayward Woods
With the first chapter of the adventure proper behind you, RPG Site's Bravely Default II Walkthrough rages on with this, a full guide to the second chapter. This walkthrough for Chapter 2 of BD2 features everything you might need, including boss strategies, story progression tips, side quests, enemy lists, treasure you won't want to miss, area maps, and more. As ever, you can click a link to jump to where you're at, or just scroll:
- Wiswald - the Scholar's Haven & Side Quests Pt 1
- Wiswald Field
- Wiswald Woods
- Great Tree Hollow and the Magical Institute
- Side Quests, Pt 2
- Secret Studio
- Side Quests, Pt 3
- Wayward Woods
As you'd expect, this guide has spoilers for Bravely Default 2 through the end of Chapter 2. If you need other chapters, hit up our walkthrough contents down the page to see the full index.
Bravely Default 2 Walkthrough Guide - Chapter 2
Wiswald - the Scholar's Haven
We pick up right where Bravely Default 2 Chapter 1 left off. When you arrive at the town of Wiswald, an event scene will occur. Then head to the top of the tower to trigger another event. This will lead to an unwinnable boss fight.
With that done, visit the magic institute and then the shop for some new items. Note on the treasure list that one of the items is not available until way later. There will also be new side quest activities, including some in Savalon. Complete them at your own leisure, backtracking if you need to. To make things easier for this chapter, it is highly recommended that you build up the strength of the thief job class. If you reach job level 9, their Godspeed Strike is one of the strongest abilities in the game.
To continue the main story, you’re left with two possible options. You choose between going to Wiswald Institute or Wiswald Woods. Although both routes must be completed in order for the main story to progress. Essentially, you're just choosing the order in which you'll complete the Wiswald Woods and Institute dungeons.
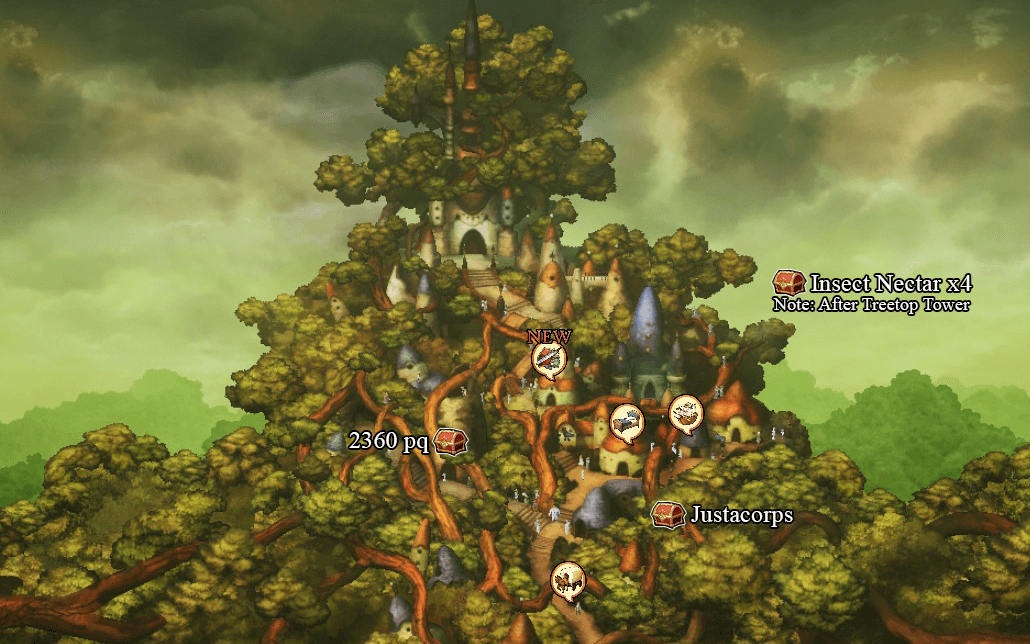
Treasure List - Wiswald
- 2360 pq
- Justacorps
- Insect Nectar x4 (Reachable after clearing Treetop Tower)
After talking to Roddy, you'll be able to undertake a fair number of side quests, some of them starting from back in Savalon:
Side Quest #029: Uneasy Friends
- Location: Talk to Anihal inside her house in Savalon.
- Reward: Sands of Time
- Objective: You can complete this quest by defeating the Sandworm in the middle of Sandswept Ruins. The Sandworm has higher base stats than the average Sandworm. Report to Anihal after defeating it.
Side Quest #030: Tools of the Trade
- Location: Talk to the man outside of Savalon.
- Reward: Medium JP Orb x2
- Objective: You can complete this quest by finding the Tradesman's Tools inside Bernard’s Mansion on the room upstairs by the upper right corner of the map.
Side Quest #031: One Swanky Shell
- Location: Talk to the girl inside Savalon Inn.
- Reward: Booster Bun (Physical Defense) x2
- Objective: To complete this quest, head back to Wiswald and travel to the swampy area to the west. You will eventually find a giant tortoise enemy. Defeat a Rock Tortoise and give the Rock Tortoise Shell back to the girl to finish the quest.
Side Quest #032: Pedal to the Medal
- Location: Talk to the boy in the middle of Wiswald.
- Reward: Teleport Stone x7
- Objective: After talking to the boy, you can find the three Mysterious Medals marked on the map inside Wiswald. Remember that you change the marked quest inside the Travelogue menu. Give the three medals back to complete the quest.
Side Quest #033: Hopping Mad
- Location: Talk to the boy near the entrance of town. (Appears after Roddy and Lily events inside the city).
- Reward: Courage Ring
- Objective: Defeat 4 lop-eared badbitts outside Wiswald. (This monster only appears at night).
Wiswald Field
Once you're done with as many side quests you want to do, you'll be on Wiswald Field with a choice between Institute or the Woods. You have to do both to move the story on, but you can do them in whatever order you like. Along the way, there's treasure to be had.
Enemy List
- Simurgh (Beast #015)
- Lop-Eared Badbitt (Beast #020)
- Veronica (Plant #001)
- Fungoo (Plant #005)
- Laerad (Plant #021)
- Paraponera (Insect #010)
- Staggermoth (Insect #006)
- Moulder (Insect #015)
- Vesp Pest (Insect #021)
- Sibilus (Aquatic #006)
- Rock Tortoise (Aquatic #009)
- Troll (Humanoid #007)
- Orc King *Rare Monster (Bosses #007)
- Baal *Rare Monster (Bosses #011)
- Vespus Hex *Quest Monster (Bosses #012)
- Skullcap *Rare Monster (Bosses #013)
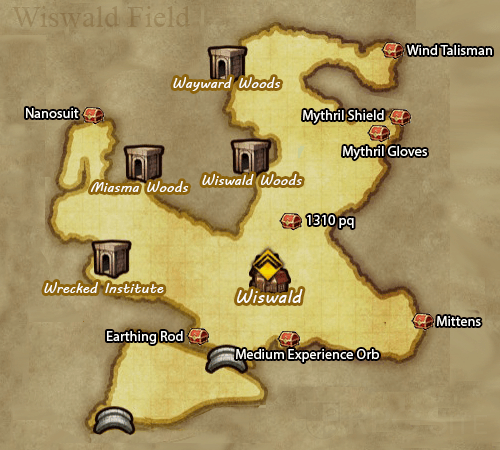
Treasure List - Wiswald Field
- Ward Light x2
- Earthing Rod
- Medium Experience Orb (Monster Chest)
- Mittens
- Mythril Shield
- Mythril Gloves
- Wind Talisman
- 1310 pg
- Nanosuit (Monster Chest)
Wiswald Woods
The Wiswald Woods is probably the most maze-like of the dungeons you've entered so far. Luckily, that's what we're here for.
Enemy List
- Petunia (Plant #002)
- Mossy Fungoo (Plant #006)
- Ogre (Humanoid #008)
- Orc Chieftain (Humanoid #013)
- Ahura (Demon #016)
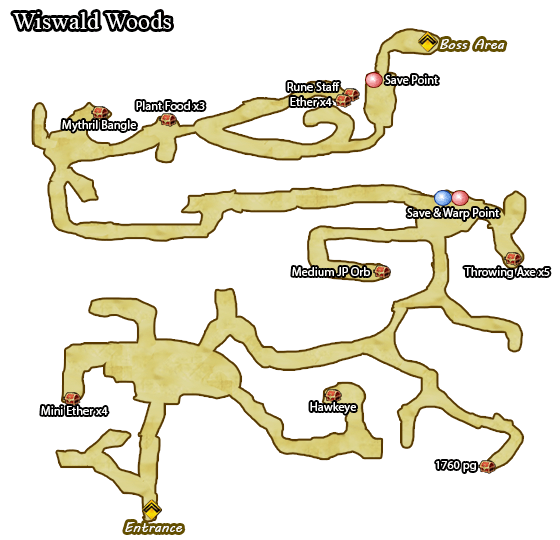
Treasure List - Wiswald Woods
- Mini Ether x4
- Hawkeye (Monster Chest)
- 1760 pg
- Medium JP Orb (Monster Chest)
- Throwing Axe x5
- Mythril Bangle
- Plant Food x3
- Rune Staff
- Ether x4
Boss: Lily
- Lily / HP (22088)
- Picto-Amrita / HP (15680)
To make matters worse, if you perform a physical attack on Lily without using any abilities, she can counter with paralysis. Anyways, if you are still using the Beastmaster job class, you can actually land poison on Lily, this is probably the easiest way to exploit this boss fight, as her quick speed will cause the poison to kill her quicker. Lily also has a high evasion rate, so you might need an accuracy buff from the Bard class to land hits on her.
- Boss Loot: Acquire EXP 2076 / JP 453 / pg 1546
After this is done, it's time to take the other route! Or you're done - if you reversed the route...
Great Tree Hollow
There are going to be a few side quests available now, but let's clear the other dungeon first. The other route requires going into the Institute of Magical Inquiry. You will need to check back the place where you encountered Roddy. You will find out the place is locked and will need to get there by the sewers through the left side of town. So effectively, this is going to be a two-part dungeon.
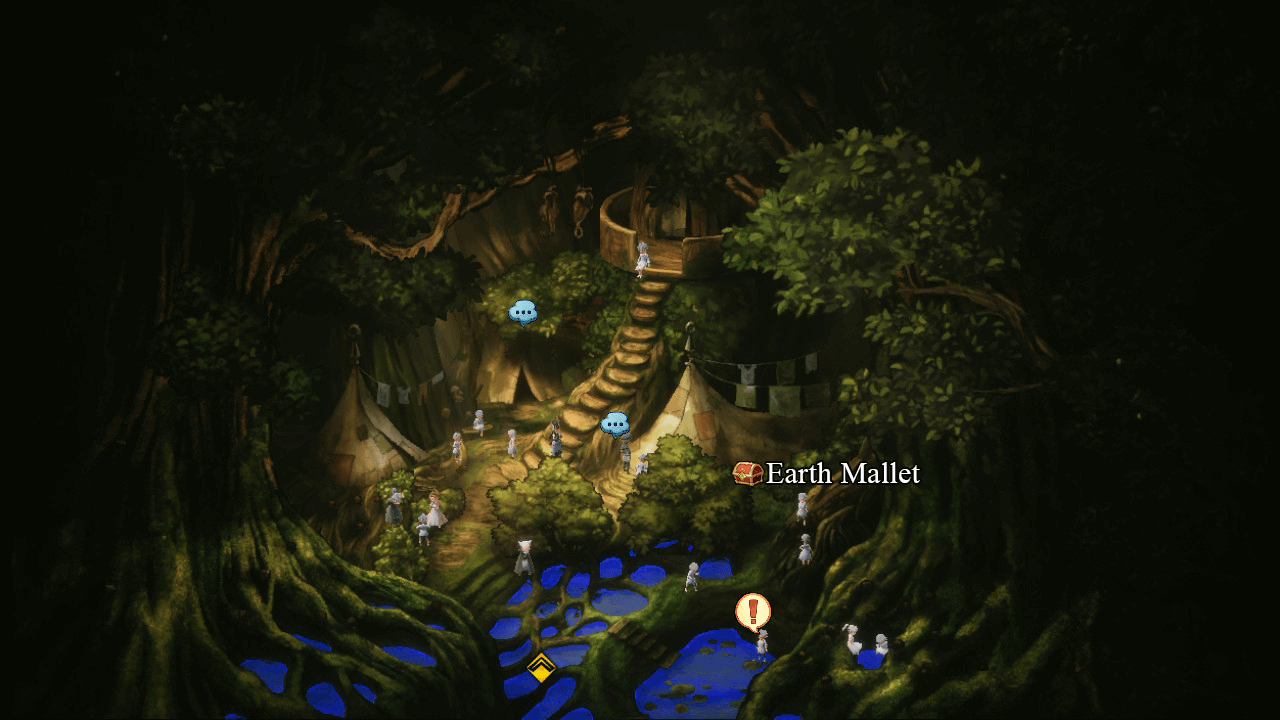
Treasure List - Great Tree Hollow
- Earth Mallet (Great Tree Hollow)
Sewers
Unlike the Wiswald Woods, the Sewers are a lot more straightforward, and there's fewer items to nab as well. Partially that's because it'll be followed up by another short dungeon, so stay tuned.
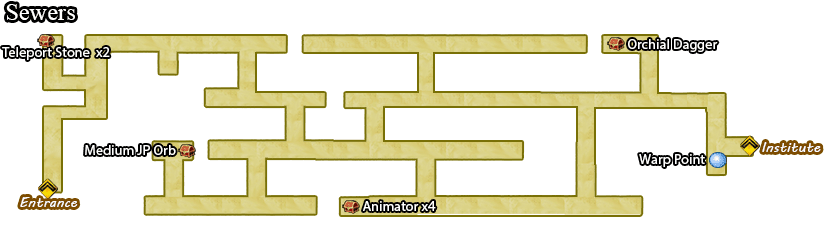
Treasure List - Sewers
- Teleport Stone x2
- Medium JP Orb
- Animator x4
- Orichal Dagger (Monster Chest)
Institute of Magical Inquiry
You'll pass into the Institute of Magical Inquiry after clearing the Sewers. You can grab the Mythril Bow here before moving onto the East Wing. Remember to step into a separate section of the Institute from East Wing - Level 3 to grab the Oak Staff.

Treasure List - Institute of Magical Inquiry
- Mythril Bow (1st Floor)
- Oak Staff (Take the south exit from the East Wing's Level 3)
- Teleport Stone (End of Dungeon)
The East Wing
Another mostly straightforward dungeon, though we'll mark where all the items are in case you get turned around.
Enemy List
- Skeleton Sellsword (Undead #005)
- Moulder (Insect #015)
- Mantrap (Plant #016)
- Golem (Spirit #001)
- Ventus Element (Spirit #013)
- Wiki-Wiki (Spirit #024)
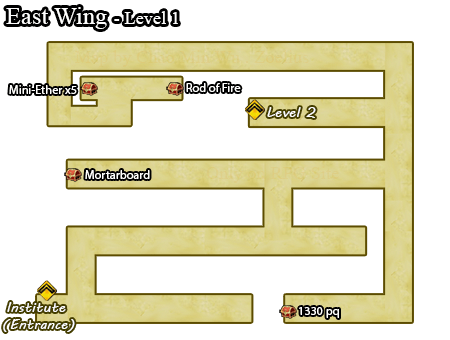
Treasure List - East Wing Level 1
- Mortarboard
- 1330 pg
- Mini Ether x5
- Rod of Fire (Monster Chest)
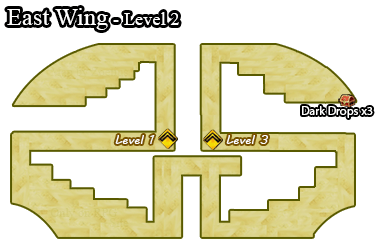
Treasure List - East Wing Level 2
- Dark Drops x3
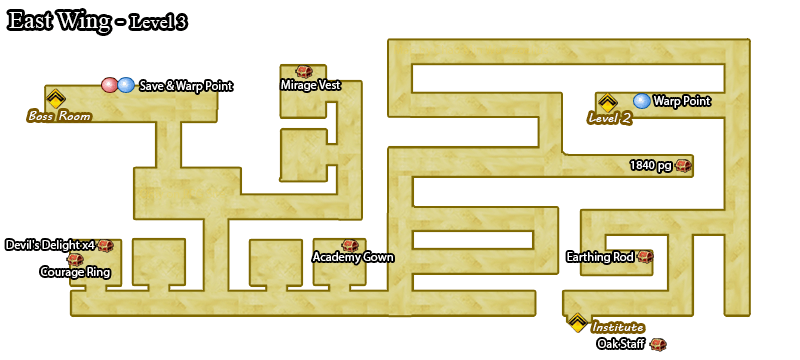
Treasure List - East Wing Level 3
- 1840 pg
- Earthing Rod
- Academy Gown (Monster Chest)
- Courage Ring
- Devil's Delight
- Mirage Vest
Boss Battle: Roddy
- Roddy / HP (17936)
- Picto-Beleth / HP (12048)
Overall this fight isn’t all that hard, your main concern would be finding methods of dealing a lot of damage at this point. He's a bit easier than Lily. You can either rely on using Beastmaster’s monster abilities, as ailments can land on Roddy such as paralyze. If you prefer to end the battle real quickly, having a thief class built, can let you use Godspeed Strike, ending the battle real quick. That's going to be a theme.
- Boss Loot: Acquire EXP 1945 / JP 453 / pg 1450
Even More Side Quests
Now with both routes completed, there are some more additional side quests within town. Complete them at your own leisure. Note that Quest #035 is not available yet.
Side Quest #034: Make Do and Mend
- Location: Talk to the man in the middle tent in Great Tree Hollow.
- Reward: Booster Bun (HP) x2
- Objective: Collect Veronica Oil by defeating the Veronica enemy. They’re a plant-type enemy that can be found in Wiswald Fields, generally in woods to the east.
Side Quest #036: An Exquisite Drop
- Location: Talk to the lady in the Wiswald Tavern (Night only)
- Reward: 2100 pq
- Objective: You can get the Rummy Morten by talking to the man inside the general store of Halcyonia.
Side Quest #037: Seek Out That Weakness!
- Location: Talk to the man just outside of Wiswald.
- Reward: Main-Gauche
- Objective: Defeat 3 Paraponera, they’re the ant type enemies on Wiswald Field.
Side Quest #038: Seek Out That Weakness… Again!
- Location: Talk to the man just outside of Wiswald. (After Quest 37)
- Reward: Flametongue
- Objective: Defeat 5 Moulders, they’re the spider-type enemies on Wiswald Field and Sewers.
Side Quest #039: The Road Home
- Location: Girl near the exploration building of Wiswald
- Reward: Direct Sunlight x3
- Objective: You can complete this quest by delivering the Handmade Doughnut to the girl’s dad in the middle of Vale of SIghs.
Side Quest #040: A Helping Hand
- Location: Talk to the old woman in the left tent in Great Tree Hollow
- Reward: Medium EXP Orb x3
- Objective: To complete this side quest, you will need to find 3 Four-leaf Clovers for the old woman. The clovers can be found in Wiswald Woods. When you return, the old woman will ask for Wizard’s Trinkets and they’re found inside the Wiswald Institute. You'll have to criss-cross through the East Wing to the other levels of the Institute to get them all.
Treetop Tower
To progress with the story, it's time to head inside the Treetop Tower. The number of levels to this place can make it somewhat confusing, but most of the paths branching off to chests are quick dead ends, so it isn't too bad. We've got all the details marked below.
Enemy List
- Kobold (Humanoid #004)
- Hellhound (Beast #002)
- Pephredo (Insect #022)
- Dead Knight (Undead #002)
- Baphomet (Demon #001)
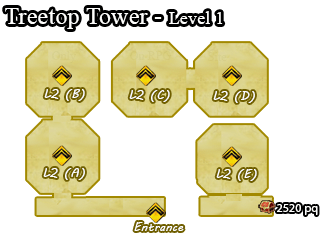
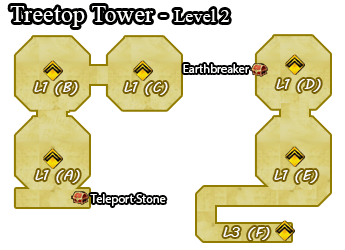
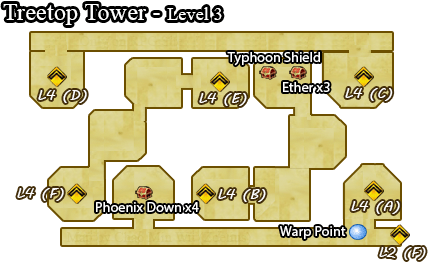
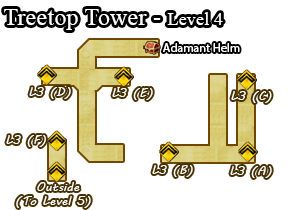
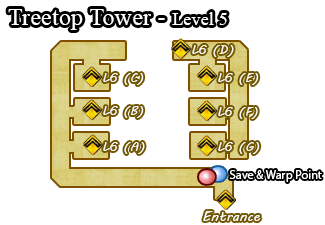
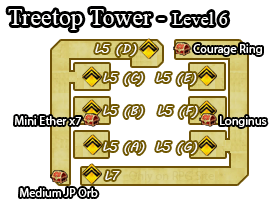
Treasure List - Treetop Tower
- Teleport Stone
- Earthbreaker (Monster Chest)
- 2520 pg
- Phoenix Down x4
- Typhoon Shield Left
- Ether x3 Right
- Adamant Helm
- Mini Ether x7
- Medium JP Orb
- Longinus (Monster Chest)
- Courage Ring
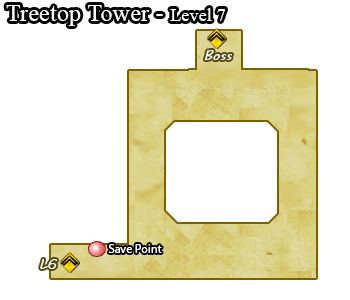
Boss Battle: Galahad
- Galahad / HP (30840)
- Picto-Amrita / HP (16448)
- Picto-Mona / HP (9252)
- Picto-Beleth / HP (12336)
Once Galahad is left all by himself the fight should be really easy, however since he is a tank type class, he is able to withstand a lot of damage. The good thing is that Galahad is also prone to status ailments, so using the Beastmaster class still works great for this fight. If you still have trouble with Galahad, the thief class can use Godspeed Strike which can easily cut through their defense ending this fight really quick.
Boss Loot: Acquire EXP 3082 / JP 509 / pg 1301 / Giant's Shield
After the event scene, go to the next room and examine the crystal. Return back to the entrance of town.
Side Quests Part 2
There is also some new side quest available right now. Finish them now or later. Here's where we'll circle back to Side Quest #035.
Side Quest #041: Like Teacher, Like Student
- Location: Talk to Elvis inside the Institute of Magical Inquiry
- Reward: Amulet
- Objective: Examine all the bookshelves within the Institute to complete the side quest. Mostly a backstory quest for Elvis.
Side Quest #035: The Tea of Teas
- Location: Talk to Elvis inside the general store. Must have completed Quest #41 first.
- Reward: Booster Bun (MP) x2
- Objective: Collect the Mandarin Tea defeating Laerads. These are enemies that look like purple trees, often outside Wiswald to the northeast.
Secret Studio
With those out of the way, to continue with the main story you'll have to erase the paintings around town. These paintings will look odd and out of place and should be marked with an objective marker. When all the last painting is examined, the party will discover a hidden passage in town. To the very east side is the last treasure in Wiswald, you will get some Insect Nectar in the area's last chest. Leave town through the south exit to go to the Secret Studio. It's, again, pretty straightforward, through there are some false walls to try to confuse you.
Enemy List
- Bullet Ant (Insect #011)
- Fallen Foliole (Plant #012)
- Bronzelion (Demon #006)
- Drys (Spirit #018)
- Wizzy (Humanoid #015)
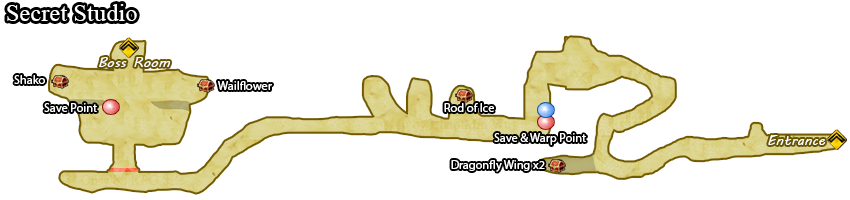
Treasure List - Secret Studio
- Dragonfly Wing x2 - False wall to the west
- Rod of Ice (Monster Chest)
- Shako
- Wailflower
Boss Battle: Folie
- Folie / HP (27168)
- Golem / HP (4528)
- Rock Turtle / HP (4594)
The other issue with this fight is that if you rely on white magic for healing, Folie might counter with a powerful single attack. Anyways similar to the boss fight before, it's best to have a balance team setup, that can unleash a good amount of damage like the Thief’s Godspeed Strike and classes to keep the damage dealer out of trouble This should make this boss battle more tolerable than the previous one.
Boss Loot: Acquire EXP 3141 / JP 519 / pg 1288
Side Quests Part 3
After winning against Folie, you will automatically return to Wiswald. There are some additional side quests after acquiring the new job class that you can complete before capping the chapter. Complete them if you'd like.
Side Quest #042: Scales in the Sand
- Location: In Savalon, talk to the woman near the center stalls.
- Reward: Light Talisman
- Objective: You will need to defeat Mushussu to complete this quest. This monster appeared in the previous chapter by taking the north exit in the Underground Reservoir. The monster here is a mini-boss and should be a formidable opponent, though he's easier than most other rare monsters. Once you defeat it, report to the client.
Side Quest #043: Blinded by Beauty
- Location: Talk to the boy and girl in the Great Tree Hollow
- Reward: Small JP Orb x10
- Objective: Find the lost girl by heading to the north part of Wiswald. Examine the object where the objective marker is placed. You will need to defeat a mini-boss Vespus Hex.
Side Quest #044: For the Sake of the Kids
- Location: Talk to the man in the top house in Great Tree Hollow. (Must have completed Quest #43)
- Reward: Booster Bun (Speed) x2
- Objective: To complete this quest, you will need to explore the optional dungeon, Misama Woods that is located northwest of town. You will find this boss in the last area near the save point.
Miasma Woods
The Miasma Woods is a pretty tough dungeon, and on top of that, it has a unique mechanic. There will be purple-looking poison fields that will damage you as you walk through them. This is one place where the Freelancer ability Dungeon Master is incredibly useful.
Enemy List
- Cerberus (Beast #004)
- Golden Bear (Beast #010)
- Poseidon (Spirit #021)
- Spigus (Insect #016)
- Razanil (Demon #002)

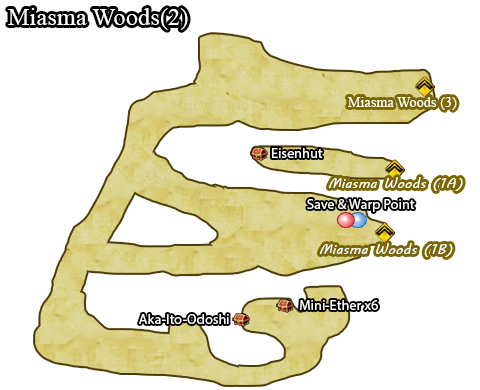

Treasure List - Miasma Woods
- Tent
- 3410 pg
- Beast Flesh x3
- Heavy Axe
- Eisenhut (Monster Chest)
- Mini Ether x6
- Aka-Ito-Odoshi
- Remedy x3
- Courage Ring
- Oak Staff (Monster Chest)
At the end, you'll find the Honeycap Mushrooms for the quest.
You need to fight a special boss. The boss is not too hard relative to previous bosses faced. The left flower (Frankenfalcot) is weak to Fire, Earth, Daggers, and Swords. The right flower (Papilloid) is weak to Fire, Spears, and Bow. The main middle head (Empuse) is weak to axes. Importantly, each head can revive the others, so be sure to take them all out near the same time.
At this point, you could explore the Wrecked Institute to the west. You won't have any real reason to go here yet, and it'll be the most difficult dungeon in the area. We'll circle back once you have a quest directing you to there.
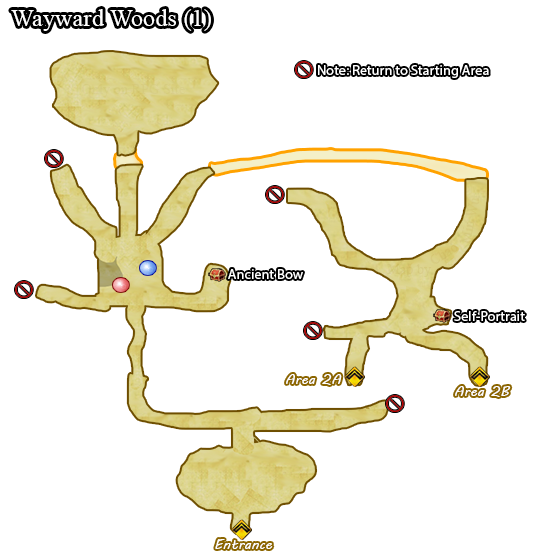
Wayward Woods
When you’re ready, head to the next story destination in Wayward Woods, reach the end to conclude the chapter. This place is basically the 'Lost Woods' of Bravely Default II, with a lot of places where you'll be sent back to the start if you make a wrong turn. Luckily, the wrong exits typically take you back to the same place, so it's basically an exercise in process of elimination. Or, just use our maps.
Enemy List
- Fresh Frond (Plant #013)
- Devil's Snare (Plant #017)
- Irminsul (Plant #021)
- Toxic Worm (Insect #002)
- Adamantite Golem (Spirit #002)
Treasure List - Wayward Woods
- Ancient Bow (Monster Chest)
- Self-Portrait
- Medium JP Orb x2
- Tactician's Hat
- Hinderlance
- Academy Gown

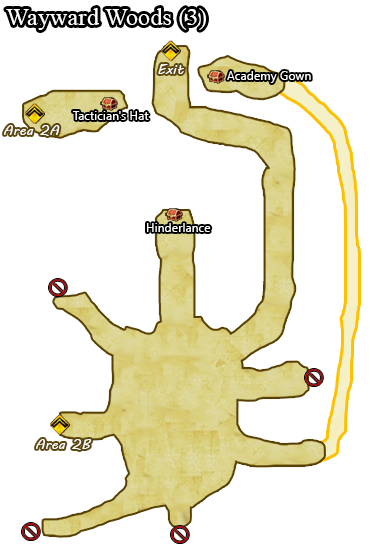
Upon leaving the Wayward Woods, you'll conclude the chapter.
- Chapter 0 - Prologue
- Chapter 1
- Chapter 2 [You Are Here]
- Chapter 3
- Chapter 4
- Chapter 5
- Chapter 6
- Chapter 7
- Monster Guide List
- Item Guide List
- Weapon Guide List
- Armour Guide List
- Card Binder List