
Bravely Default II Walkthrough - Chapter 3 | Rimedhal, Enderno, Serpent's Grotto, and Jaws of Judgement
With the first major antagonist Folie defeated and the second chapter of the adventure behind you, RPG Site's Bravely Default II Walkthrough rolls on with a full guide to the third chapter. Chapter 3 is perhaps the longest of the game, with a fair amount of side content to boot. This walkthrough for Chapter 3 of BD2 features everything you might need, including boss strategies, story progression tips, side quests, enemy lists, treasure you won't want to miss, area maps, and more. As ever, you can click a link to jump to where you're at, or just scroll:
- Rimedhal Field
- Enderno - a Remote Village & Side Quests Pt 1
- Crystalcap Mountain & Side Quests Pt 2
- Rimedhal, the Snowbound Land
- Serpent's Grotto
- Jaws of Judgement & Side Quests Pt 3
- Frosty Forest
- Hall of High Holies
As you'd expect, this guide has spoilers for Bravely Default 2 through the end of Chapter 3. If you need other chapters, hit up our walkthrough contents down the page to see the full index.
Bravely Default 2 Walkthrough Guide - Chapter 3
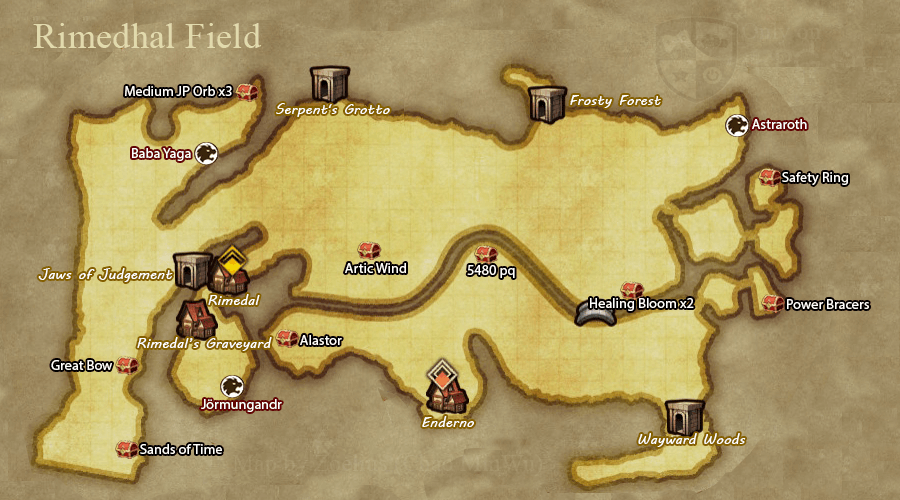
Rimedhal Field
You'll immediately be able to explore around Rimedhal Field if you wish. As typical, there are a handful of items to pick up and some rare monsters to fight. You might want to progress the story a little bit first as you'll be wandering the fields completing objectives anyway, but for those wanting to clear out all of the chests and pickups, we'll list them out here.
Treasure List - Rimedhal Field
- Power Bracers
- 5480 pg
- Alastor (Monster Chest)
- Healing Bloom x2
- Safety Ring
- Arctic Wind (Monster Chest)
- Great Bow
- Sands of Time
- Medium JP Orb x3 (Monster Chest)
Enemy List
- Aka-Oni (Humanoid #009)
- Shadowmoth (Insect #007)
- Yeti (Beast #006)
- Polar Bear (Beast #011)
- Vengeful Souls (Undead #013)
- Goliath (Undead #021)
- Flabanero (Aquatic #003)
- Kukulcan (Aquatic #007)
- Dagon Shaman (Aquatic #017)
- Dusk Wizzy (Humanoid #016)
- Baba Yaga *Rare Monster (Bosses #003)
- Eclipse *Quest Monster (Bosses #006)
- Jormungandr *Rare Monster (Bosses #010) - Near the Rimedhal Cemetary
- Astaroth *Rare Monster (Bosses #021)
Once you're done exploring Rimedhal Field to your heart's content, you will notice there are two towns you can enter. If you explore the closest town to the south, you will end up in Enderno. Note that immediately at the outset of the chapter here, there are optional side quests located here and back in Wiswald.
Enderno, a Remote Village
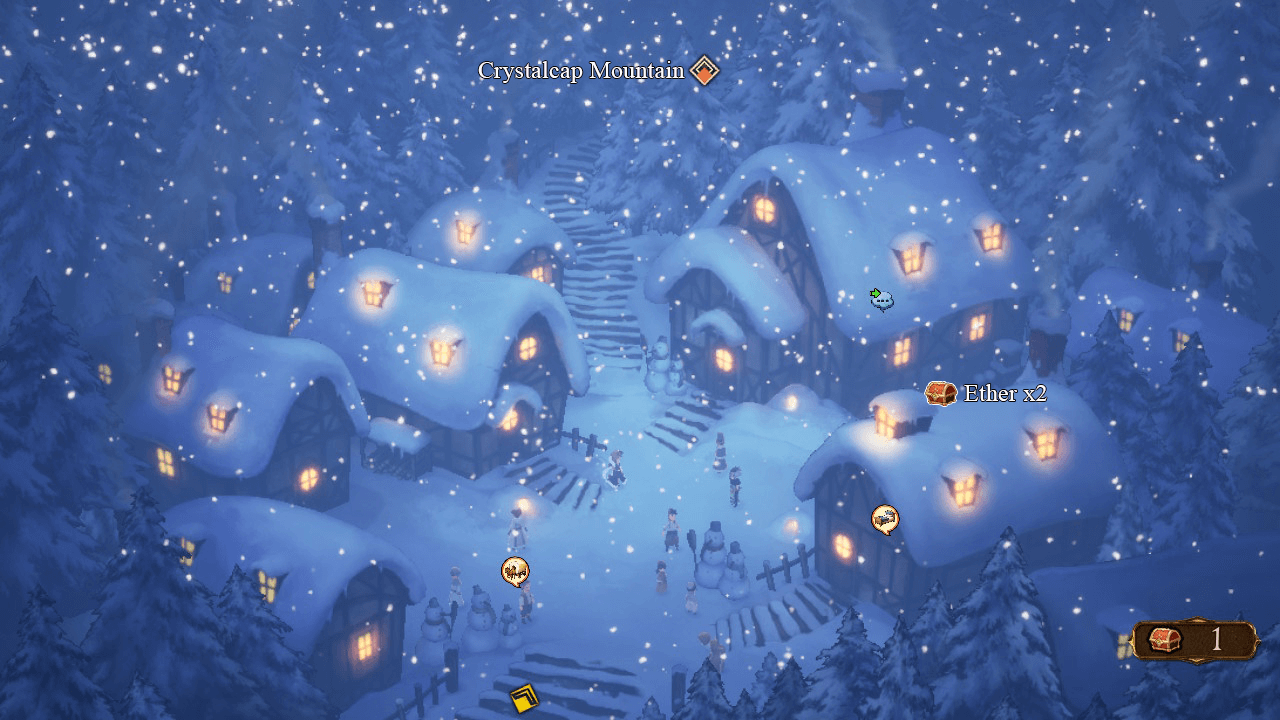
Treasure List - Enderno
- Ether x2 - Partially hidden from view on the righthand side
Enderno is a mostly optional location, for now anyway. As soon as you enter, you can head back to Wiswald to take on two new sidequests there before heading onto the sidequests here:
Side Quest #045: Taste Test
- Location: Talk to the woman inside the Wiswald Pub.
- Reward: Bomb Arm x4
- Objective: To complete this quest you will need to find 3 Banaectarine. This is found in Wiswald Woods and will be marked with an objective marker. Just cut the grass around the marked spot to get the quest item.
Side Quest #046: Test Your Strength
- Location: Talk to the woman just above the general store in Wiswald.
- Reward: Ikaboshi Kabuto
- Objective: When you acquire the quest, you will need to defeat a list of monsters, all of them can be found in Rimedhal field:
- Aka-Oni
- 2x Yeti
- 3x Polar Bear
While marked as a sidequest, the next part is the major objective of Enderno, and will reward you with a new job:
Side Quest #047: In Dreams
- Location: Talk to Glenn in the upper right house of Enderno.
- Reward: Large Experience Orb and a new Asterisk, Salve-Maker
- Objective: After acquiring the side quest, you will need to explore the optional dungeon to the north. Which is the Crystalcap Mountain. This dungeon is a bit tougher than the rest of the area, so if you’re having trouble, you can always return and save this quest for later.
Side Quest #048: Human's Best Friend: Part III
- Location: Talk to Truff near the entrance of Enderno.
- Reward: Large Experience Orb
- Objective: After meeting Truff, visit Enderno and talk to the chef inside the left house. Then find Truff in the field map, he should be located in the southwest corner outside of town. Break the rocks with the Y button to complete the quest.
Crystalcap Mountain
For being a side-objective, this dungeon is pretty long and the enemies here can be a notch up from what you've faced so far. If you spent any amount of time exploring the field area earlier though, things shouldn't get too out of hand, and you can always head back to rest up.
Treasure List - Crystalcap Mountain
- Adamant Bangle
- Ether x5
- Valkyrie's Coat
- Vaccine
- Chronos Glaive (Monster Chest)
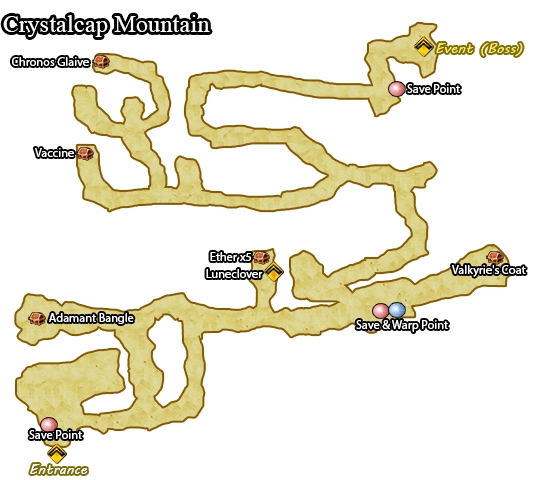
Enemy List
- Triffid (Plant #018)
- Sleipnir (Undead #018)
- Lapislion (Demon #010)
- Plague (Demon #013)
- Aigaion (Demon #022)
In the middle of the mountain, you can find the Luneclover near the Ether treasure chest. Bring the clover back to Glenn in Enderno. Glenn will ask you if you want to go to Dreamland. Inside dreamland, you will have to reach the end of the Crystalcap Mountain again for a boss fight. Finishing this quest will give you the Salve-Maker job class.
Boss: Glenn
- Glenn / HP (34860)
- Boss Loot: Acquire EXP 2445 / JP 550 / pg 1680
Once you're done with everything in Enderno, you're ready to head onto the chapter proper. Trek on over to Rimedhal, the city located near the center of the field area.
Rimedhal, the Snowbound Land
Rimehal is a bit more maze-like than most cities, but it's not too bad. Snow cities in RPGs are always appreciated. As usual, here's the layout of the town and some items you can pick up.
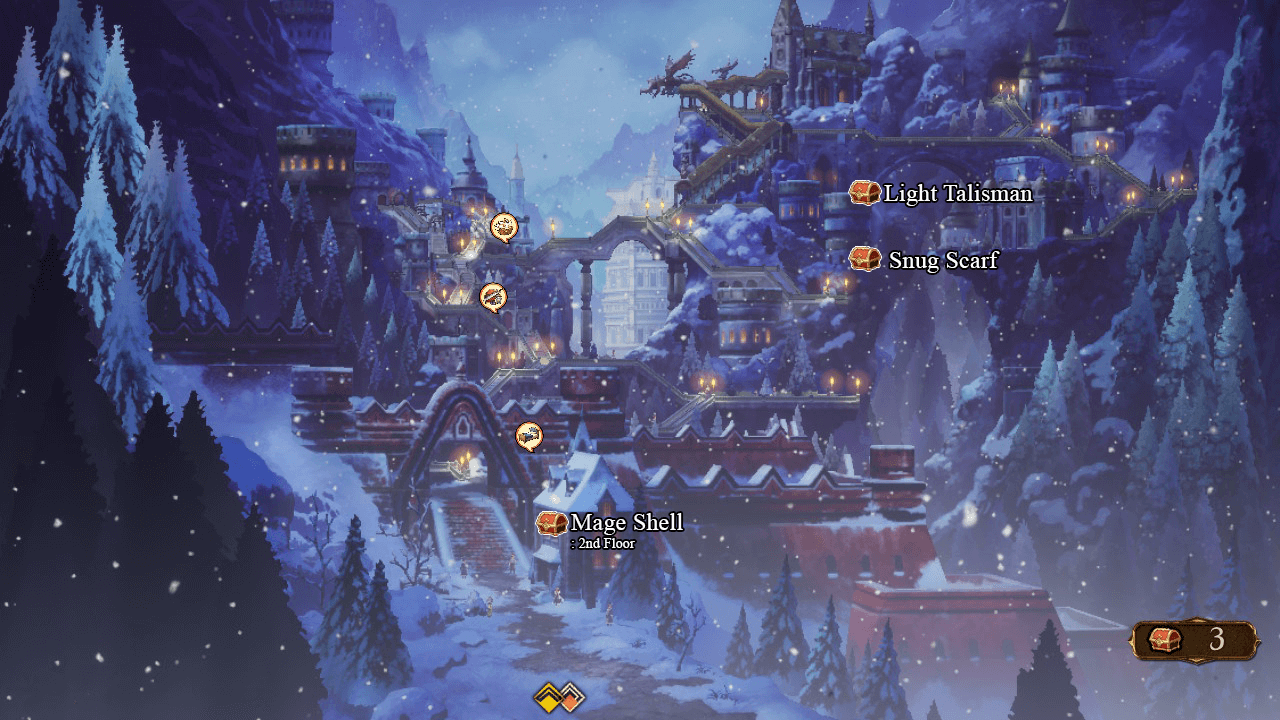
Treasure List - Rimedhal
- Mage Shell - Hidden on the second floor of the first building in the area.
- Snug Scarf
- Light Talisman
- Jade Crosier - Inside the Hall of High Holies
After witnessing the bizarre event in the center, visit the building all the way to the top right corner for another event. Then you're free to leave town.
You'll be tasked to head to the Serpent's Grotto, but before heading over there, a good number of side quests have opened up again:
Side Quest #049: Leading by Example
- Location: Talk to Lily in the Magic Institute (Wiswald).
- Reward: Heart Ring
- Objective: This side quest requires a bit of money to complete. It might be worth doing though, as the end reward is a ring that drastically raises MP. After acquiring the quest, head to the Great Treehollow area and talk to the elderly man. Give him 3000 pg as a part of the quest. Then talk to the scholar near the general store. This man will ask for 10000 pg. Then talk to the woman near the Treetop Tower entrance. This woman will ask for 24000 pg. Then talk to Lily in the Institute to complete the quest.
Side Quest #050: The Wayward Merchant
- Location: Talk to the Merchant in the upper right side of the Rimedhal.
- Reward: 11500 pg
- Objective: For this quest you will need to go the Wayward Woods. Inside there take the warp point and go north. You will find the missing merchant being chased by Jealous Jody. Defeat this mini-boss to complete the quest.
Side Quest #051: Mysteries of the Heart
- Location: Talk to the person on the Rimedhal staircase.
- Reward: Booster Bun (Aim) x2
- Objective: Talk to the girl near the exploration shop in Rimedhal. Then report to the client to complete the quest. Short and sweet.
Side Quest #052: The Joys of Spring
- Location: Talk to one of the townspeople by the Rimedhal plaza.
- Reward: 7700 pg
- Objective: For this quest you will need to collect 3 Horsetail Buds. These are found in the field map of Halcyonia. Once over to Halcyonia and cut the grass on the marked spots. Remember that you change the marked quest inside the Travelogue menu
Side Quest #053: Gone Fishing
- Location: Talk to one of the townspeople by the Rimedhal plaza.
- Reward: Adamant Bangle
- Objective: You will need to defeat 4 Flanbaneros to complete this side quest. They are common enemies found in the Rimedhal field mostly to the northeast near the water.
Side Quest #054: The Ultimate Stew
- Location: Talk to the woman just right outside of Rimedhal.
- Reward: Carving Knife
- Objective: For this side quest you will need to collect some ingredients for the client. These items are scattered all over the place. You can find the items pretty easily inside the Travelogue menu, but here are the locations just in case.
- Snow Cabbage: In Rimedhal Field just right behind the client.
- Moon Onion: Found in Hydrangea Hills just south from the warp point.
- Flowery Fungus: Found in Wiswald Woods, take the warp point, go slightly east and then north.
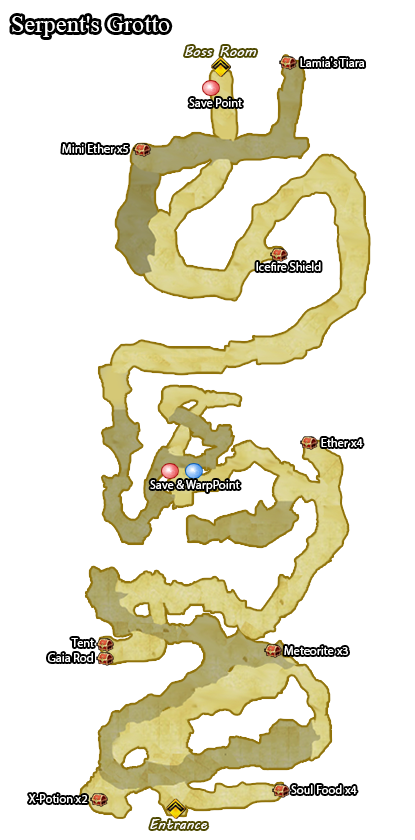
Serpent's Grotto
This dungeon is quite intricate with multiple levels, but you mostly have to make you're way north. It's a pretty good place to level up if you want to strengthen some of your more recently acquired jobs like Pictomancer or Salve-Maker.
Treasure List - Serpent's Grotto
- Soul Food x4
- X-Potion x2
- Meteorite x3
- Tent
- Gaia Rod (Monster Chest)
- Ether x4
- Icefire Shield
- Mini Ether x5
- Lamia's Tiara (Monster Chest)
Enemy List
- Cask Paraponera (Insect #012)
- Ice Golem (Spirit #003)
- Kitty-Cait (Spirit #006)
- Lux Element (Spirit #014)
- Turan (Spirit #019)
When you reach the end, talk to Martha. Then make your preparations to start a boss fight with her.
Boss: Martha
- Martha / HP (56265)
- Boss Loot: Acquire EXP 3360 / JP 520 / pg 2300 / Hermes Sandals
The Dragoon job is one of the best in Bravely Default 2, so consider switching one of your party members to it right away. Now you're free to return to Rimedhal; there is a simple new side quest available if you're interested.
Side Quest #055: Pen Pals
- Location: Speak to the woman to the left of the Rimedhal General Store (Night Only).
- Reward: Remedy x2
- Objective: You can complete this quest by quick traveling to Wiswald. Then go inside the tavern to the east side and talk to the old man. Report back to the client to complete the quest.
Once you're ready to continue with the main story, head to the town center for an event, then talk to the NPC surrounding the area. When is that done, visit the priest northwest of town and then try to leave. After this event, run towards the really north side of the map. Then follow the stairs to the east side, it will lead to another area of Rimedhal. Watch the event.
Leave town and head to the area behind Rimedhal to the Jaws of Judgement.
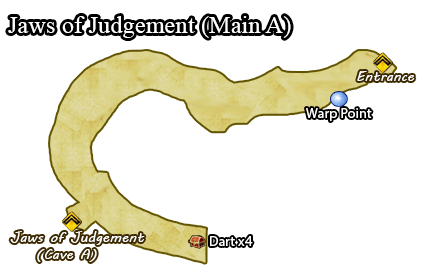
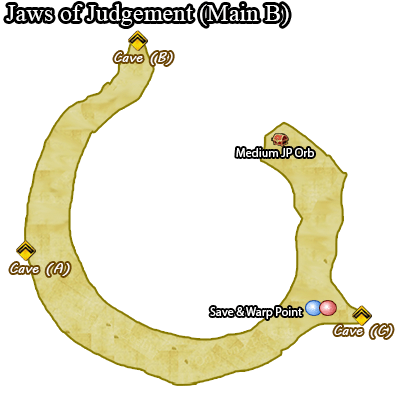
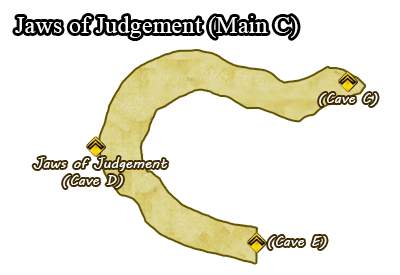
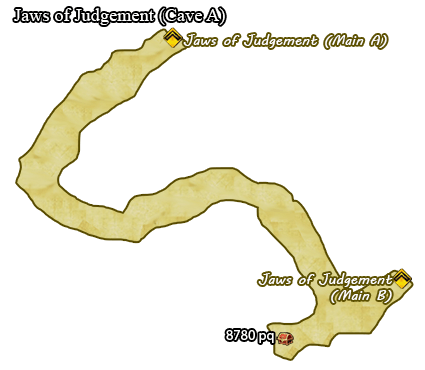
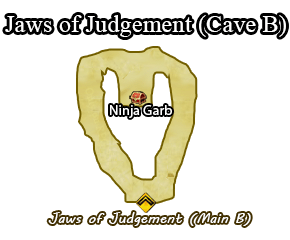
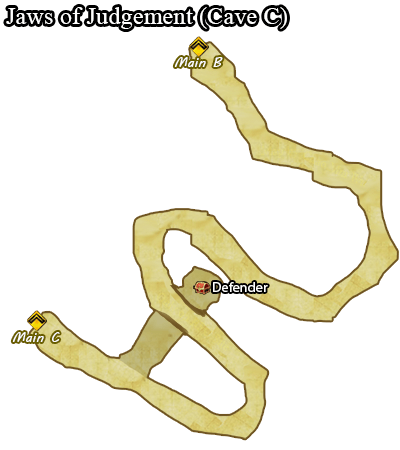
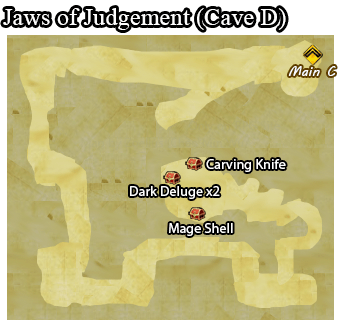
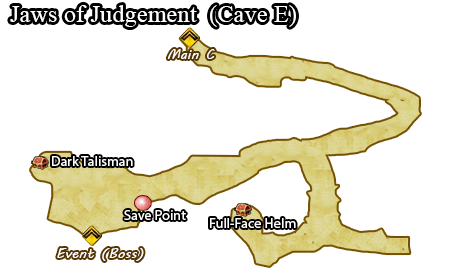
Jaws of Judgement
With all of the optional objectives wrapped up, it's time to head into one of the larger dungeons of Chapter 3. The Jaws of Judgement are quite long but there's lots of items to pick up here and plenty of opportunities to level up your new classes.
Treasure List - Jaws of Judgement
- Dart x4
- 8780 pg
- Ninja Garb (Monster Chest)
- Medium JP Orb
- Defender
- Carving Knife (Monster Chest)
- Dark Deluge x2
- Mage Shell
- Full-Face Helm
- Dark Talisman (Monster Chest)
Enemy List
- White Fang (Beast #003)
- Merciless Souls (Undead #014)
- Frost Tortoise (Aquatic #010)
- Thor (Spirit #022)
- Azazel (Demon #003)
- Big Wiki-Wiki (Spirit #025)
Start out by picking up the Darts and then moving into the nearby cave. Pick up the money then head out back to the main area. Here, head north to a dead-end for the useful Ninja Garb. From here it's mostly straightforward until you're on the penultimate screen. Once you head west into Cave D, you'll need to stay on the upper area to gather the three chests at the end, if you fall you'll likely run into some enemies before you can get back and retry. Sadly, none of the items here specifically are that great but for completionists, you'll want to grab them.
Once you're on the last screen, note that you'll immediately head into battle and be returned back to town if you get too close to Helios. Make sure to grab the Dark Talisman past him unless you want to trek back here later to pick it up.
Boss: Helios & Gladys
- Helios / HP (27612)
- Gladys / HP (42480)
- Boss Loot: Acquire EXP 3520 / JP 540 / pg 2420
After defeating the boss, you will automatically return to town. Head to the same area where they perform the sacrifice ceremony for an event scene.
From here on there are some remaining optional side quests you can complete. One of these will take you to a challenging optional area, the Frosty Forest
Side Quest #056: That's the Spirit!
- Location: Speak to the man in the upper northeast side of Rimedhal.
- Reward: Monstrous Medley x 2
- Objective: Collect 4 Soul Food and give it to the client. Soul Food is dropped from spirit-type enemies, if you have been fighting them for a while, you should have enough by the time you start this quest. Otherwise you can easily purchase it later.
Side Quest #057: Cool Customer
- Location: Speak to the man on the left side of Enderno.
- Reward: Large JP Orb
- Objective: For this side quest you will need to gather some Sugar Rime for the client. This is found in the optional dungeon to the north in the Frosty Forest. The enemies there are much stronger than the current area so be cautious.
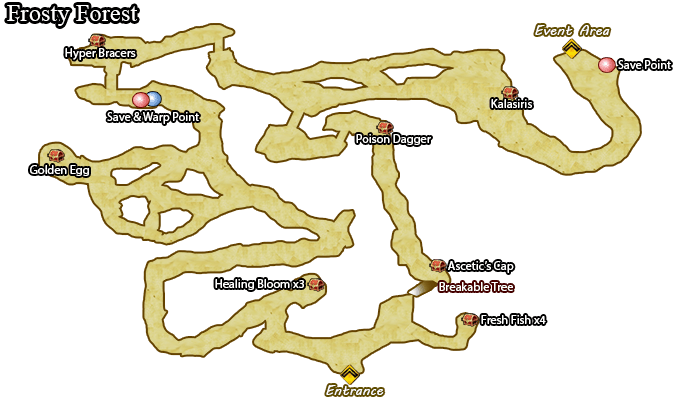
Frosty Forest
I hope you didn't step into here when you first arrived at Rimedhal because these guys are challenging. Once you've gathered the chapter's newest jobs and perhaps farmed on some Wiki-Wikis in the Jaws of Judgement, you'll finally be ready to trek through this difficult dungeon. It's also the most maze-like area so far, though luckily that's why we have a nice map for you.
The Golden Egg you can acquire here is a nice accessory that doubles the money you earn from battles, though do note it is quite heavy to equip.
Treasure List - Forest Forest
- Fresh Fish x4
- Healing Bloom x3
- Golden Egg (Monster Chest)
- Hyper Bracers
- Kalasiris
- Poison Dagger (Monster Chest)
- Ascetic's Cap
Enemy List
- Arachne (Insect #017)
- Nemophila (Plant #003)
- Blue Funoo (Plant #007)
- Coppice (Plant #022)
- Skeleton Assassin (Undead #006)
This is a great place to grind if you're into that. For the side quest itself, you just need to grab the Sugar Rime items. Remember that you change the marked quest inside the Travelogue menu to find them easily. Return once you've gathered all of them.
To finally finish off the main story in Chapter 3, visit the northeast building to town in the Hall of High Holies. Then open the door to the right to enter the dungeon.
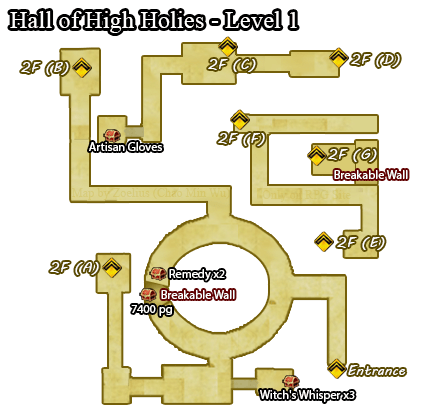
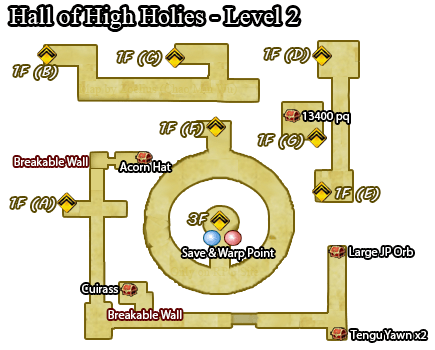
Hall of High Holies
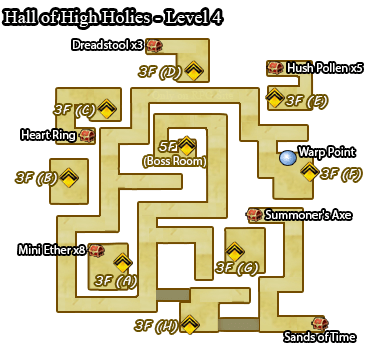
Treasure List - Hall of High Holies
- 7400 pg
- Witch's Whisper x3
- Acorn Hat
- Cuirass (Monster Chest)
- Tengu Yawn x2
- Large JP Orb (Monster Chest)
- Remedy x2
- Artisan Gloves
- 13400 pg
- Hush Pollen
- Dreadstool
- Heart Ring
- Mini Ether x8
- Sands of Time
- Summoner's Axe (Monster Chest)
Enemy List
- Holy Sword (Humanoid #031)
- Holy Mace (Humanoid #032)
- Holy Lance (Humanoid #033)
- Holy Wand (Humanoid #034)
- Abaddon (Demon #017)
- Gagana (Demon #021)
Note that this dungeon has a few hidden paths and breakable walls leading to some of the items listed here. Normally you can tell by looking at the damage in the wall or rubble on the ground.
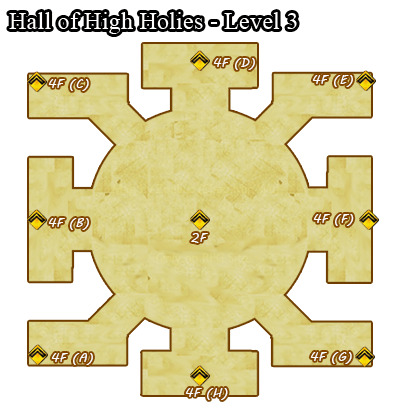
Once you get to Level 3, you'll have a lot of rooms to choose from. Most of these (marked A through E) lead to dead ends, often with a chest. F and H (east and south staircases) will lead to the main part of the 4th level that can take you to the boss area. There are some darker areas on the map that you can travel though despite the route being obstructed by the overhead camera angle.
Boss: Domenic
- Domenic / HP (70920)
- Boss Loot: Acquire EXP 3780 / JP 580 / pg 2600
After winning this fight, leave the dungeon and head outside. Move to the building near the entrance. From here if you talk to Martha, it will lead to a series of battles, so make sure you make the proper preparations. During the battle you will be fighting three groups of soldiers, they roughly have 12000 to 18000 HP depending on the difficulty you’re playing. When the battles are over, the chapter will end. Interestingly enough, some of the soldiers here are unique enemies not found anywhere else, and aren't located in the Monster Guide.
Upon finishing the event, you'll conclude the chapter.
- Chapter 0 - Prologue
- Chapter 1
- Chapter 2
- Chapter 3 [You Are Here]
- Chapter 4
- Chapter 5
- Chapter 6
- Chapter 7
- Monster Guide List
- Item Guide List
- Weapon Guide List
- Armour Guide List
- Card Binder List