
Bravely Default II Walkthrough - Prologue | Halcyonia, Outlaw's Hideout & Breath of Sighs
Welcome to RPG Site's official Bravely Default II Walkthrough. This guide is designed for first time players to have a general outline of what to expect, even though the game does share enough information to get started.
Throughout this guide, you'll encounter enemy lists, side quest lists & completion directions, treasure checklists, boss strategies, and handy maps. This section of the walkthrough covers the Prologue:
- Adventure Begins in Halcyonia
- Outlaw's Hideout Dungeon
- Halcyonia Prologue Side Quests
- Vale of Sighs Dungeon
When you start the game for the first time, a difficulty option is given, select the option that is best suited for you. RPG Site's guide is written under normal mode circumstances.
This guide covers the prologue. If you've already completed it, continue to our BD2 Chapter 1 Walkthrough. Alternatively, see our Bravely Default 2 Walkthrough Contents Index at the foot of this page.
Bravely Default 2 Walkthrough - Prologue
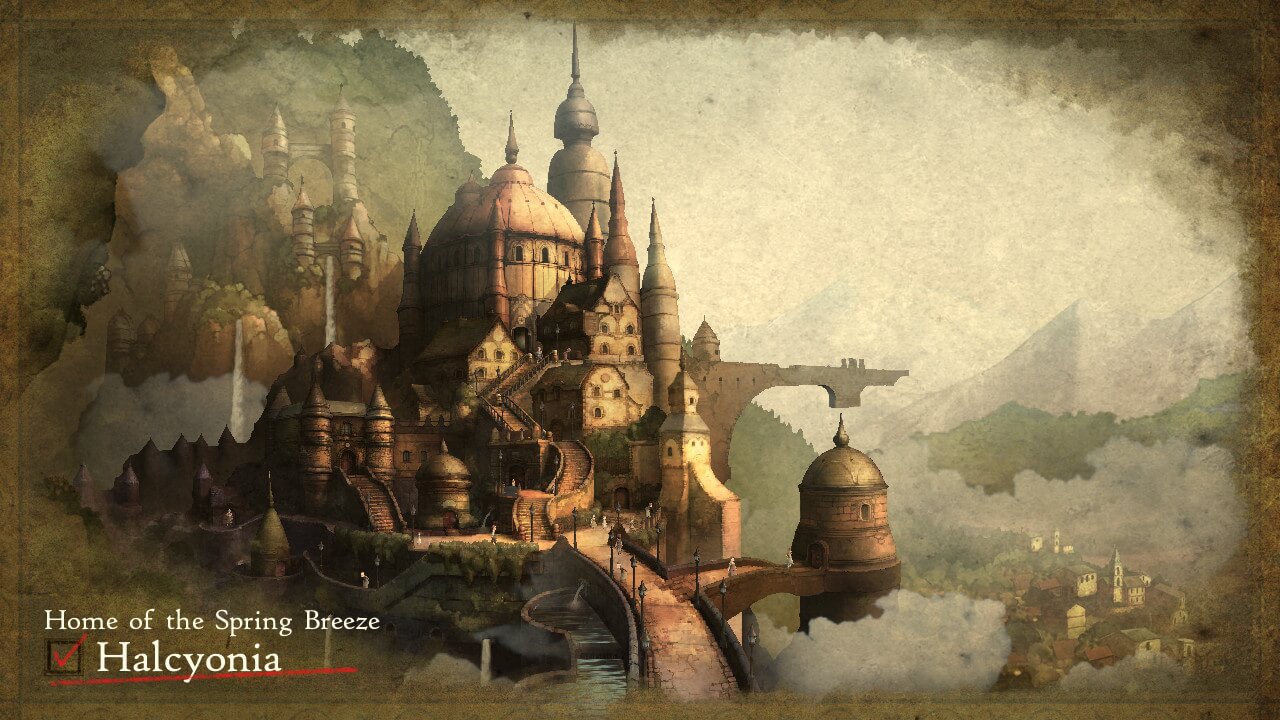
Halcyonia - Adventure Begins
Treasure List - Halcyonia
- Inn (Phoenix Down x2)
- Bottom Left House (Buckler)
- Royal Palace - (Pilgrim’s Hat)
When you regain control of the game, open the chest beside you to get some Phoenix Downs. Then talk to the owner of the Inn.
Before leaving town there are some treasures placed in Halcyonia, if you go to the house on the bottom left corner of the map. You will find a Buckler.
Leave Halcyonia, then move to the beach area.
--Battle Tutorial--
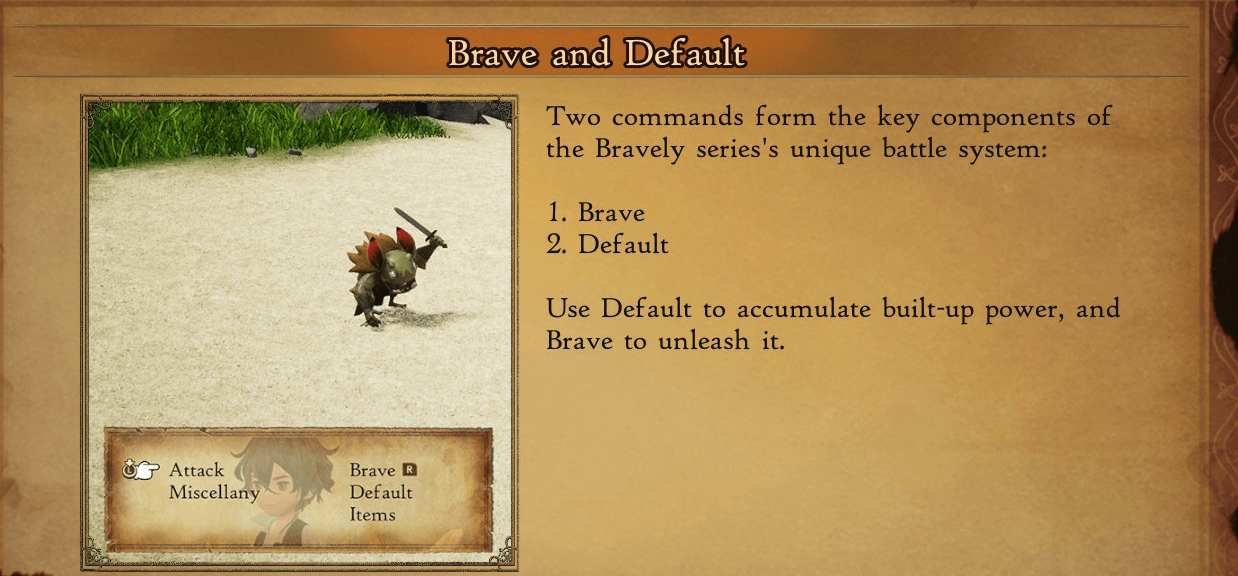
You will encounter the first battle. Nothing to worry about here, as this is to get familiar with the game. The protagonist is actually invincible here, so just follow the command prompts. If you haven’t played the previous games before, utilizing the Brave and Default system will bring an advantage in battle.
- Brave - Use BP for an extra action. However, if BP goes negative, BP needs to return to 0 to move again.
- Default - Defensive action that will store up BP.
Two new party members will join your party, and at this point you'll also be allowed to access the Job and Abilities menu.
With this sequence done, return to Halcyonia. There will be wandering monsters in the field map, touching them will trigger enemy battles.
Enemy List
- Goblin (Humanoid #001)
- Orc (Humanoid #011)
- Wolf (Beast #001)
- Ratbitt (Beast #017)
- Flannacotta (Aquatic #001)
- Sahagin (Aquatic #013)
- Fresh Forkling (Plant #009)
- Ochu (Plant #015)
- Woody (Plant #019)
- Brimstone Stallion (Undead #015)
- Sylph (Spirit #016)
- Vesp (Insect #019)
- Coral Emperor *Rare Monster (Bosses #009)
- Treant *Rare Monster (Bosses #015)
- Leannan Sith *Rare Monster (Bosses #009)
After the event scene in Halcyonia, leave town and head to the Outlaw’s Hideout (Northwest of map). The guest member helping you is also much stronger than the rest of the cast and can give you a large advantage in leveling. There are also treasures found in the field.
Equip the 'Divining Rod' ability to display how many treasures are left in the map. Or use our map & treasure list below - or both.
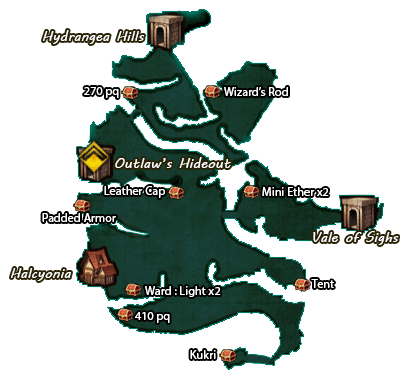
Treasure List - Near Halcyonia
- Ward Light x2
- 410 pq
- Kukri
- Leather Cap
- Mini Ether x2 (Monster Chest)
- 270 pq
- Tent
- Wizard's Rod (Monster Chest)
- Padded Armor
Outlaw’s Hideout - the first dungeon
The first dungeon is here. It's quite straightforward, but there is still a range of optional treasures to find and battles to fight on your way to the boss battle on 2F.
Enemy List
- Goblin Chopper (Humanoid #002)
- Mageling ((Humanoid #019)
- Ghost Knight (Undead #001)
- Bronzegoyle (Demon #005)
- Freyr (Spirit #020)
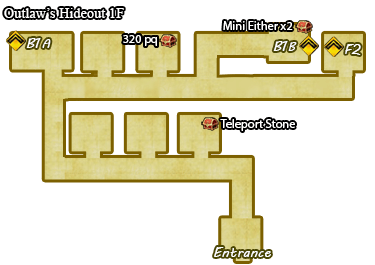
Treasure List - Outlaw Hideout 1st Floor
- Teleport Stone
- 320 pq
- Mini Either x2
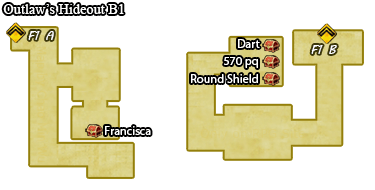
Treasure List - Outlaw Hideout B1
- Francisca (Monster Chest)
- Dart
- 570 pq
- Round Shield
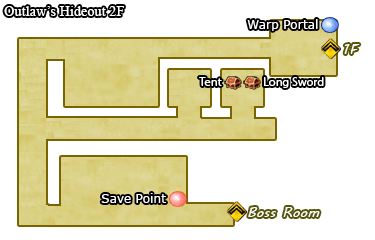
Treasure List - Outlaw Hideout 2F
- Tent
- Long Sword
There are no maps when exploring dungeons, however, if you do get lost, following the yellow point will lead you to the end of the dungeon.
During the story sequence, examine the crystal before the time limit runs out or else it is a game over.
First Boss Battle: Selene & Dag
- Selene / HP (2457)
- Dag / HP (3822)
Selene’s healing can easily outheal your DPS at this point, so focus on Dag. Dag is weak against dagger and thunder attacks. Try not to spend all your BP as when Dag has accumulated 3 BP, he will unleash a flurry of strikes that can easily K.O. your team if no one is using Default.
In the worst case scenario, Sloan will also provide amazing support if you do find yourself in a pinch. He will attack if your party is healthy, heal if they're not, and revive if someone is downed - but only one action per turn. When Selene is the only boss left, just focus on her without much worry, as she only heals and rarely attack your team.
Boss Loot: Acquire EXP 660 / JP 310 / pg 560
After winning the first battle, you are given the job abilities of White Mage and Vanguard. Job abilities are the main key feature of getting your party upgraded and finding success in later battles. Jobs, which are Bravely Default 2's classes, offer a large variety of setups. The guide here will provide a setup mostly on what the author used and might not be the most optimized method of winning all boss battles.
We also have created pages to outline all jobs in Bravely Default 2, and some of our picks for the best jobs, subjobs and job combinations overall, but these pages will contain spoilers, so please read at your own risk.
Return to Halcyonia - side quests galore
Return back to town (Halcyonia). The game will tell you that there are side quests available by talking to anyone with a blue text bubble.
For the first side quest, visit the house in the center below the stairs and talk to the old lady to get a Side Quest. This quest is also mandatory to complete in order to advance the story.
At this point, a string of side quests is unlocked. We list them all here, but when you're ready to move on with the story you'll simply need to leave Halcyonia and follow the objective marker East, to the Vale of Sighs.
A note about Side Quests
Bravely Default II does not seem to have any sort of formal quest log -- there won't be any easy way to track what you've completed. However, if you go into the menu and select Travelogue, you'll be able to press X to choose 'In Progress', and you'll be able to toggle waypoint markers for up to three quests. If you pick up a quest and you're not sure where exactly to go, double-check that you have it selected as active in this menu.
Enemy List
- Fenrir *Quest Monster (Beast #004)
- Grizzly *Quest Monster (Beast #009)
Side Quest #001: Borrowing the Boat
- Reward: Teleport Stone x2
- This side quest is automatically completed when the event ends. This quest lets you use the Online Functionally. As you can send your ship to explore and get some treasures in return. This is similar to the old Bravely games where you can get rewards during your downtime of playing. We have a full explanation of the Boat Exploration mechanic if you end up a little confused by it.
- Note: After completing the side quest, return to the Inn for an event scene. Then leave the inn, there are several new side quests available before heading to the next destination.
Side Quest #002: A Knife to Remember
- Location: Talk to the man in the pub. (Middle right house)
- Reward: Dart
- Objective: Defeat the Sahagin near the beach area.
Side Quest #003: Human’s Best Friend: Part 1
- Location: Meet Truff near the beach area.
- Reward: Small Experience Orb x2
- Objective: Cut the nearby grass by pressing Y until you find a ring. This side quest also lets you use special actions in the field map to gain battle advantages. Defeat the group of monsters to complete the quest.
Side Quest #004: You-Know-What
- Location: Talk to the man in the middle of the field map (near Leather Cap chest).
- Reward: Mini Ether x4
- Objective: Give the man 3 potions.
Side Quest #005: One Boy’s Quest
- Location: Talk to the lady on the bottom right side of Halcyonia.
- Reward: Echo Herbs x3
- Objective: Talk to the boy in the small house in the bottom left corner of the map.
Side Quest #006: Business to Be Getting on With
- Location: Talk to the lady near the staircase. (*Appears at Night)
- Reward: 470 pq
- Objective: Defeat 3 Goblins.
Side Quest #007: Dish of the Day
- Location: Talk to Adelle at the inn after completing Quest #002, and #003.
- Reward: Fresh Fish x2
- Objective: Defeat Fenrir. Fenrir is found on the North side of the field map. After defeating Fenrir, report back to the Innkeeper.
- Mini Boss: Fenrir: HP 3120 / EXP 528 / JP 200 / pq 680
- Strategy: Fenrir can counterattack when you land physical attacks on it. If you spam Brave nonstop, you can be badly hurt from its counterattack. Anyways, Sloan will carry your party if anything goes haywire.
Side Quest #008: Presentation Is Everything
- Location: Talk to the man on the left side of the Royal Palace. After completing Quest #002, and #003.
- Reward: Small JP Orb
- Objective: Collect 3 Sprigs of Motley Trefoil. These can be collected in Hydrangea Hills, the location in the north part of the map.
- Note: Treasure and Enemy Lists for Hydrangea Hills is covered in our Chapter 1 guide.
Side Quest #009: Double Dare
- Location: Talk to the boy on the left side of town. (*Appears at Night)
- Reward: Booster Bun (Evasion) x2
- Objective: Return the Boy’s Book by finding it in the Outlaw’s Hideout.
Side Quest #010: A Grizzly Conundrum

- Location: Talk to the Man outside of town. (Northeast from Halcyonia)
- Reward: Mythril Staff
- Objective: Defeat the Grizzly Bear. It's marked on the northwest side of Halcyonia.
Side Quest #011: Hear the Wind Blow
- Location: Talk to the lady on the bottom right side of Halcyonia.
- Reward: Ward Light x2
- Objective: Talk to the old man on the bottom left side of town. Then talk to the client and the old man again.
To move on with the main story, leave Halcyonia and go to the location on the east side of the map. It will take you to the Vale of Sighs.
Vale of Sighs - prologue's climax
The Vale of Sighs is another dungeon-like area, although it's an outside environment. It features optional treasure to grab on a journey to a boss, and a range of enemies to battle.
Enemy List
- Roc (Beast #013)
- Ahriman (Demon #011)
- Asp (Demon #015)
- Hecatoncheir (Demon #019)
- Aqua Element (Spirit #010)
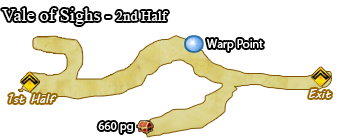
Treasure List - Vale of Sighs
- Kukri (Monster Chest)
- Mini Ether x3
- Tent
- Throwing Knife x3
- 660 pq
Boss: Horten
- Horten / HP (8892)
As like the previous bosses, Horten will try to use default to accumulate BP, usually will unleash a series of strikes when he’s at 3 BP. Be sure to guard against this. In the worst case scenario, Sloan can still provide healing as a handy AI back-up.
Boss Loot: Acquire EXP 1250 / JP 210 / pg 740 / People Pleasers
After winning the Monk Asterisk from Horten, you'll immediately be thrown into another boss fight.
Boss: Adam
- Adam / HP (99330)
It is actually possible to win this fight, but not without a lot of planning and a bit of luck, or perhaps a rematch on New Game+. To continue with the story however, you must lose, which you'll likely do anyways.
After the events, you can explore the other half of the hill. Reach the end of the hill to end the prologue chapter. From here on out, chapter 1 - and the real adventure - truly begins!
- Chapter 0 - Prologue [You Are Here]
- Chapter 1
- Chapter 2
- Chapter 3
- Chapter 4
- Chapter 5
- Chapter 6
- Chapter 7
- Monster Guide List
- Item Guide List
- Weapon Guide List
- Armour Guide List
- Card Binder List