
Wild West walkthrough, Trap Placement Puzzle Solution & Boss Strategy | Live A Live guide
The Wild West isn't the most obvious setting for a Japanese RPG, and that makes it one of the most iconic and attractive scenarios in Live A Live. After all, that makes this a blend of the grand old American West with Japanese RPG mechanics from the East - but in truth, it's actually not a chapter that's very heavy on gameplay at all. This Wild West chapter walkthrough will help you with the puzzles and battles you'll find within, however.
In truth, the Wild West chapter is a simple story that hinges on one minor puzzle built around finding items and setting traps. Essentially, you'll find yourself in a classic Wild West town-under-siege story - and by setting traps to knock out enemy forces before they can reach the town, you'll make the big battle at the end of the chapter easier.
This walkthrough guides you through the mechanics of this chapter step-by-step so you can get the best result and have the easiest time. This scenario is of short length, and we'd say it's of Medium difficulty, if only because there's a definite knack to beating its boss. We'll teach you the knack, however, and can do the same for every chapter - just visit our Live A Live walkthrough contents page.
The American frontier is a place of foolish dreams and dashed hopes. A tired soul rides into a dying town terrorized by outlaws. Success, they call it, though to look at it now, none can imagine why. Against a gang of villains, a lone gunslinger stands no chance. But perhaps, by working together with the locals to prepare traps before the Crazy Bunch arrives, one man may yet make a difference.
Live A Live Wild West Walkthrough: First Steps in Success
In short, The Wild West is a brief scenario in Live A Live where the protagonist, The Sundown Kid, must defend the small town of Success from a group of villains known as the Crazy Bunch. Since you’re vastly outnumbered, the Sundown Kid must install traps and give the civilians a mean to protect themselves. Depending on how efficient you plant your traps it will determine the difficulty of the last battle. This scenario is might be difficult for the first time and will likely require some trial and error to get the best results.
Before all that, however, you'll have to face an unavoidable battle between protagonist The Sundown Kid and his rival, Mad Dog - a classic old west duel.
Boss Battle: Mad Dog
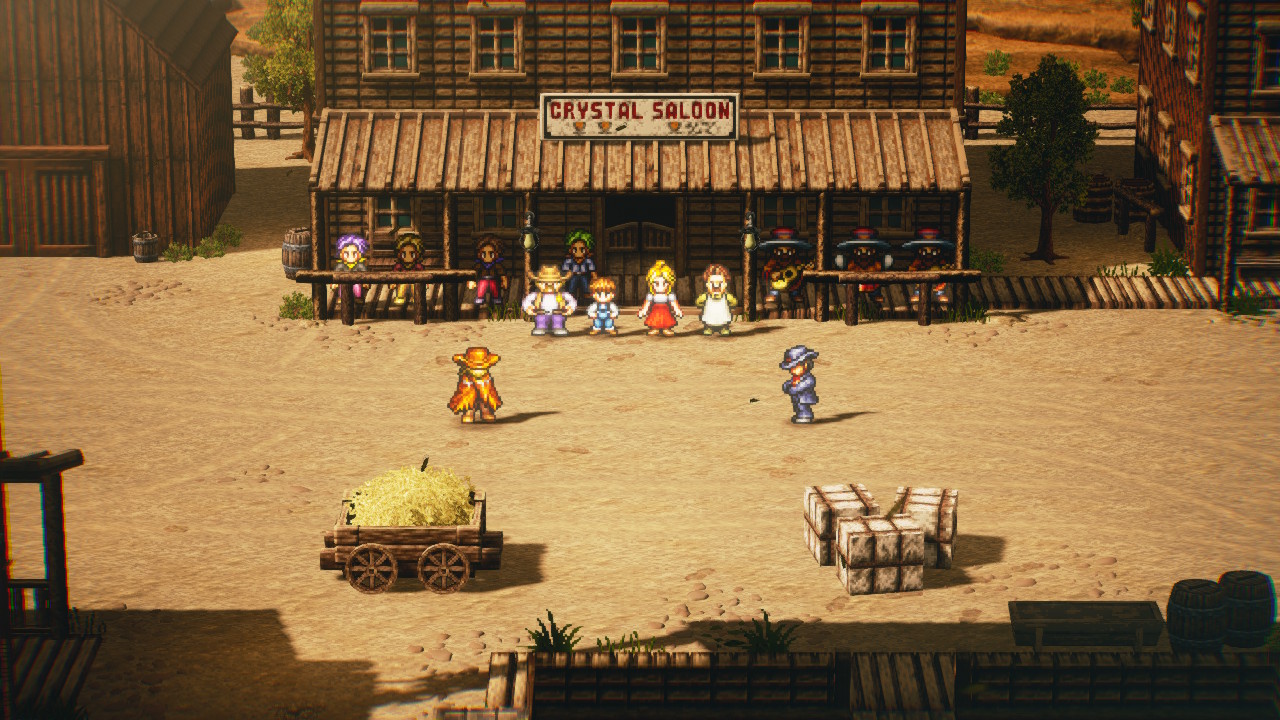
With that, it's onwards to the town of Success. This is where you'll be spending the rest of this chapter, in this little frontier town with its handful of citizens.
When you reclaim control, move inside the Saloon. Pick up an Herbal Liniment item behind the bar counter, then talk to the barkeep for an event. Regardless of which choice you pick, a fight will ensue. After the story event, head outside the bar for another event. After the showdown event, talk to everyone in the Saloon. Then finally talk to Mad Dog for the next scene. You will receive a Sheriff's Badge.
Now with that set, you have a time limit to explore the town to find items that the locals can use. The bell to the upper right corner determines the time limit. Make a back up save file immediately in case if you need to redo this section - it's truly time limited - you've got eight minutes only.
Setting Traps in the Wild West
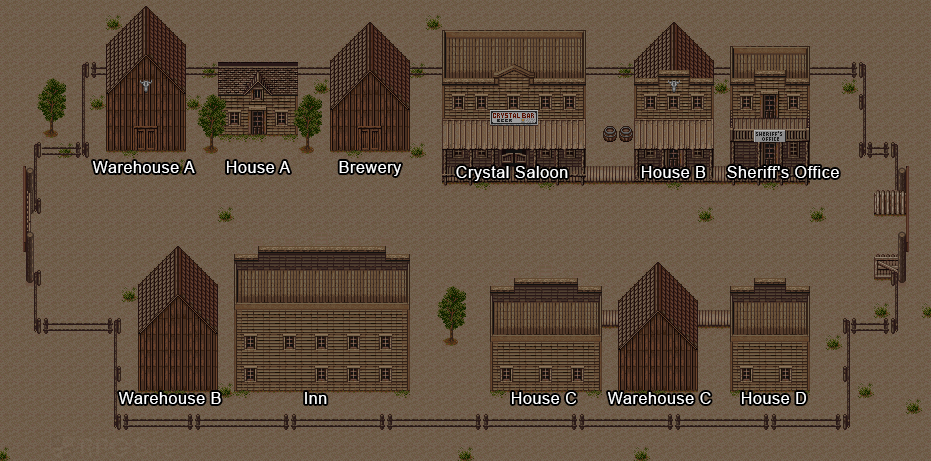
The most important thing to do before going into this time-limited trap-setting section of the game is to familiarize yourself with the map of Success, the unlucky town in the sights of The Crazy Bunch. So here's an overview map of the area:
With the map in mind, here's how this gimmick works. As we mentioned, you have eight minutes to plant as many traps as possible - each time a minute passes, a bell will ring. The timer does pause when you're in dialogue, for the record.
Spread across the town are many items. Practically every building and room in this town contains a few items that you can use. Some items can be used alone to set a trap. Others can be combined with another item to create a weapon (such as a Molotov cocktail, or "Bottled Fire" as Live A Live calls it) which can then be used as a trap. Finally, some items can be kept by the Sundown Kid for use in combat, like healing items.
Sundown can't place traps himself - once he's gathered the materials, you must entrust the placement of traps to the citizens of the town. Some of them are better at it than others - more on that in a moment.
Item Location List
The first thing to do as part of this trap-setting game, then, is to gather all of the items you can. Here's what's in each house; you'll want to prioritize.
- Warehouse A (Storehouse) : Carrot x2, Coal Tar
- House A (Sheriff's House) : Oil
- Brewery : Miracle Tonic
- Crystal Saloon : Slingshot (Talk to Billy), Oil, Miracle Tonic, Herbal Liniment, Jerky, Barkeep's Beloved Poster, Annie's Diary (You can take it after Annie is away setting a trap)
- House B (Post Office) : Jerky, Empty Bottle, Herbal Liniment
- Sheriff's Office : Jerky, Dynamite, Peacemaker, Buntline Special
- Warehouse B (Stables) : Horse Shit, Carrot, Empty Bottle
- Inn (Wayne's Boarding House) : Rope (Middle room in the backroom, hidden below the stairs)
- House C (Diner) : Oil, Frying Pan, Carrot
- Warehouse C (Larder) : Shovel
- House D (Miner's Lodge) : Empty Bottle
List of Traps
The items you collect above can either be used as traps or can be used to create them. Here's the various traps and their outcomes:
- Bottled Fire: Made from 1x Oil and 1x Empty Bottle; Kills 2 goons.
- Dynamite: Boom! Kills 4 goons
- Rope: Kills 2 enemy units that are on horseback
- Shovel: Kills 1 goon
- Horse Shit: Kills 1 goon, but only if you've also used the Shovel trap
- Carrot: Distracts a Horse, killing the goon riding it
- Barkeep's Beloved Poster: Distracts a Horse, killing its rider
- Coal Tar: Can be used in a pinch to buy yourself two more minutes of trap-planting time. While you probably won't need to do this, there's an achievment for setting each trap, so you'll want to do this.
- Annie's Diary: Give to Annie in order to trigger a small optional scene. You'll also get an achievement for this.
Also, you only need to set one of each trap. No need to use all the Carrots or Bottled Fire.
So, there you have it. There is only a limited time that you can use. Hearing the chime for the 8th time, means that your eight minutes has ran out and the story will automatically move to the next part.
Trap Placement & Which NPCs to Use
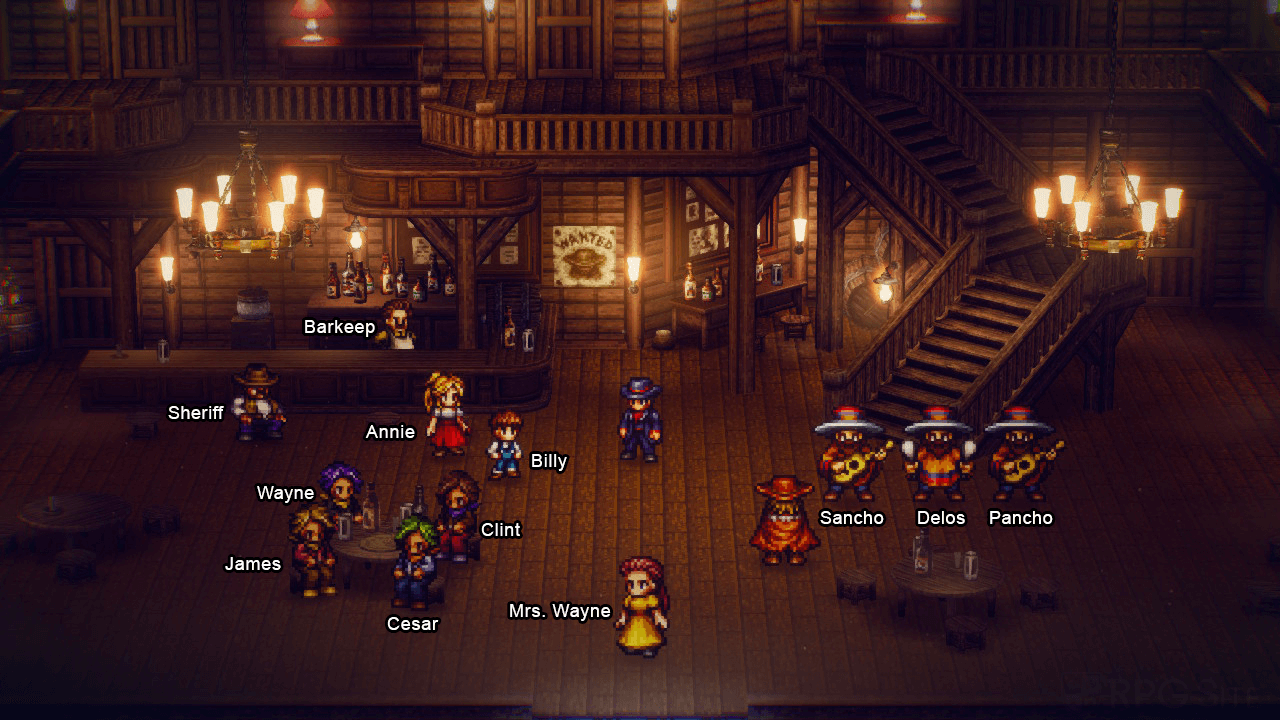
You've got eight minutes to gather as many items as you can and then have your NPC friends in the Success Saloon place them throughout the town. Here's the catch, however: the various NPCs all have varied skill levels, which determines how quickly they can plant a trap. Some will take longer than others, so you need to choose carefully.
We recommend you first grab the items that are in the Saloon itself, and then send your first NPC on their first errand. At that point, you can then go exploring, gathering items and periodically returning to the Saloon to order more NPCs to set traps. You need to talk to the Sheriff a few times before you can begin assigning NPCs to work on traps, too.
There are two NPCs with exclusive tasks - only Billy can use the Slingshot, and only Annie can use the Frying Pan - so make sure to assign them those. The Frying Pan can also be kept as an equippable accessory that gives +10 Vitality if you prefer - but if you do, it will mean you have to face one additional weak enemy in the final battle.
Beyond that, because of the time limit, it is highly recommended that you assign the slowest NPC immediately. When the NPC returns, it means their task is done. Some NPCs can set traps really fast, allowing you reassign them again. Here's the speed of each NPC from fastest to slowest:
- Sheriff (0:30)
- Annie (0:50) (Can use the Frying Pan trap)
- Barkeep(1:10) (You can talk to him to pass time if you don't care about the time limit.)
- James (1:30)
- Mrs. Wayne (1:50)
- Wayne (2:10)
- Clint (2:30)
- Sancho (2:50)
- Pancho (3:10)
- Billy (3:30) (Can use the Slingshot trap)
- Cesar (3:40)
- Delos (0:01 to 4:00) (Speed is entirely random, can be fast or really slow. Avoid using him.)
1 Bell = 1 Minute
The items you can collect around town mean that you'll be able to place one of each trap type, but you'll also have some excess trap materials, such as Bottled Fire, that you can't get rid of. These can be kept and used in battle like Grenades. Remember, you'll only need to set one Bottled Fire and one Carrot.
If you're efficient, you can easily have all of the traps placed with two or three minutes remaining - so try not to panic too much. One the bells ring out, it's time for the final encounter.
Showdown with O. Dio - Wild West Final Boss

The exact situation you find yourself in here will depend on how well you placed the traps. The evil O. Dio rides into town accompanied by a huge gang of goons. The more traps that go off, the less allies he'll have in the final boss.
If you failed utterly at the trap placement section, you will be dealing with O. Dio’s entire gang, which is that you are surrounded with a total of 15 enemies. No matter how impossible that sounds, it is still possible to defeat all 15 enemies. The traps you did not use will still be in your inventory can help turn the tide of battle in these impossible odds. However, if you did not pick up any items and started the battle with all the goons, the battle might be hopeless and you might have to redo the trap section again.
If there's a few traps that went off, there will of course be less enemies. If all traps are successfully placed, he'll be all on his own, and the prelude to the final battle will look like this:
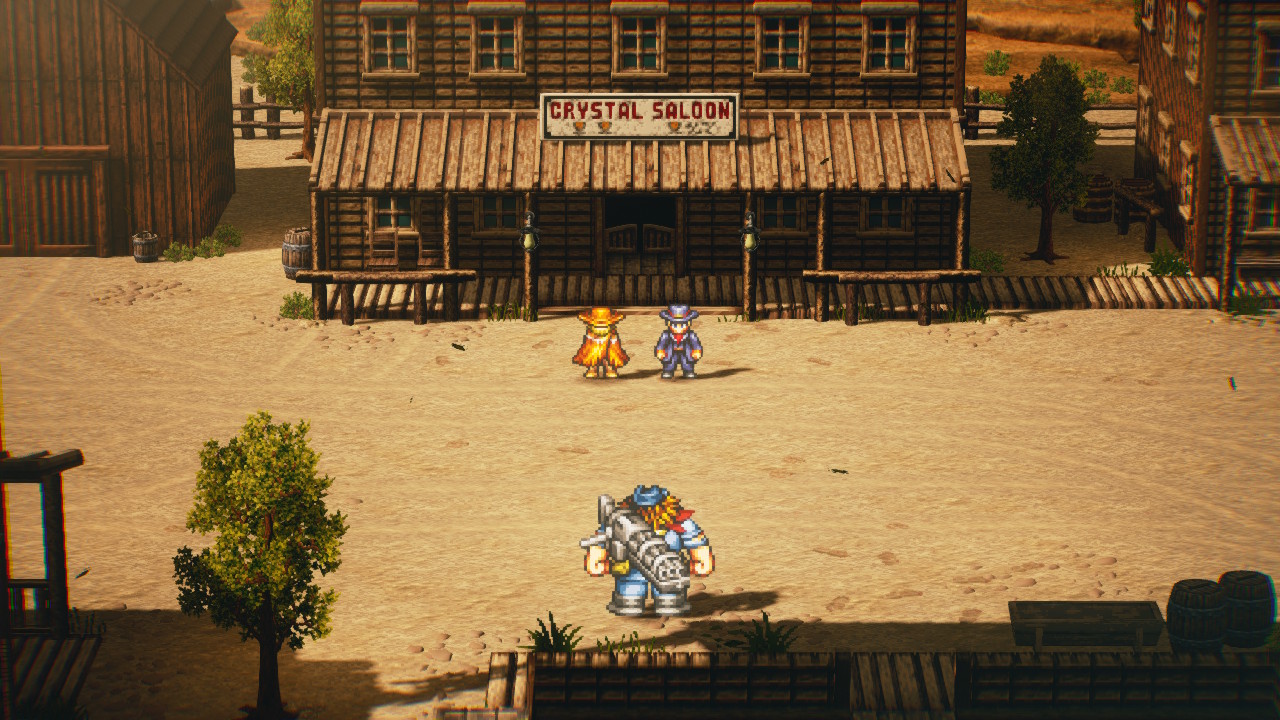
Battle Strategy VS Dio Alone :
With this knowledge. take advantage of his range and just fire at him. You will not be punished so long as you stay away from his direct view. If Dio cannot hit you, he will most likely move closer so that he can unleash his gattling gun on you.
In this version of the fight, there's also a couple of boulders scattered on the battlefield. You can use the boulders to take cover fire, but it also works on Dio's end as well. If you decided to keep the Frying Pan, then there will be one extra minion. Since Dio is pretty pathetic by himself, dealing with one extra minion should not cause any trouble.
Battle Strategy VS Dio and All Goons:
If you have pick up some items on the trap segment, this section should be clearable. Throwing the Dynamite can stunlock a large group of enemies at once. It will also leave behind a tile of fire and will hurt anyone that stays in the tile.
If you do not have any items the best thing to rely on is Mad Dog's Texas Jitterbug. This is an AOE attack that does random hits and can clear out enemies if luck is in your flavor. Once you have cleared out some mobs, rely on attacks that has a low charge time. The other thing you can use is throw the Bottled Fire for some AOE damage. When all the mobs are defeated, fighting Dio by himself will be a cinch. Dio can attack directly to his line of sight, but as long as you avoid being diagonal or vertical towards him as described above, you will not be attacked.
After defeating Dio, there will be one last battle. Its similar to the very first battle of this scenario, except that Mad Dog hits slightly harder. There shouldn't be any difficulty clearing this fight - but you can also choose an alternative outcome by running away. In the end, however, this scenario can only mend one way... such is the life of a gunslinger.
Afterwards, save your clear data for the final scenario, and move on to the next chapter. You'll see Sundown again, of course...
Live A Live Walkthrough Hub / Chapter Walkthroughs: