
Near Future Walkthrough, Mind Reading and Taiyaki Selling | Live A Live guide
The Near Future in Live A Live is one of the more 'standard' story chapters in the game, following a more traditional Japanese RPG game structure. For that reason, this chapter walkthrough guide is likely to be a lengthier one compared to the others. We'd categorize this as a long scenario, then, while its difficulty is firmly in the medium camp.
As is standard in Live A Live, there is a unique gimmick for this Near Future chapter: the protagonist, Akira, can read the hearts of others as well as talk to them. With that in mind you cause use that information to navigate through this scenario. Along the way there'll be battles, loot, and pretty much everything else you'd expect from a full-length RPG, just in a shorter form.
This walkthrough will guide you through the Near Future chapter step-by-step, including the best places to use the mind-reading gimmick, boss strategies, and more. If you're currently starting another chapter, go back to our Live A Live walkthrough contents page.
One day soon - but not yet - a rebellious youth lives a hard life, getting into trouble and picking fights because he knows what others are thinking. A rough routine, but one to which he's grown accustomed. However, his power eventually leads him to become involved in a dark conspiracy... which can only be stopped through the resurrection of an ancient robot king: the Steel Titan!
Live A Live Near Future Walkthrough: First Steps
As mentioned, The Near Future scenario of Akira is one of the chapters of Live A Live that plays more of the standard JRPG structure - though it's ultimately all driven by his unique mind-reading gimmick.
In the opening sequence of the chapter, the choice you pick doesn't matter - choose whatever you like. You'll very quickly be introduced to the main gimmick of this scenario; Akira has discovered the ability to read the hearts of others. You can do this by pressing the left face button, instead of talking to NPCs as you usually would.
As a general rule of thumb for this chapter, read the minds of NPCs constantly. Start out by reading the mind of the people in the park, if you want hear them. Then take the east exit out of town. A tutorial will pop in, giving a little more detail on the mind-reading.
Read the mind of the thugs - this leads to your first battle in control of Akira. Akira is mainly a support character and isn’t really all that strong. The main specialty would come in from Akira’s debuffing abilities. For the first battle, use the Lawless biker to defeat the gang of Crusaders.
After the battle is over, read the biker's mind to advance the story. Head inside the orphanage.
Bright Spark Orphanage
Item List
- Shampoo Hat (Shower room, examine the upper right corner)
After the event, you can explore the orphanage. If you move to the shower room to the northeast, you can find a Shampoo Hat by examining the corner. Then leave room and talk to the children in the right side of the building until Watanabe runs off. After this scene look for to the rooms in the left and talk to him. Return to where the kids are and examine the TV. After this event, move to the room on the very left of the map. Then talk to Kaori.
After this event, you can leave the Orphanage. Now you will you see the world map, there are also crusaders that are placed in the map. If they touch you, an enemy encounter will start. Since Akira isn’t that strong, it you might want to avoid combat until you have more party members.
If you do engage in combat, the game will let you know that Akira's flee function is replaced with Teleport. Escaping from battle will teleport you to a random location in the world's map so be wary of using it. Another note is that a lot of enemy encounters in Akira's scenario will have thugs come along with pets and machine. If you defeat all the thugs first, it will end the fight, avoiding the need to finish all enemies.
The next objective is to Doc Tobei's house. This is located to the south-west side of the map.
Timeless Wonders Antiques
Use the mind reading ability on the door, then follow the doctor to the basement. Use the telepod and then leave the place. After this event, you can return to the Orphanage or visit the park. In this guide, we're going to visit the park first.
At the park, you can help out the lawless biker to sell Taiyaki. If you successfully make a sale, you will receive a healing item from the biker. Use this mini-game to stock up on healing items.
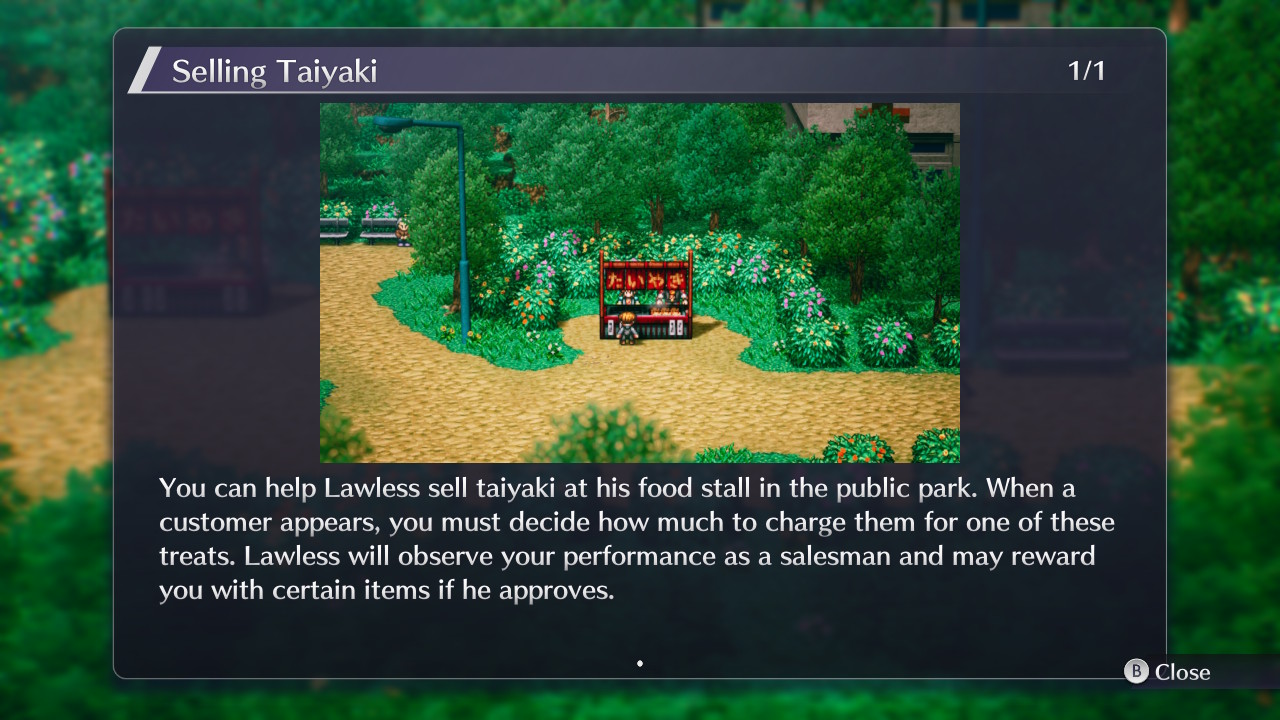
Taiyaki Selling Rewards & Prices:
- 100 Yen = Taiyaki
- 300 Yen = Banana Crepe
- 1000 Yen = Guts and Glory Special
- 10000 Yen = Misawa Special
- Little Boy: 100 Yen or 300 Yen
- Girl: 300 Yen or 1000 Yen
- Salary Man: 100 Yen or 10000 Yen
- Old Woman: 100 Yen or 10000 Yen
When you have stocked up on plenty of healing items, return to the Orphanage to advance the story further.
Bright Spark Orphanage Revisited
Once you get back to the Orphanage, enter and head to the Kaori's room to the very left side. After the event, examine the power socket near the door - you will get a new party member!
Then examine the doctor and read his mind after. The doctor will leave. After this event, go to rooms where the orphan is sleeping. Talk to them, and give the snacks you got from the park.
- Yuki = Misawa Special (Power Wristguard)
- Aki = Taiyaki (Misanga)
- Watanabe = Banana Crepe (Cap)
- Kazu = Guts and Glory Special (Baseball Glove)
Note: Kazu is outside of the orphange, you can talk to him when you can leave.
Next, visit the bathroom. After going to the bathroom, Taeko will return to do the laundry. Examine the washing machine to get the Matron's Crochet. Then try to leave the orphange. Akira will mention that he needs to meet up with Watanabe in the bathroom. Then examine the toilet for Watanabe to show up. He will give you a Pocket Lint.
However this item isn't exactly what you need, so head back to the toilet again. Repeat this several times. You receive Taeko's Pouch, Taeko's Picture, and the next event, you will get busted. You will also receive Taeko's Furious Fist.
Go back to the toilet again. This time you will get Taeko's Secret Stash. With this item, you can move forward with the story and leave the Orphanage. You can also examine the laundry that's hanging to get some random items. With everything all set and done, head back to Timeless Wonders Antiques.
Head downstairs, you will find that there is hidden stairway that will lead to Doc's secret lab. Talk to Doc and answer with the first choice "Hell yeah!:" Then run all the way back to the top and talk to the Doc. The doc will give you a set of instructions. Follow them carefully.
- Examine the pink elephant statue to the upper right.
- Read the book that Doc is reading.
- Play the Xylophone (Table on the center)
- Examine the blue mask (upper left corner, near the stairs)
- Go near the Steel Titan (All the way downstairs)
- Wash your hands (Sink to the upper right)
- Toilet.
If you did everything correctly, the event scene with the Steel Titan will play out. If not then you will have to redo the Doc's instructions all over again.
In the Steel Titan control panel, examine the 5 switches below. Then talk to the Doc when you examine all the switches. After this event, you can talk to Doc to synthesize different items - and it doesn't cost you anything to do so. The item the doctor synthesizes is usually an upgraded version of the item, but some items might change into something completely different, like an equipment to a healing item. You can get an achievement for doing this on PlayStation and PC.
If Tobei fails, don't worry, the item isn't consumed. Here are some suggested items to make:
- Watanabe's Badge -> Sweats/Taiko's Pouch -> Taeko's Picture/Full-body Tights/Punk's Jacket -> Biker's Belt -> Jushin Wrestling Shirt
- B-Ball Kicks -> Steel-toed Boots (don't give Tobei the Boots, they will become a worse item)
- Taeko's Secret Stash -> Power Wristguard (this might take a few tries, save beforehand)
Get 3x Jushin Wrestling Shirts, 1x Steel-toed boots, 1x Power Wristguard, 5x Biker's Belt for Akira.
You can also get accessories for Taroimo (or other robots) from the Napalm Grenades dropped by the enemies on the town world map. The item creation chain looks like this:
- Napalm Grenade -> 100-volt Laser/Stun Gun/Plasma Spark -> Poison Spray -> Kotobuki Lacquer/Rock Launcher -> Bottled Angel/Showa Goldfish Launcher -> Showa Chick Launcher
At least get the Showa Chick Launcher, Showa Goldfish Launcher, Kotobuki Lacquer, Rock Launcher, and Plasma Spark. These can also be used repeatedly as an Item in battle.
With all this done, return to the Orphanage once again, and then head inside for an event scene. Read the mind of Taeko, and then defeat the group of thugs in the battle that ensues.
City Docks
The objective here is pretty simple: Chase after the thugs. Keep following them until they take the south exit. Head down to trigger a boss fight.
Boss: Crusader Road Captain & Thug
This is similar to the very first battle of the game. The thug captain is much stronger than everyone else, so just have Matsu take him out. Akira's 'Mother Shame' ability can easily wipe out the weaker thugs.
After defeating the thugs, read the mind of them. Then read Lawless's mind. Once that's done... it's back to the Orphanage, of course. Head to Kaori's room to the very left. Talk to her than read her mind.
At this point, it's time to clear up anything of the above you haven't already done and make any preparations you need to - because the next destination will involve some fighting. When you're set, head to the east side of the world's map and go inside that building.
Tsukuba Research Facility
Head into the Research Facility and select the second option, "Appointment?" to engage in combat. Then head inside the building. There's a bevvy of items to be had here, as described and listed below.
Item List
- NW2 (Upper Floor)
- Throwing Knife
- Fragmentation Grenade
- NW 1 Hallway, (Bottom room in hallway)
- Throwing Knife
- Fragmentation Grenade
- SE1 (Center Room)
- Throwing Knife
- Napalm Grenade
- Fragmentation Grenade (Back Room)
- 100 Volt Laser (Back Room)
- Throwing Knife (Back Room)
- Fragmentation Grenade (Back Room)
- 100 Volt Laser (Back Room)
- SE1 (East Room)
- Napalm Grenade
- Napalm Grenade
- Napalm Grenade
- Plasma Spark
Inside, getting close to any of the guards will trigger combat, so if you're unleveled, you can fight the enemies to level up and grind it out a little. When you're ready to progress, take the escalator up. You will end up in NW2. Go to the room on the far right side and open the lockers to find some battle items. Then head back downstairs and go to the path to the right. In the room to the bottom also lies some battle items in the locker. Then take the escalator to NE2.
Head south to room S2, then take the escalator down to S1. Go to the room to the right. You will end up in the washroom - which means it's time to examine the toilet. Lawless will return and join you.
Leave the bathroom, then go to the south exit. The two rooms over here contain treasures. Grab them and return back upstairs. Then go back to S2 and take the bottom left escalator to SW1. Clear the enemies and and go to the room to the very left. In the research lab, read the mind of the scientist to the very left to get the password. (F49F). Leave and examine the room to the center, enter the passcode, (F49F). A boss fight will ensue as you enter.
Boss Fight: LH Combat Unit W1
This boss hits extremely hard and can easily one shot any party member when hit directly. If you're struggling against this boss, there is a possibility that the boss will try to self-destruct to wipe out any nearby party members.
To easily win this fight, have someone go behind the boss and hit them with a physical attack, like Elbow Strike.
As long as there is someone still alive when the boss blows up, you will win. If you do not want to do this method then fighting it the long way will take a while as Akira's abilities don't do much damage and the boss is highly resistant to physical attacks.
After the event scene, leave the Orphanage and go back to Timeless Wonders Antiques. Read Doc's mind. Your next destination is at the bar. The bar is located just directly north of the Orphanage. Find Matsu in the bar and read his mind.
After reading his mind, return to the Orphanage. Talk to the Matron. Then head inside the orphanage. Look for Taeko to the left side of the building and talk to her. Then find Kaori in the orphan bedroom. Talk to her to trigger the next scene. During the event, read Lawless's mind to proceed with the story.
Steel Titan
After this event you will take over the Steel Titan. The Steel Titan is perhaps the strongest playable character in the game. Every attack deals ludicrious amount of damage, and you also have a ton of HP as well. Control the Titan, you will encounter a series of battles.
Each battle you will feature you battling fight a ton of enemy units at once. Use the Halogen Laser to quickly get rid of any enemies. With that handled, your next destination is the Temple located directly north of the map. Head there and destroy any enemies you encounter on the way.
Boss Fight: The Great Inko
The Great Inko has the exact same amount of HP as you. Due to the Steel Titan not having any healing abilities, you do no want to waste any low damage attacks on this boss. The good thing is, this boss is pathetically easy, because the Steel Titan is ridiculously overpowered.
The best ability to spam on the boss is the Babylon Kick. This can do multiple hits and a good hit can dish out over 600 damage. Avoid using abilities like Halogen Laser as it doesn't do much damage on the boss.
After watching the ending, save a clear data. You will need this data for the final scenario; for now you can head to your next scenario of choice to continue advancing the story.
Live A Live Walkthrough Hub / Chapter Walkthroughs: